
A round bag is a trendy and eye-catching accessory that can add a touch of style to any outfit. Whether you’re looking to expand your collection of handbags or eager to try your hand at a fun DIY project, making a round bag is a rewarding endeavor.
With a few materials and a bit of creativity, you can create a unique and fashionable bag that showcases your personal style. In this article, we will guide you through the process of how to make round bag step by step.

From selecting the right fabric and pattern to sewing the bag together and adding finishing touches, we’ll provide you with the knowledge and inspiration to create a round bag that is both functional and fashionable. Get ready to unleash your creativity and carry a one-of-a-kind accessory that will turn heads wherever you go.
Introduce the Appeal of Round Bags as Trendy and Fashionable Accessories
Round bags are the perfect fashion accessory to add a touch of sophistication and elegance to any outfit. Whether you’re looking for something playful or more traditional, these chic bags can fit your style perfectly.
With their sleek design, round bags are the perfect way to show off your personal style while still making a statement. The circular shape makes them eye-catching yet timeless, so they will always be in style regardless of what trends may come and go.
From everyday use to special occasions, round bags are the ideal bag for both casual and formal settings. And with so many beautiful colors and fabrics available, you can find one that’s just right for you. So why not join in on this stylish trend and get yourself a round bag today? With one of these bags, you’re sure to make a lasting impression.
Highlight the Versatility and Uniqueness of Round Bags
Round bags are unique and versatile accessories that can add a touch of fun and style to any outfit. Unlike other handbags, round bags have the added benefit of being suitable for any occasion, from a casual day out to a formal event.
The bag’s round shape makes it perfect for storing all kinds of items and its unique shape is sure to turn heads wherever you go. Round bags come in all sorts of colors, sizes, and materials, so you can find one that suits your style perfectly.
With these bags, you can be creative with designs and add bold details such as embroidery or tassels to make them truly unique. Whether you prefer large shoulder bags or small clutch purses, there’s sure to be a round bag that fits your needs. You’ll enjoy having an accessory that stands out from the rest and will give your look some extra personality!

Discuss Different Material Options for Making a Round Bag
Round bags can be made from a variety of materials. Some of the most popular fabrics that are used to make round bags include canvas, leather, faux leather, and vinyl. Canvas is a strong fabric that is often used for crafting projects due to its durability. Leather is also ideal because it doesn’t stretch or tear easily.
Faux leather looks similar to genuine leather but it is much more affordable and easier to work with. Vinyl is another great option since it comes in a wide variety of colors and patterns and is quite easy to clean. Additionally, nylon webbing can be used as an accent trim on many styles of round bags. It adds strength and stability while providing an eye-catching visual detail.
No matter the material you choose, understanding how to make a round bag is important. Be sure to familiarize yourself with sewing basics before getting started on your project. If you are unfamiliar with sewing, there are plenty of tutorials available online that can help get you up to speed.
You should also double check the type of fabric and thread you’re using so that everything will hold together properly. With a little bit of practice and patience, you can make a stylish and functional round bag in no time!
10 Steps How to Make Round Bag
Step 1: Gather Your Materials
To make a round bag, you’ll need a few key materials. These include fabric for the exterior and lining, interfacing or stabilizer for added structure, a zipper or closure mechanism, thread, scissors, pins, a sewing machine, a circular template or compass, and any additional embellishments you desire, such as straps or decorative elements.
Step 2: Create a Pattern
Using a circular template or compass, draw a circle on paper or cardboard with the desired diameter of your round bag. This will serve as your pattern. Add a few inches to the diameter for seam allowance and additional space inside the bag.
Step 3: Cut the Fabric and Interfacing
Using your pattern, cut two circles from the exterior fabric, two circles from the lining fabric, and two circles from the interfacing or stabilizer. Make sure to transfer any markings or notches onto the fabric for reference during assembly.

Step 4: Prepare the Exterior and Lining
Place one exterior fabric circle right side up and align it with one lining fabric circle right side down. Pin them together, ensuring the edges match. Repeat the process with the other set of fabric circles. If desired, attach any straps or decorative elements to the exterior fabric at this stage.
Step 5: Sew the Exterior and Lining
Using a sewing machine or needle and thread, sew around the edge of each fabric set, leaving a small opening for turning. Backstitch at the beginning and end of the stitching to secure it. Trim any excess fabric and clip the curved edges to help them lay flat when turned.
Step 6: Attach the Interfacing
Place one interfacing circle on the wrong side of the corresponding exterior fabric circle. Attach it by either sewing around the edge or using an adhesive suitable for fabric. Repeat the process with the other set of fabric circles.
Step 7: Turn the Fabrics Right Side Out
Carefully turn the fabric sets right side out through the small opening left for turning. Use a blunt object, such as a knitting needle or chopstick, to push out the edges and create a smooth circular shape. Press the fabric with an iron on a low heat setting to remove any wrinkles.
Step 8: Sew the Opening Closed
Using a small hand stitch or a sewing machine, close the opening left for turning. Ensure that the stitches are secure and blend in with the rest of the seam. Take care not to catch any stray fabric or interfere with the circular shape.

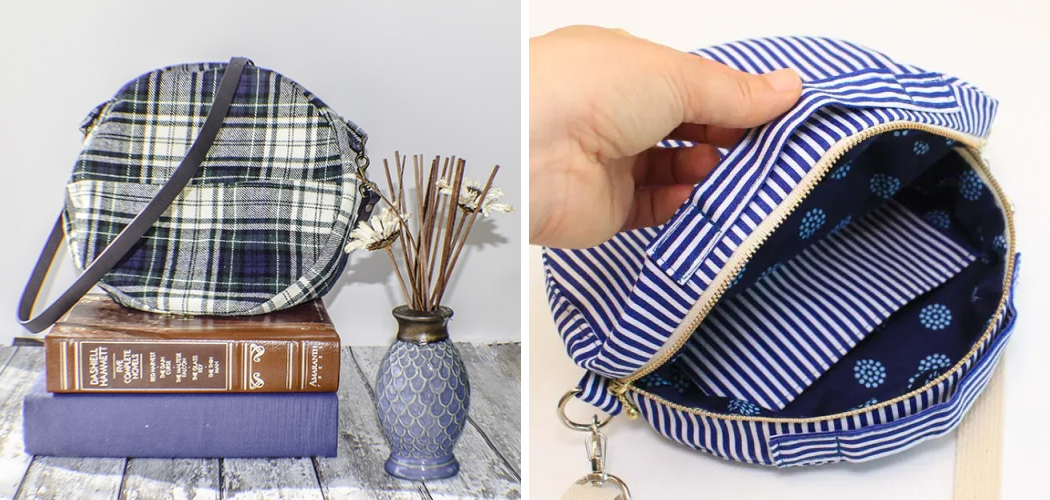
Step 9: Insert the Zipper or Closure
Decide on the placement of your zipper or closure mechanism. If using a zipper, sew it onto the lining fabric, ensuring it is centered and aligned. If using a different closure, such as snaps or buttons, attach them according to the manufacturer’s instructions.
Step 10: Attach the Exterior and Lining
With the zipper or closure in place, align the exterior and lining fabric circles with the right sides together. Pin them in place, making sure the zipper is open halfway. Sew around the entire circumference, securing the exterior and lining together. Trim any excess fabric and reinforce the stitching at the ends of the zipper for added durability.
Some Common Mistakes to Avoid When Making Round Bag
1. Not Measuring Fabric before Cutting: Before cutting any fabric, it is important to measure the width and length of the fabric accurately so that you can have enough material for your bag.
2. Not Using Stabilizers or Interfacing: Stabilizers or interfacing help provide structure and thickness to your bag. Without them, your bag may appear flimsy or collapse when filled up with items.
3. Forgetting to Sew a Hem: A hem gives your bag’s edges a nice finished look and prevents fraying from occurring over time.
4. Cutting Out the Wrong Pieces: You need to cut out two identical pieces of fabric in order to make a round bag, so make sure you don’t make any mistakes when cutting the fabric and that you end up with two pieces of the same size.
5. Not Sewing a Bottom-Up Seam: This is an important step in making your round bag, as it helps keep its shape once filled up with items. The bottom-up seam should be sewn at least twice for strength.
6. Not Following Directions Carefully: While making a round bag may seem like a pretty straightforward task, there are some steps that must be followed carefully to ensure the best results. Skipping or missing out on steps could lead to errors and a less than perfect outcome.
7. Not Using Enough Threads When Sewing: When sewing together different parts of the bag, make sure to use enough threads so that you can achieve a secure and tight stitch.

8. Not Pressing Seams: Pressing seams helps them hold their shape and gives your bag a neat look. Make sure you press all of your seams carefully using either an iron or finger pressing.
Conclusion
Crafting your very own round bag can be an incredibly rewarding and satisfying experience. Not only does it allow you to have full control over the specifics of what you want in your bag, but it also lets you express your creativity and originality in the process.
With the right materials and instructions like those we’ve provided here, making a unique, handmade round bag is within reach regardless of experience or necessary tools.
Moreover, the end result is sure to please as a one-of-a-kind accessory made by none other but yourself. So don’t hesitate – investing time into creating a custom, round bag will not only hone your crafting skills but brighten up your wardrobe too! Now that you know how to make round bags, get creative and start designing yours today!