
Embracing the free-spirited essence of the 1960s, crafting your own hippie headbands is a delightful journey into bohemian style and self-expression. These iconic accessories, adorned with vibrant colors, intricate patterns, and eclectic embellishments, capture the carefree and artistic spirit of the era.

In this article, we delve into how to make hippie headbands, guiding you through a variety of creative techniques that celebrate individuality and evoke a sense of nostalgia.
From macramé knots and tie-dye designs to beaded details and flower adornments, each method offers a unique way to infuse your headbands with the essence of the hippie movement.
Whether you’re seeking to complete a retro-inspired look or simply express your inner bohemian, join us as we embark on a journey to craft these timeless and expressive accessories that pay homage to a bygone era of peace, love, and artistic freedom.
The Bohemian and Free-Spirited Style of Hippie Headbands
Hippie headbands are the perfect way to add a touch of bohemian flair to your style. The look is easy to recreate with just a few basic materials, and you can customize it however you like! Whether you’re going for a statement piece or something subtle, this guide will show you how to make hippie headbands that will have people turning heads.
First, you’ll need to gather the supplies you need for your headband. You’ll want an elastic band of some kind (ribbon or stretchy fabric will work), as well as beads, charms, and other decorations if desired. Make sure to measure the length of the elastic before you start so that it fits comfortably around your head.
Next, you’ll weave the beads and charms onto the elastic band in whatever pattern you choose. You can use a simple back-and-forth technique or go for something more elaborate with multiple strands. Once all of your decorations are secured, tie the ends of the band together to keep everything in place.
Finally, you can jazz up your hippie headband with feathers, tassels, and other fun details. Use as much or as little as you want – the possibilities are endless. When you’re finished, give your creation a twirl and show off your cool new look!
Embracing Creativity and Self-Expression through Diy Crafting
Hippie headbands are perfect for expressing your creativity and celebrating yourself! Whether you’re looking to add a statement to your outfit or just channeling some boho vibes, making your own hippie headband is an easy way to stand out. It’s also a great DIY project that allows you to unleash your inner-artist and create something truly special.

There are lots of creative ways to make your own hippie headband. We’ll start with a few basic steps that will help you get started on the journey to making your own unique creation. However, don’t be afraid to take risks and experiment with different materials, textures, and designs. That’s part of the fun!
10 Methods How to Make Hippie Headbands
Method 1: Macramé Magic
Discover the mesmerizing world of macramé as you craft intricate hippie headbands. Choose a sturdy cord or twine and master basic macramé knots like square knots, half knots, and diagonal double half hitches.
Combine these knots to create captivating patterns, such as chevrons or diamonds, that evoke the nostalgia of the 1960s. Integrate wooden beads or colorful accents into your macramé design to add an extra touch of bohemian charm. The result is a headband that captures the essence of hippie fashion while showcasing your knotting finesse.
Method 2: Tie-Dye Bliss
Embrace the swirling, psychedelic allure of tie-dye to fashion headbands that exude a sense of free-spirited individuality. Begin by selecting a plain white or light-colored fabric headband. Prepare a variety of vibrant dye colors and apply them in unique patterns, from spirals to sunbursts, using rubber bands and squeeze bottles.
Allow the dye to set, rinse the headband, and witness the transformation as the colors meld and merge. The end result is a headband that encapsulates the vivacious energy of the 1960s counterculture movement.

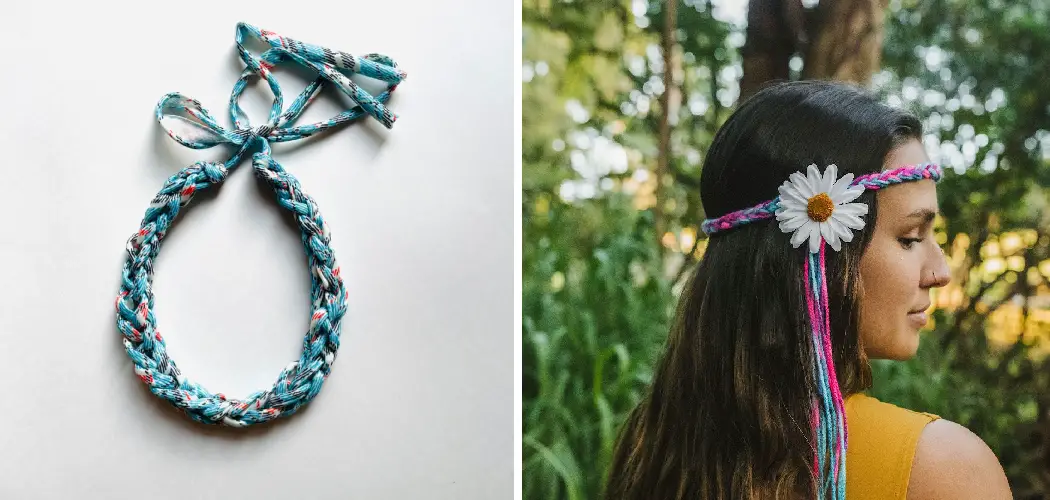
Method 3: Floral Elegance
Evoke the romantic and ethereal vibe of the 1960s with floral-adorned headbands. Start by crafting a base from a soft fabric or braided cord. Select an assortment of artificial flowers in various sizes and colors, and use craft glue to carefully attach them to the headband.
You can create a single focal point with a large flower or scatter an array of blooms for a whimsical effect. Whether you opt for daisies, roses, or wildflowers, these floral headbands capture the essence of nature’s beauty and the bohemian spirit.
Method 4: Beaded Boho
Indulge your inner bead enthusiast by crafting beaded hippie headbands that shimmer with every movement. Begin with a plain fabric or leather headband as your base. String a diverse array of beads onto thin wires and attach them to the headband using crimp beads.
Create intricate patterns, incorporate meaningful symbols, or embrace a colorful mishmash of beads for a captivating and personalized accessory. The interplay of beads and textures captures the eclectic charm of the hippie era.
Method 5: Crochet Chic
Channel your inner crochet virtuoso to create headbands that are both cozy and chic. Pick a soft yarn in vibrant colors and master basic crochet stitches like chain, single crochet, and double crochet.
Experiment with openwork patterns or scalloped edges for added flair. Incorporate wooden or vintage buttons for a rustic touch. The result is a headband that not only keeps you warm but also showcases your crochet craftsmanship in true hippie style.

Method 6: Fringed Fantasy
Capture the dynamic movement of the 1960s with headbands adorned with playful fringes. Begin with a fabric or leather base, then attach layers of fringe along the length using glue or stitching.
You can opt for uniform or varied lengths of fringe, depending on the desired effect. The swaying fringes add a sense of movement and whimsy to your headband, channeling the carefree spirit of the hippie subculture.
Method 7: Vintage Vibes
Repurpose vintage scarves, fabrics, or laces to create headbands that pay homage to the past. Cut or fold the fabric into a headband shape and secure the ends with stitching or adhesive. Embrace the aged charm of the material, complete with its unique patterns and textures. The resulting headband tells a story of eras gone by, infusing your look with a touch of nostalgia and vintage flair.
Method 8: Embroidered Enchantment
Immerse yourself in the art of embroidery to craft headbands adorned with intricate designs and motifs. Begin with a fabric headband and select embroidery floss in a palette that resonates with your bohemian vision.
Experiment with stitches like satin stitch, chain stitch, and French knots to create captivating patterns, whether inspired by nature, symbols, or abstract forms. The fusion of colors and stitches culminates in headbands that are both visually captivating and deeply personal.
Method 9: Patchwork Panache
Embrace the collage-like aesthetics of the 1960s by crafting headbands from a patchwork of fabrics. Select a variety of colorful, patterned materials and cut them into small squares or shapes.
Arrange and sew the patches onto a fabric or elastic base, creating a harmonious mosaic of textures and colors. The patchwork headbands encapsulate the spirit of individualism and self-expression that defined the hippie era.
Method 10: Ribbon Woven Whimsy
Master the art of ribbon weaving to create headbands that are as intricate as they are charming. Choose an assortment of ribbons in different colors, patterns, and widths.
Weave the ribbons together using a simple over-and-under pattern, creating a delightful interplay of colors and textures. The result is a headband that boasts a woven masterpiece reminiscent of friendship bracelets and bohemian tapestries.

Things to Consider When Making Hippie Headbands
Making a hippie headband is an easy and fun way to express yourself while keeping your hair out of your face. When making one, however, it’s important to consider both material and design so that you have the best end product possible.
The material you choose for your headband will depend on how much of a statement you want to make. If you want something subtle, look for a fabric like cotton or linen that can be dyed to whatever color you’d like. For a bolder statement, go with something more eye-catching, such as velvet, sequins, or even rhinestones!
The design you choose will also affect the final outcome of your headband. If you’re looking for something simple, just make sure to tie the ends together in a bow or knot and you’ll have yourself a classic headband. Alternatively, you can get creative with it by adding ribbons or trims, or even making intricate patterns out of different fabrics!
Conclusion
From this tutorial, you have seen that making a hippie headband isn’t difficult as there are only a few simple steps to follow. Depending on the look and style you are going for, you can adjust the steps accordingly. You can purchase or make a variety of beads along with an elastic band and ribbon to design your own custom-made headband in no time.
When completed, your hippie headbands can be worn to parties or festivals and will even make great gifts for friends and family! Now that you know how to make hippie headbands, why not get creative and show off your handiwork? Start getting creative with these unique designs today!