
Are you looking for a creative and interesting way to spruce up your home? Look no further than epoxy cups! This DIY project is easy, affordable, unique, and can add a personal touch to any surface or table in your home.
With the right supplies and some patience, you’ll be able to create stunning epoxy cups that are sure to wow anyone who sees them. In this blog post, we detail exactly how you can make epoxy cups of all shapes and sizes with simple instructions.

Whether it’s decorating your living room shelves or making an eye-catching party favor, learning how to make epoxy cups will give you endless customization options and provide hours of creative fun. So read on if you want to get started crafting beautiful resin creations today!
What is Epoxy Cup?
An epoxy cup is a type of cup that is coated with epoxy resin, resulting in a glossy and durable finish. Epoxy cups have become increasingly popular due to their versatility and the unique designs that can be created using epoxy resin. These cups are often handmade or customized, allowing individuals to express their creativity and personal style.
The process of creating an epoxy cup involves applying layers of epoxy resin onto the cup’s surface. The resin is typically mixed with various additives such as glitter, pigments, or even small objects like flowers or beads to create stunning visual effects. The resin is then poured onto the cup and spread evenly, allowing it to cure and harden, resulting in a smooth and glass-like finish.
Needed Materials
To make epoxy cups, you will need a few key materials to ensure a successful project. Here are the essential materials you will need:
Epoxy Resin:
This is the main component used to create the clear, glossy finish of the cups. Epoxy resin is typically a two-part system that requires mixing a resin and a hardener in specific ratios.

Mixing Cups:
You will need separate cups for measuring and mixing the resin and hardener. Use disposable cups or reusable silicone cups for easy cleanup.
Stirring Sticks:
These are used to mix the resin and hardener thoroughly. Wooden craft sticks or plastic stirrers work well for this purpose.
Silicone Molds:
Silicone molds are ideal for creating epoxy cups as they are flexible and allow for easy removal of the cured resin. Choose molds in various shapes and sizes depending on your preferences.
Heat Gun or Torch:
To remove any air bubbles that may form during the pouring process, a heat gun or torch can be used to gently pass over the surface of the resin. This helps the bubbles rise and dissipate.
Color Pigments:
If you want to add color to your epoxy cups, you will need color pigments specifically formulated for use with epoxy resin. These come in various shades and can be mixed to create custom colors.
Decorations and Additives:
To add unique touches to your cups, consider using decorations such as dried flowers, glitter, or stickers. You can also experiment with different additives like glow powders, mica powders, or alcohol inks to create interesting effects.

Sandpaper or Rotary Tool:
After the resin has cured, you may need sandpaper or a rotary tool to smooth out any rough edges or imperfections on the cups.
Protective Gear:
When working with epoxy resin, it’s important to protect yourself. Wear gloves, safety goggles, and work in a well-ventilated area to ensure your safety.
Soap and Water:
Once the cups are finished, you will need soap and water for cleaning and removing any residue from the resin-making process.
10 Step-by-step Guidelines on How to Make Epoxy Cups
Creating epoxy cups is a fun and creative craft project that allows you to make unique and personalized drinkware. With epoxy resin, you can achieve a glossy, durable finish that will protect your designs. In this step-by-step guide, I will walk you through the process of making epoxy cups, from preparation to finishing touches.
Step 1: Gather Your Materials
Before you begin, make sure you have all the necessary materials on hand. Collect all the materials mentioned above before getting started. It is

Step 2: Prepare Your Workspace
Cover your work surface with a plastic sheet or a drop cloth to protect it from any spills or drips. Ensure that you are working in a well-ventilated area or use a respirator mask to avoid inhaling resin fumes.
Step 3: Clean and Prime the Cups
Clean the cups thoroughly to remove any dirt or debris. If you want to paint the cups before applying the epoxy resin, apply a coat of white primer or acrylic paint. This step helps the colors of the epoxy resin pop and provides a smooth base for your design.
Step 4: Mix the Epoxy Resin
Follow the instructions provided by the manufacturer to mix the epoxy resin and hardener in the correct ratio. Use separate mixing cups for resin and hardener. Pour the required amounts into each cup, then transfer the hardener into the resin cup. Use a stirring stick to mix them together thoroughly. Be careful not to introduce any air bubbles while stirring.
Step 5: Add Color and Decorations
If you want to add color to your epoxy cups, now is the time to do so. Add a few drops of color pigment to the resin mixture and stir well to distribute the color evenly. You can experiment with different colors or create marbled effects by mixing multiple pigments.
If you wish to include decorations or additives, such as glitter, dried flowers, or stickers, carefully place them into the silicone molds before pouring the epoxy resin. Arrange them as desired, ensuring they are fully submerged in the resin.
Step 6: Pour the Epoxy Resin
Slowly pour the mixed epoxy resin into the cups, ensuring that it covers the entire interior surface. Use a stirring stick or a brush to spread the resin evenly if needed. Take your time and pour slowly to minimize air bubbles.

Step 7: Remove Air Bubbles
After pouring the epoxy resin, you may notice small air bubbles trapped in the mixture. To remove these bubbles, use a heat gun or torch. Gently pass the flame over the surface of the resin, moving in a sweeping motion. The heat will cause the bubbles to rise and dissipate. Be cautious not to overheat the resin or hold the flame too close to the surface to prevent scorching or damage.
Step 8: Optional: Use a Cup Spinner or Turner
If you have a cup spinner or turner, it can be helpful to place the cups on it and let them rotate slowly for approximately 12-24 hours. This will ensure an even coating of the epoxy resin and prevent pooling or uneven areas. However, if you don’t have a spinner or turner, you can skip this step. Just make sure to periodically rotate the cups manually to prevent any drips or unevenness.
Step 9: Let it Cure
Once you are satisfied with the epoxy resin application, place the cups in a dust-free and well-ventilated area to cure. Follow the manufacturer’s instructions for the specific curing time, as it can vary depending on the brand of epoxy resin you are using. Typically, the curing time ranges from 24 to 48 hours.
During the curing process, it’s important to keep the cups undisturbed to avoid any dust or debris settling on the surface. Covering them with a dust-free container or placing them in a designated curing box can help protect them.
Step 10: Sand and Polish
After the epoxy resin has fully cured, you may notice some imperfections, rough edges, or high spots on the cup’s surface. To achieve a smooth and polished finish, you can use sandpaper or a rotary tool.

Start with a lower grit sandpaper (around 120-220) and gently sand the surface, focusing on any uneven areas. Gradually move to higher grit sandpapers (400-600) to refine the surface until it feels smooth to the touch. Be sure to sand evenly and avoid applying excessive pressure.
Once you are satisfied with the smoothness, you can further polish the cups using a polishing compound or a buffing wheel attached to a rotary tool. This step will enhance the glossiness o
Do You Need to Use Professionals?
When it comes to making epoxy cups, many people wonder if they need to enlist the help of professionals or if it’s a task they can undertake on their own. The good news is that making epoxy cups is a DIY project that can be done by beginners with some basic tools and materials.
While professionals certainly have experience and expertise in working with epoxy, it is not necessary to hire them for this particular project.
The process of making epoxy cups involves a few key steps, such as preparing the workspace, mixing the epoxy resin, applying the resin to the cup, and adding decorative elements like glitter or decals. These steps can be easily followed by anyone who takes the time to learn and understand the process.
One important consideration is to ensure you are using food-safe epoxy resin if you plan to drink out of the cup. This type of resin has been specifically formulated to be safe for contact with food and beverages. It is essential to choose a high-quality, food-grade epoxy resin to ensure the safety of your epoxy cups.
While professionals may have access to specialized tools and equipment that can aid in the process, such as cup turners for even coating and drying, there are alternative methods for achieving desirable results without these tools. For example, some tutorials suggest using hanging methods or manual rotation to coat the cups evenly without a cup turner.
Frequently Asked Questions
When it comes to making epoxy cups, beginners often have a lot of questions. To help you get started on your epoxy cup-making journey, I’ve compiled some frequently asked questions and their answers on how to make epoxy cups. Let’s dive in!
Q1: What Kind of Epoxy Should I Use for Making Epoxy Cups?
A1: There are various types of epoxy available in the market, but it’s crucial to choose one specifically designed for creating epoxy cups. Look for food-safe epoxy that is resistant to yellowing and has excellent clarity. Some popular brands in the market include ArtResin, ProMarine Supplies, and Alumilite Amazing Clear Cast.

Q2: How Do I Prepare the Tumbler Before Applying Epoxy?
A2: To ensure a smooth epoxy application, you need to prep the tumbler properly. Start by cleaning the tumbler thoroughly with soap and water. Remove any dust or residue, and dry it completely. Some crafters also recommend wiping the surface with rubbing alcohol to eliminate any oils or greases that might affect the adhesion of the epoxy.
Q3: How Long Does It Take for Epoxy to Cure?
A3: The curing time of epoxy can vary depending on factors like temperature, humidity, and the specific brand you’re using. Generally, epoxy takes around 24-48 hours to cure fully. However, it’s essential to check the manufacturer’s instructions for accurate curing times and allow the epoxy cups to cure in a dust-free environment.
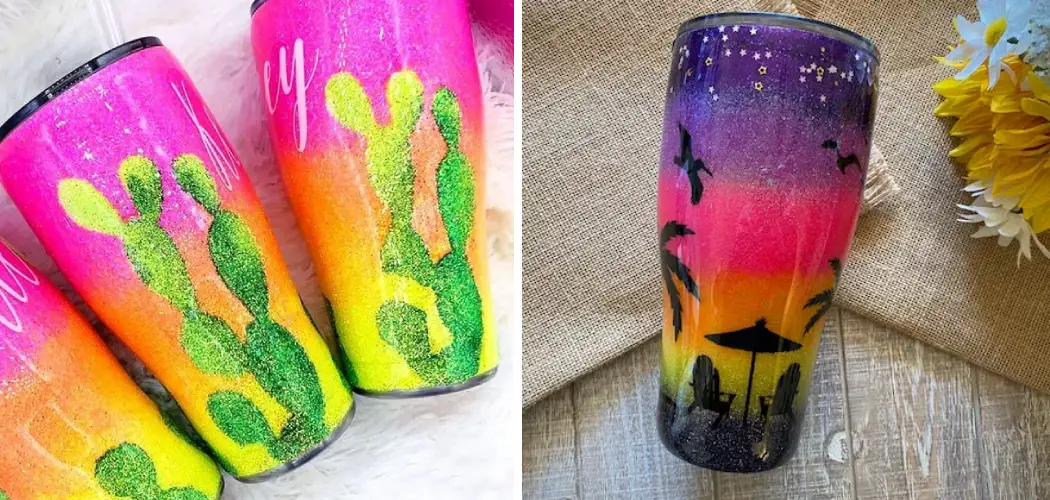
Q4: What Are Some Creative Ideas for Decorating Epoxy Cups?
A4: The possibilities for decorating epoxy cups are endless! You can experiment with different color combinations, create intricate designs with alcohol inks, incorporate decals or vinyl stickers, or even try resin art techniques like geode designs or fluid acrylic pouring. Let your creativity soar and customize your epoxy cups to suit your style.
Conclusion
Making epoxy cups is both a creative and challenging project to tackle. While it takes time and dedication, it’s incredibly rewarding to create something unique out of everyday materials. Once you’ve made your first cup, why stop there? Experiment with different materials and designs to come up with innovative ways to express yourself or make the perfect gift for a friend or loved one.
And don’t forget about those extra ingredients that could add sparkles, color, flakiness, texture or scent to your epoxy cup masterpiece. If you’re looking for more DIY projects to try out, look no further than our website for other tutorials and ideas.
Making is half the fun; the other half comes from seeing your finished products! So go get crafting and show us what you can create! Thanks for reading this article on how to make epoxy cups.