
Are you constantly overwhelmed by the clutter in your home or office? Are drawers, shelves, and closets scattered with random items that need to be organized? If so, have you considered making box dividers for those big open spaces like drawers or cabinets where small items can get lost? Having dividers will help keep your belongings sorted, and it takes little effort to make them.
Suppose you’re looking for a way how to make box dividers! This guide will provide you with easy steps that are sure to help.

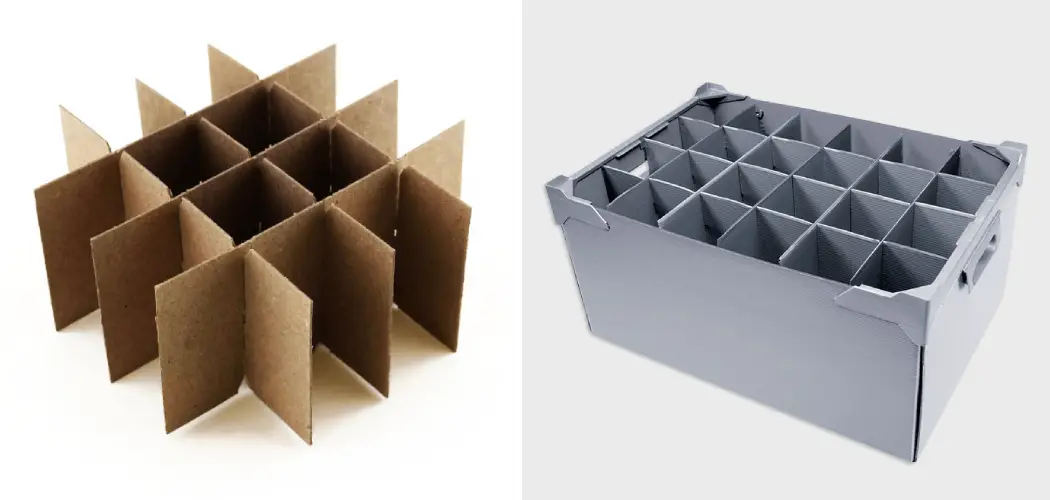
In this blog post, we’ll create custom box dividers from recycled material around the home. From measurements and cutting to assembling your divider boxes, this guide will provide all the information you need to make them yourself successfully.
What Will You Need?
Before getting started, you will need to gather some supplies.
- Cardboard or recycled material of your choice
- Measuring tape
- Pencil
- Ruler or straight edge
- Utility knife or scissors
- Glue gun or double-sided tape (optional)
These items should be enough to make your box dividers. Now let’s get started!
10 Easy Steps on How to Make Box Dividers
Step 1. Mapping Out the Space and Taking Measurements:
The first step is to map out the space you want to divide up. If it is a drawer, measure the interior dimensions of the drawer from each side and top to bottom. This will give you an idea of how much space you have for dividing up.
After taking measurements, mark those onto your cardboard with a pencil to cut along those lines later easily. When marking the measurements, leave about an inch for the length and width of each divider.

Step 2. Cutting Out your Design:
Once you have mapped out the area, use a ruler or straight edge to follow the lines you marked on your cardboard, with a utility knife or scissors, carefully cut along the measured edges to make separate pieces for making dividers. Try to use cardboard boxes that come with lids, as these will be perfect in size and shape for creating your dividers without needing extra cutting or measuring.
Step 3. Assembling Your Box Dividers:
Now it is time to assemble your box dividers! Take one of the pieces you cut out and fold it into thirds to create three separate compartments in the box. Then glue or double-sided tape to ensure each compartment is sealed shut. Repeat Steps 1-3 with all the pieces you have cut out until you make enough dividing boxes for the space you are organizing.
Step 4. Place Your Box Dividers into the Space:
Once your dividers are ready, it’s time to place them inside the drawer, shelf, or cabinet that needs organizing. Make sure to evenly distribute them so that they fit perfectly and no space is wasted. If needed, adjust the dividers to fit better as you insert them.
Step 5. Label Your Box Dividers:
Labeling your box dividers will make finding what you need easier and keeping everything organized. You can use a simple label maker or handwrite the labels with a permanent marker – whatever works best for you. Be careful not to forget this step as it is the key to a successful organization!

Step 6. Keep Your Box Dividers Secure:
If you want to keep your box dividers in place, you can use double sided tape or glue along the edges of each divider so that they are securely locked into the space where they are placed. As an extra measure, add a bit of tape or glue along the bottom edge to ensure maximum security. It’s up to you how secure you want your dividers to be.
Step 7. Adding Extra Support:
For extra support and stability, you can add some wooden sticks on the inside of your dividers. This will help them stay upright and make sure they don’t tip over when you open or close the drawer. Don’t forget to measure the sticks according to the size of your box dividers.
Step 8. Fill Up Your Compartments:
Now that your box dividers are finished, it’s time to fill them up with all your belongings! Place items into each compartment as neatly as possible to ensure everything is easy to find. You can also use extra tape or glue to keep items securely in place.
Step 9. Clean Up:
Once you’re done, it’s time to clean up your workspace and put away any extra materials or tools used in making the box dividers. There’s nothing worse than a messy workspace! Use this as an opportunity to tidy up and keep your workspace organized.

Step 10. Enjoy Your Newly Organized Space:
The last step is just to enjoy your newly organized space! Now that everything has its own home, you can easily access whatever items you need in seconds without rummaging through drawers or shelves for hours. Remember to thank yourself for taking the time and effort to make such a useful home organization tool.
By following the ten easy steps above, you’ll complete your box dividers in no time! These help keep your space organized and can be a great DIY project to try out if you’re looking for something fun and creative.
5 Additional Tips and Tricks
- Measure the box divider and its components before cutting. If you don’t take accurate measurements, your divider won’t fit properly.
- Consider using a jigsaw or table saw for precision cuts while making the divider pieces.
- Use wood glue, screws, and nails to secure the pieces together so the divider is durable and lasts longer.
- Sand down rough edges with sandpaper after assembly for a smoother finish.
- Apply a finishing coat of paint, stain, or varnish to protect against wear and tear and create a more polished look for box dividers made of wood or other metal or plastic that can be painted or stained.
With these tips and tricks, you can create the perfect box divider for whatever purpose you need!
5 Things You Should Avoid
- Avoid using staples or screws that are too long, as this can cause structural damage to your box divider.
- Don’t use glue alone to secure pieces, as it may need to provide more support and stability for a more permanent solution.
- Remember to wear proper safety equipment, such as goggles and gloves, when using power tools like a jigsaw or table saw.
- Make the cuts only a little deep on materials like wood, metal, or plastic, as these can also affect the overall structure of your divider.
- Avoid using cheap materials that won’t last and may cost you more in the long run if they need replacing sooner than expected due to poor quality construction.

Following these simple tips and tricks, you can make an effective and stylish box divider quickly! With careful planning and the right tools, you’ll have the perfect box divider.
How Do You Make a Custom Drawer Divider?
- Measure the exact dimensions of your drawer and cut pieces of wood or other materials according to these measurements.
- Use a jigsaw, saw, or power drill to create slots in the wood/material so that it can be assembled into a frame.
- Securely attach each frame part using wood glue, screws, and nails.
- Cut out pieces that fit inside the frame and use glue, screws/nails for added stability if needed.
- Sand down any rough edges or imperfections with fine-grit sandpaper for a smoother finish.
- Apply a finishing coat of paint, stain, or varnish to protect against wear and tear and create a more polished look.
- Insert the drawers into the frame, and your custom drawer divider is ready for use!
With these steps, you’re sure to have a beautiful, functional custom drawer divider that will last for years to come! Making a custom drawer divider can be a fun project that lets you get creative while being practical and efficient. Just follow these steps, and you’ll be well on your way to having the perfect addition to any room in your home!
What Material is Best for Dividers?
The best materials for dividers are wood, metal, and plastic. Each material has advantages and disadvantages that should be considered when deciding which one to use.

Wood is a popular choice because of its durability and aesthetic appeal. It is lightweight yet strong, making it ideal for creating sturdy box dividers or drawer organizers. However, wood is less resistant to moisture and humidity than other materials, so it may not be suitable for areas exposed to high moisture levels.
Metal is another great option due to its strength and resistance to corrosion. It can also be easily cut into various shapes with the right tools to create unique designs. The downside is that metal can be quite heavy if used in large quantities, and it can also be expensive.
Plastic is a great alternative to wood and metal as it is lightweight and easy to work with. It also has the advantage of being inexpensive and available in various colors, textures, and shapes. However, plastic may not be as durable as other materials and is prone to cracking or breaking.
Whatever material you choose, just ensure it fits your needs and budget. With the right tools and materials, you can create a sturdy, stylish divider that will last years!
Conclusion
What has been covered in this post is the knowledge of how to make box dividers, a neat and useful addition to any household. With the use of commonly found materials and tools, it’s possible to have custom-made dividers that can be adjusted and modified based on whatever needs one may have.
Not only does this project cost a fraction of regular store bought dividers, but it also provides an opportunity to personalize the color choices.
Indeed, if you’re looking for a great way to keep your living space organized yet affordable, look no further! Our post here has provided all the information needed to ensure you and your home benefit from some nice DIY-made dividers.
Put that creative spark inside you into action, and see how far it can take you – who knows? You may enjoy it so much that it could be the start of many more projects like this!