
Do you love the rustic charm of willow wreaths? The beauty and fragility of a handmade willow wreath can bring life and natural texture to any wall or door, instantly transforming your home. If you’ve ever wanted to make your own willow wreath but were hesitant because it seemed like such a challenging task, don’t worry – we are here to help! In this blog post, we’ll simplify the process by providing an easy step-by-step guide on how to make a willow wreath with minimal effort.

So grab your supplies and get ready for some crafting — let’s start building that perfect one-of-a-kind statement piece!
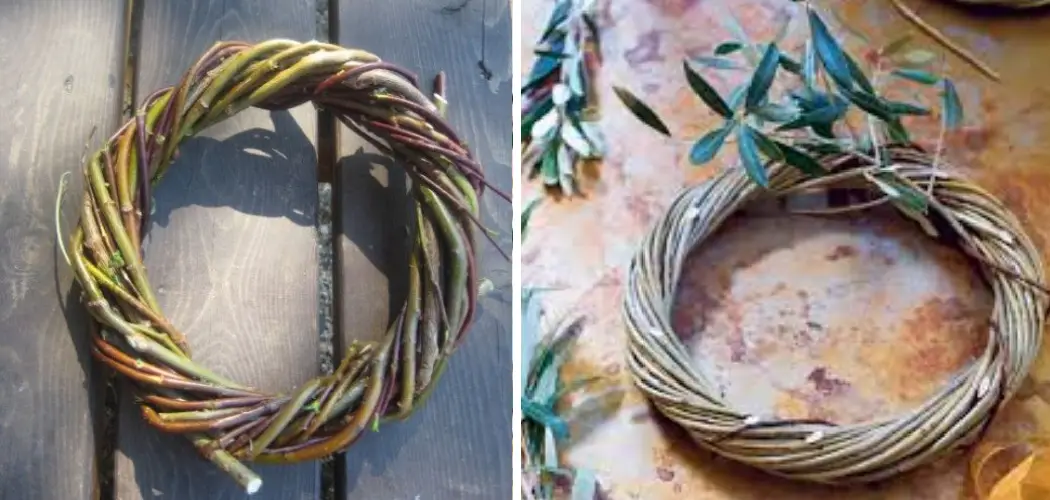
Can You Make Wreaths Out of Willow?
Yes, you can make wreaths out of willow! Willow is a natural material that makes wonderful and unique wreath designs. You can weave the willow branches into intricate shapes or braid them together for different looks. With a bit of creativity, you can create beautiful and lasting creations out of willow for decorating your home or giving them as a special gift. You can also dye the willow to add an extra touch of color and vibrancy to your wreath design.
With an endless array of possibilities, making wreaths out of willow is a fun and creative craft project that you can enjoy for years.
You Can Check It Out To Knit a Bow
10 Methods How to Make a Willow Wreath
1. Gather Your Supplies
You will need a few supplies before you get started on your willow wreath. First, you will need a pair of sharp shears or pruning scissors. You will also need a length of green floral wire and a spool of green florist’s tape. Finally, you will need a bundle of fresh willow branches. If you are unable to find fresh willow branches, you can substitute them with dried willow twigs. Make sure the twigs are still flexible and pliable.

2. Choose Your Willow Branches
When choosing your willow branches, look for ones that are long and flexible. Avoid branches that are too thick or too brittle, as they will be difficult to work with. If possible, try to find branches that are still attached to the main tree, as these will be the freshest and easiest to work with. Although you can purchase willow branches from a craft store or online, it is best to find them in the wild for the freshest and most malleable branches.
3. Cut the Branches to Length
Using your sharp shears or pruning scissors, cut the willow branches to the desired length. You will want the branches to be long enough to wrap around your head comfortably, with some extra length to spare. If you are making a larger crown, you may need to use longer branches. Make sure each branch is carefully cut at a 45-degree angle, as this will make it easier to attach them together. Make sure that all the branches are of equal length so that your crown will have a uniform shape.
4. Strip the Leaves from the Branches
Next, you will need to strip the leaves from the branches. To do this, simply hold the branch in one hand and run your other hand down the length of the branch, stripping off the leaves as you go. Be sure to check the length of each branch for any hidden leaves that could be further down. You can also use a pair of pruning shears if you wish, but it isn’t necessary.

Once the leaves have been removed, dispose of them in a compost bin or add them to your garden mulch. Make sure that the leaves are completely dry before adding them to the compost bin.
5. Start Wrapping the Wire Around the Branch
Once all of the leaves have been stripped from the branch, it’s time to start wrapping it with wire. Begin by wrapping the wire around one end of the branch, and then continue wrapping it along the length of the branch until you reach the other end. Make sure that you wrap tightly so that the wire doesn’t slip off. You may need to wrap the wire multiple times in some areas to ensure that it is secure.
When you reach the other end of the branch, twist the end of the wire around itself to keep it from coming undone. However, make sure not to twist it too tightly, or else you may damage the branch.
6. Secure the Wire with Tape
Once you reach the end of the branch, secure the wire in place by wrapping it tightly with tape. Make sure that there are no gaps or spaces between wraps, as this could cause the wire to come loose later on. You may also want to use electrical tape specifically designed for the purpose, as this will provide the best level of protection against moisture and wear.

After securing the wire, you can move on to the next step. Make sure to check the connection regularly to ensure that it remains secure.
7. Repeat Steps 5-7 for the Remaining Branches
Repeat steps 5-7 for each of the remaining branches until you have a nice bundle of wired branches. Make sure to check each branch to make sure it is secured in the right place. When all of your branches are wired, you can move on to the next step. Although it may look intimidating, wiring your Christmas tree is a fun and easy way to get it ready for the holiday season.
With just a few simple steps, you’re ready to decorate your tree and enjoy the holiday season with family and friends. Try to enjoy the process, as it can help get you in the holiday spirit! Now that your tree is wired and all setup, it’s time to take a step back and admire your handiwork.
8. Shape Your Wreath into Desired Form
Now it’s time to shape your wreath into its desired form. You can make it as simple or as elaborate as you like – it’s up to you! Once you have shaped it into its final form, use additional pieces of wire to secure it in place if necessary. If you are using a wreath form, you can use small pieces of wire or pipe cleaners to attach the materials. However, it’s best not to use too much wire – you don’t want your wreath to look like a bird’s nest!
9. Decorate Your Wreath as Desired
Finally, it’s time to decorate your wreath! You can add ribbons, bows, flowers, or any other type of decoration that you like. Get creative and have fun with it. Try to use items that fit the theme of your wreath, like pinecones and berries, if you’re making a winter wreath. Once you’re done decorating, you have a beautiful handmade wreath that is ready to be hung up and enjoyed. Congrats on your accomplishment!
10. Hang Your Wreath
The last step is to hang your wreath. You can hang it on the front door, over the fireplace, or any other place in your house where you would like to display it. You can also use a wreath hanger or special command hooks to hang your wreath without damaging the door or wall. Enjoy your beautiful creation, and have fun making more!

Things to Consider When Making a Willow Wrench
1. The Size of the Willow Wrench:
Depending on the size of your project, you’ll need a different-sized wrench. You also have to consider the space you have available, as larger wrenches can be more difficult to maneuver in tight spaces. Choose a size that is suitable for your project and the space you’re working with.
2. Quality of Materials:
The quality of materials is important when choosing a willow wrench. You want something that will last and won’t break easily or quickly rust due to moisture exposure. Make sure to check what materials are used in the construction of the wrench before making your purchase.
3. Cost:
Willow wrenches can vary in price from very affordable to quite costly depending on how intricate they are or where you buy them from, so make sure to research different brands and compare prices.
4. Ergonomics:
When it comes to using a willow wrench, ergonomics are important because you want something that is comfortable to use and won’t cause discomfort or fatigue while in use. Look for wrenches with an ergonomic design that fits comfortably in your hand.
5. Ease of Use:
Finally, consider how easy the willow wrench is to use and if it has any special features that make it easier or more efficient for your project. You also want something that isn’t too difficult to figure out when you first start using it, so look for one that has clear instructions and labels on all parts. This will help ensure smooth operation.
Following these tips will help you make an informed decision when shopping for a willow wrench. With the right tool, you’ll be well on your way to completing any project with ease and efficiency.
Do You Need to Soak Willow before Weaving?
The answer to this question is it depends. Soaking willow before weaving can help in the process and make it easier, but it’s not always necessary. If you are using fresh green willow, then soaking is recommended as it makes it more pliable and easier to weave. On the other hand, if you’re working with dry or cured willow, then soaking is not necessary.
When soaking willow, be sure to use warm water and avoid hot water, as this could cause damage to the material. Leave the pieces of willow submerged for at least an hour (or longer if needed) until they become soft and pliable enough for weaving. Be sure to drain off any excess water before beginning your project.
Conclusion
Now that you know how to make a willow wreath, there’s no excuse not to try it! This activity is perfect for a summer day and can be enjoyed by people of all ages. Just gather your supplies, find a comfortable spot outside, and enjoy the process of creating something beautiful. We hope you have as much fun making your willow wreath as we did ours!
You Can Check It Out To Knit a Leaf