
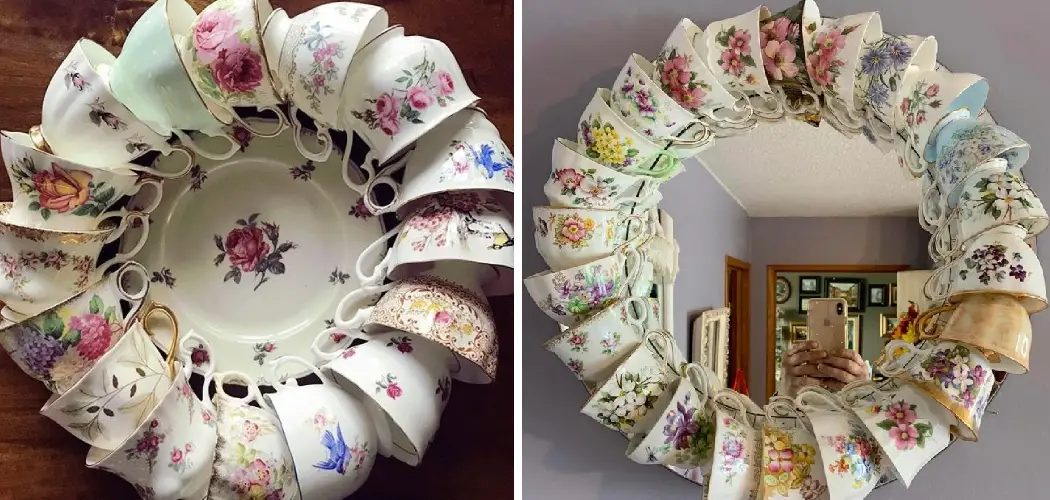
Immerse yourself in the art of crafting by learning to create a stunning teacup wreath that exudes elegance and charm. A teacup wreath is a unique and beautiful way to repurpose vintage teacups, transforming them into a captivating piece of decor.
This crafting venture combines creativity and a love for vintage aesthetics, resulting in a wreath that can grace your walls or doors.
In this comprehensive guide, we’ll take you through the step-by-step process of how to make a teacup wreath, from choosing the perfect teacups to arranging them in a visually pleasing manner. Embrace your creative spirit and let’s embark on this delightful journey to craft a teacup wreath that will enchant all who behold its grace.

Selecting Teacups and Saucers for the Wreath
When creating a teacup wreath, it is important to select teacups and saucers that will work well together. While mismatched pieces can add a whimsical touch, you want to make sure they still complement each other in color and style.
To begin, take inventory of the teacups and saucers you have available. Consider their size, shape, and design. You may want to choose a color scheme or theme for your wreath and pick pieces that fit within that aesthetic.
If you do not have enough teacups and saucers on hand, consider visiting thrift stores or flea markets to find unique pieces at affordable prices. You can also ask family and friends if they have any unused teacups and saucers that they would be willing to contribute.
Once you have gathered your teacups and saucers, lay them out in a pattern on a flat surface to get an idea of how they will look together. This will also help you determine if you need any additional pieces or if any do not fit well with the rest.
When selecting teacups and saucers, keep in mind that they will need to be securely attached to the wreath form. Look for pieces with sturdy handles and saucers that are flat with a lip around the edge. This will make it easier to attach them using wire or hot glue.
Considering Colors, Patterns, and Sizes
When making a teacup wreath, one of the most important things to consider is the color scheme. You want to choose colors that will complement each other and create a visually pleasing arrangement. This can be achieved by using similar shades or contrasting colors.

In addition, choosing patterns can add interest and texture to your wreath. Mixing different patterns, such as floral and polka dots, can create a whimsical and unique look. Alternatively, you could stick to one pattern for a more cohesive design.
Another factor to consider is the size of your teacups. Using a variety of sizes can add dimension and depth to your wreath. You may also want to mix in other elements, such as saucers or teapots, to create a more dynamic and interesting composition.
Ultimately, the key is to experiment with different colors, patterns, and sizes until you find a combination that you love. Don’t be afraid to play around with different combinations and layouts before settling on a final design.
After all, making a teacup wreath should be a fun and creative process! So take your time and enjoy the journey of creating a beautiful and unique teacup wreath. The possibilities are endless, and your end result will surely be one-of-a-kind.
10 Methods How to Make a Teacup Wreath
1. Gather the Materials
To make a teacup wreath, you will need a few supplies. These include a foam wreath form, silk flowers, ribbon, and hot glue. You will also need scissors to cut the stems of the flowers and ribbon and wire cutters to trim the wires of the foam wreath form. Make sure to gather all these materials before beginning your project.
2. Cut the Flowers
The next step is to cut the stems of your flowers so they are short enough to fit onto your wreath form. To do this, use scissors or wire cutters to snip off any excess stem length. Make sure that each flower is cut at an angle so it can easily be tucked into the foam form without sticking out too far.
3. Arrange the Flowers
Once you have trimmed all your flowers, it’s time to arrange them on your foam wreath form. Start by placing one flower at a time onto the foam and tucking it in securely with your fingers or tweezers. Continue adding more flowers until you have filled up most of the form with blooms in an aesthetically pleasing way.

4. Attach Ribbon
Now it’s time to add some ribbon for decoration! Start by cutting several strips of ribbon in various lengths and widths, and then attach them to your wreath using hot glue or floral tape. You can wrap them around branches of flowers or tie them in bows for added interest.
5. Add Accents
Now that you have arranged all your flowers and attached ribbons, it’s time to add some accents! This could be anything from feathers, beads, buttons, sequins, charms, or even small toys like plastic animals or figurines – whatever strikes your fancy! Secure these items onto your wreath using hot glue or floral tape as well for extra stability if needed.
6. Hang Your Wreath
Now that all of your decorations are complete, it’s time to hang up your teacup wreath! You can use a simple hook on a wall or door frame if you want it displayed indoors; alternatively, you can use a fishing line if you want it hung outside from a tree branch or fence post instead!
7 . Embellish With Ribbon Bows
For an extra special touch, you can embellish your teacup wreath with some pretty ribbon bows! Start by making several loops from thin pieces of ribbon in various sizes and colors; then secure each loop onto the wreath using hot glue or floral tape for added stability if needed!
8 . Add Glittery Accents
If you want to give your teacup wreath some extra sparkle and shine, try adding some glittery accents! This could be anything from glittery paint pens used on leaves and petals; sequins glued onto branches, glittery fabric glued onto ribbons, or even tiny gems glued into place for an extra special touch!
9. Decorate With Feathers
Another great way to dress up your teacup wreath is by adding feathers! Choose feathers in various colors and sizes – these could be real feathers found outdoors (or bought online) or craft store feathers made from paper – then attach them onto branches with hot glue or floral tape for an elegant look!

10. Create A Hanging Loop
Finally, once all of your decorations are complete, don’t forget about creating a hanging loop at the top back part of your teacup wreath so that you can hang it up easily when finished!
To do this, simply take a piece of thick string such as jute twine and tie it securely around two branches near the top back part of the wreath – now you’re ready to hang up your beautiful creation wherever you please!
Things to Consider When Making a Teacup Wreath
When it comes to making a teacup wreath, there are several things to consider in order to ensure that the final product is both beautiful and durable. Below are some tips and tricks to help you create the perfect teacup wreath.
- Choosing the Right Teacups: The first step in making a teacup wreath is selecting the right teacups. It’s important to choose cups that are sturdy and can withstand being glued and hung without breaking. Additionally, consider the size and shape of the teacup as it will determine how it fits into the wreath design.
- Picking a Wreath Base: The base of your wreath is just as important as the teacups themselves. There are many options to choose from such as a foam wreath form, a wire frame or even a grapevine wreath. Each has its own advantages and disadvantages, so be sure to consider your desired look and level of difficulty before deciding on a base.
- Using the Right Glue: When it comes to securing teacups onto a wreath, the type of glue used is crucial. A strong adhesive, such as E6000 or hot glue, is recommended to ensure the teacups stay in place.
- Considering a Color Scheme: Teacup wreaths can be made with a variety of colors and patterns, but it’s important to consider a color scheme before getting started.

Conclusion
A beautiful teacup wreath can be the star of the show at any special event. All you need are some old teacups, ribbon and wire to create a unique work of art. With a bit of creativity, it’s possible to create an eye-catching focal point that will attract admiration from all your guests. To make something truly spectacular, consider adding intricate details such as bows, lace or dried flowers.
The possibilities are endless! Now that you know how to make a teacup wreath it’s time for you to get creative and come up with your own designs. So grab your supplies and let’s get crafting – there is no limit to what you can create!