
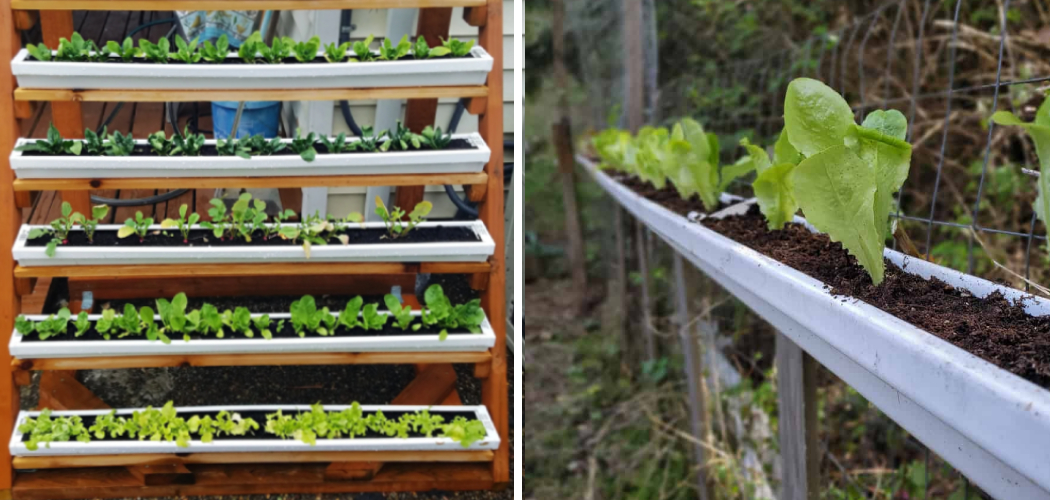
Are you looking for a way to spruce up your outdoor space and add some color, but don’t want to break the bank? Look no further! Upcycling rain gutters into planters is an easy and inexpensive project that will not only brighten your yard or patio, but it’s also great for the environment. In this post, we’ll show you how to turn recycled rain gutter sections into beautiful containers for flowers and plants.

With just a few simple supplies like bolts, screws, brackets, and soil you can transform any old gutter into something special in no time! So let’s get started – read on for our easy step-by-step guide on how to make a rain gutter planter.
Supplies You Will Need to Make a Rain Gutter Planter
- Rain gutters
- Bolts, screws, or brackets (depending on the material of your rain gutter)
- Soil for filling
- Paint or sealant (optional)
- Plants/seeds
- A drill and screwdriver (for assembly)
Step-by-Step Guidelines on How to Make a Rain Gutter Planter
Step 1: Choosing the Perfect Gutter for Your Planter
Before you begin, it’s important to choose a gutter that is strong enough and of a size suitable for your planter. You’ll want to make sure the gutters are made from a material that won’t rust or corrode easily. If necessary, use a drill and screws to reinforce the gutter section. Choosing a gutter with an end cap will also help keep the soil inside.

Step 2: Preparing Your Gutter
Once you’ve chosen a rain gutter, it’s time to prepare it for use as a planter! Clean the gutter thoroughly with soapy water, then let it dry completely. If desired, you can also paint or seal the gutters for added protection. While preparing, pay attention to any holes, cracks, or punctures in the gutter that may need to be repaired.
Step 3: Assembling the Gutter
Now it’s time to assemble your rain gutter planter. Using bolts, screws, and brackets, attach the gutters together in whatever configuration you would like (e.g., a curved shape). Make sure the gutters are securely attached so they won’t come apart. If necessary, use a drill and screws to reinforce the gutter section.
Step 4: Filling Your Planter
Once your planter is assembled, it’s time to fill it with soil. A mixture of potting soil and compost works best for container plants, as this provides the most nourishment for growing plants. Fill the gutter planter until it is about two-thirds full and then add your plants or seeds. This is also a great time to add any fertilizer or plant food.
Step 5: Installing the Planter
Now that you’ve assembled and filled the planter, it’s time to install it in your garden or outdoor space. Make sure the planter is firmly fastened to a wall or fence using brackets or screws. You can also use hanging hooks for an alternative installation. And that’s it! Your rain gutter planter is now ready to adorn your garden with colorful blooms.

Making a rain gutter planter is a great way to brighten up any outdoor space without spending too much money. All you need are a few simple supplies and some patience, and soon enough you’ll be able to admire your handiwork. Give it a try today!
Additional Tips and Tricks to Make a Rain Gutter Planter
1. Mount the rain gutter planter to the wall with screws, making sure it is level and securely attached.
2. To ensure proper drainage, drill a small hole near the bottom of each section of the gutter. Make sure these holes are large enough for excess water to escape without allowing soil or other materials to leak out.
3. For an aesthetically pleasing finish, add decorative trim around the edges of the rain gutter planter. Paint or stain the trim to match your existing color scheme.
4. Fill each section with potting soil and a generous amount of organic matter such as compost or peat moss. This will help give the plants more nutrients as they grow in the gutter.
5. Plant your favorite flowers, herbs, or vegetables in each section of the rain gutter planter. Make sure to leave some space between plants for proper air circulation and growth.

6. Place a few large stones at the bottom of each section as drainage material. This will help absorb excess water and prevent soil from washing away during heavy rains.
7. Water your plants regularly and make sure to give them plenty of sunshine for healthy growth.
Following these steps should help you have a successful rain gutter planter that will bring life and beauty to any space! Enjoy!
Things You Should Consider to Make a Rain Gutter Planter
1. Make sure you choose the right length for your rain gutter planter. Measure the area where you intend to install the planter and buy a rain gutter long enough to fit that space. If it’s too short, there won’t be enough room for soil and plants; if it’s too long, it won’t fit properly and you’ll have to do some cutting.
2. Choose the right type of material for your rain gutter planter. If you’re looking for a low-maintenance option, consider PVC or metal gutters as they are the most durable and weather-resistant options available.
However, if appearance is more important to you than practicality, feel free to pick any other materials you like such as wood, terracotta, or even fiberglass.
3. Consider the type of plants you want to grow in your rain gutter planter. Different types of plants require different soil depths and water drainage capabilities, so it’s important to take these factors into account when selecting a rain gutter size.
4. Make sure the location of your planter is suitable. Look for a spot with access to plenty of sunlight and make sure it’s not too close to other structures or plants that could potentially shade the rain gutter planter.

5. Finally, it’s important to ensure you have all the right tools and supplies before you start building your rain gutter planter. This includes a saw, a drill, screws, and sealant. Once you have the supplies, it’s time to start building!
Following these considerations will help you create a functional and attractive rain gutter planter that can serve as a focal point for your outdoor living space. With the right supplies, tools, and preparation, you’ll be able to build an eye-catching garden feature you can enjoy for years to come. Good luck!
Precautions Need to Follow for Making a Rain Gutter Planter
1. Choose the right type and size of rain gutter for your planter. Make sure that it is strong enough to hold the weight of soil, water, and plants. It should also be rust-resistant and long-lasting.
2. Check if there are any sharp edges on the corners of the gutter that need to be filed down.
3. Make sure to install the planter at a height that is comfortable for you to reach, or else you may need a ladder while tending to it.
4. Take extra care when drilling holes into the gutter as there may be hidden wires inside which can cause electrocution if not handled properly.
5. While attaching the planter to the wall, make sure it is secure and will not cause any harm if it falls.
6. Use a rainwater collection system to channel water from your roof into the planter, otherwise, you may find yourself watering it manually every now and then.
7. Before filling the gutter with soil, line it up with a piece of fabric so that the soil does not seep out of the holes.
8. Make sure to use only high-quality plants and seeds in your planter as low-quality ones may not be able to survive outside in the elements.

Following these precautions will help ensure that your rain gutter planter is safe and secure. With proper care and maintenance, it can easily last for years to come. Happy gardening!
Common Mistakes in Making a Rain Gutter Planter
1. Skipping over the planning phase and rushing into putting up the gutter planter. Not having a good plan can lead to making measurements in haste and cutting incorrect lengths of rain gutters that do not fit correctly onto your house or fence.
2. Failing to secure the rain gutters properly with screws, nails, and other fasteners. If the rain gutters are not well-secured, they can become loose and detach in strong winds or heavy rains.
3. Not installing a gutter guard to prevent debris from clogging up the gutters. Without a gutter guard, leaves, small branches, and other debris can accumulate in the gutter and impede water flow to your plants.
4. Not properly preparing the soil in the planter before planting. Without good soil preparation, it will be difficult for your plants to thrive in the planter. Make sure to add compost, manure, and other organic matter to create a rich environment for your plants.
5. Not selecting a location carefully. Make sure that you choose a spot for the planter that is out of direct sunlight, away from harsh winds, and has good drainage.
By avoiding these common mistakes, you can ensure that your rain gutter planter will be an attractive and pleasant addition to your outdoor space. With proper planning and care, it can become a beautiful part of your garden or yard.
Frequently Asked Questions
What Types of Plants Can Be Used With a Rain Gutter Planter?
The type of plant that you choose should depend on the size and shape of your planter as well as local climate conditions. If your planter is wide enough, some popular options include herbs, vegetables, flowers, succulents, low-maintenance grasses, and small shrubs. Be sure to research plants that are suitable for your area before getting started.
Do Rain Gutter Planters Require Much Maintenance?
Rain gutter planters require minimal maintenance. You will need to periodically check the soil for moisture levels and fertilize when necessary. Additionally, you should clean out any debris from the gutters that could clog the drainage holes. With proper care, your planter should provide you with years of enjoyment!

Can I Make a Rain Gutter Planter Outdoors?
Yes! You can easily make and install rain gutter planters outdoors. Just be sure to use weatherproof materials such as galvanized steel or aluminum gutters and hardware. If you’d like to add a bit of color, paint the gutters with weather-resistant paint before installing them.
Can I Hang a Rain Gutter Planter?
Yes! You can hang rain gutter planters from fences, trellises, or walls by using screws or hooks, and eyelets. Make sure the surface is securely attached and able to hold the weight of the planter before hanging.
What Should I Do if My Rain Gutter Planter Is Not Draining Properly?
If your rain gutter planter is not draining properly, you may need to adjust the angle of the gutters or add additional drainage holes. You can also use larger stones or gravel at the bottom of the planter to create better drainage. Additionally, be sure to check for any debris or blockages that may be preventing proper drainage.
Conclusion
Taking the time to create a rain gutter planter will add an extra pop of style and activity to your garden in no time. This is a great way to both recycle old gutters and repurpose them into something unique and beautiful for your yard. Making your own rain gutter planter not only saves you money but also lets you show off your creative side with an interesting do-it-yourself project.
The best part about this kind of design is that it fits almost any kind of plant, giving you the freedom to choose whatever suits your taste best. If you’re feeling a bit adventurous, adding a couple of these rain gutter planters to your patio or balcony gardens will definitely be a conversation starter!
So, if you’re ready to try out this unique project, follow our guide on How to Make a Rain Gutter Planter and get ready for some outdoor fun!