
Making a layered bow with ribbon can be a fun and easy project for any crafter. Whether you’re looking to add the perfect finishing touch to your gift wrapping or if you want to create some delightful decorations for an upcoming party, this is a great technique that everyone should know!

With this blog post, we’ll provide you with simple step-by-step instructions on how to make a layered bow with ribbon so that you can impress everyone from your friends and family to those walking by!
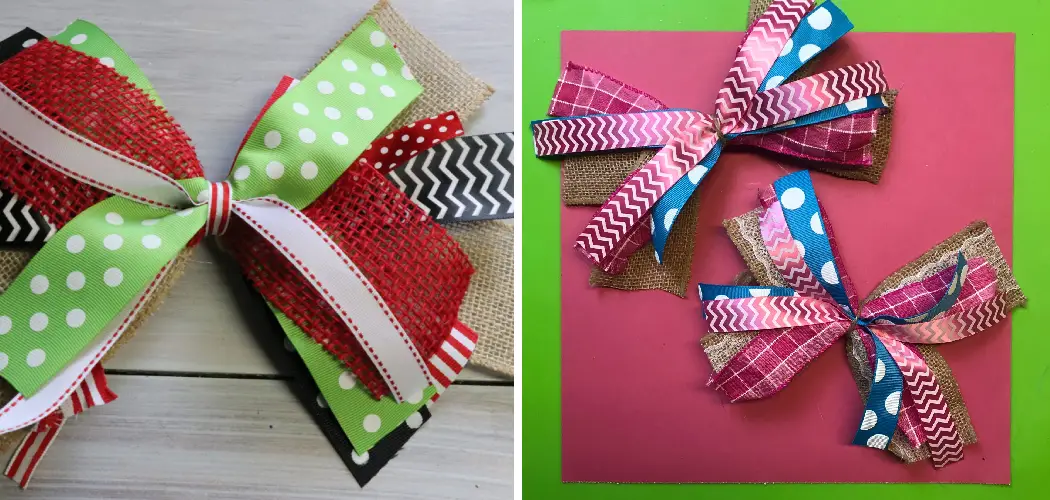
Learning to make a layered bow with ribbon that will be sure to make your next package stand out. Not only is this process easy to follow, but you can customize each one according to the size or color of ribbon you prefer!
At its core, making a layered bow requires just a few simple materials like scissors, pieces of ribbon, and an adhesive option—all easily accessible items in most households. Once you understand the basics, there’s no limit as far as what type of look you can create by experimenting with different designs and sizes.
Why May You Want to Make a Layered Bow With Ribbon?
1 . To Give a Gift an Extra Touch
A bow is the perfect way to top off any gift. But if you really want your present to stand out, why not give it a layered bow? A layered bow with ribbon adds extra dimension and style to any gift-wrapping project. Not only will your gift be beautifully presented, but it will look extra special too!
2 . To Make a Statement
A layered bow with ribbon can also be used to make a statement. Whether you are celebrating an event or giving someone a special gift, adding a layered bow will give it the impact it deserves. The colors and textures of the ribbons you choose will help express your message while making it look more stylish too!

3 . For Craft Projects and Home Decoration
Making a layered bow with ribbon is also perfect for craft projects or home decoration. You can use it to decorate wreaths, festive centerpieces, or even create an eye-catching accent piece for your wall or mantle. The combination of colors and textures will add extra personality to any project you make.
4 . For Weddings and Special Events
Finally, you may want to make a layered bow with ribbon for weddings or other special events. From bouquets to boutonnieres, a layered bow is the perfect way to give your decorations an extra touch of glamour. The right colors and textures will help create the perfect ambiance for any event.
No matter why you want to make a layered bow with ribbon, it’s easy to do and sure to make your gift, craft project or special occasion look even more spectacular! So why not give it a try? With just a few simple steps you can create an eye-catching bow that will add extra style and personality to anything.
How to Make a Layered Bow With Ribbon in 5 Easy Steps
Step 1: Gather All The Tools You Will Need
The very first step is to gather all the tools and materials you will need for making a layered bow with ribbon. This includes ribbon in your desired colors, scissors, measuring tape, glue gun and sticks, needle and thread (optional), and wooden dowel (optional).
Step 2: Measure and Cut The Ribbon
Once you have gathered all the supplies, measure and cut the ribbon in the desired sizes. For a layered bow, you will need four pieces of ribbon — two long ones and two shorter ones. Make sure that each piece is twice as long as the other one for an even look.

Step 3: Glue The Ribbons Into A Bow Shape
Now it’s time to start crafting your layered bow with ribbon. Start by gluing the two ends of one ribbon together to form a loop. Now take the second piece and carefully glue it around the first loop, making sure that it is even on both sides. Do the same with the third and fourth pieces of ribbon until you have all four loops glued into a bow shape.
Step 4: Make The Loops Even More Secure
To make the loops even more secure, you can use a needle and thread or a wooden dowel. If using a needle and thread, simply stitch around all the loops of ribbon to secure them in place. If using a wooden dowel, cut it into four pieces and slide each one through each loop before gluing it together at the center.
Step 5: Add The Finishing Touches
To finish off your layered bow with ribbon, add a few finishing touches. You can use extra ribbons to tie around the center of the bow, glue on some decorative elements such as beads or buttons, or just leave it plain and simple. Whatever you choose — your layered bow with ribbon is now complete!
Some Extra Tips to Make a Layered Bow With Ribbon
1 . Do Not Cut Too Early
When cutting the ribbon for your bow, make sure not to cut too early. As you wrap and form the shape of your bow, it is important to leave a longer tail beyond your starting point so that you can adjust the size and shape of your bow as needed.
2 . Use Quality Ribbon
Using quality ribbons is key to making a perfect bow. The quality ribbon is usually easier to work with because of its strength and flexibility, which will help you get that perfect shape for your bow.

3 . Choose the Right Size Ribbon
Choose a size of ribbon according to the size of your project. Thicker ribbons are usually better for larger projects while thinner ones are more suitable for small projects.
4 . Add Some Glitter
Adding some glitter to your ribbon bow will definitely give it a more glamorous look. You can add glitter by gluing thin strands of glittery ribbon onto the edges of your bow. This will make it stand out even more!
5 . Play Around With Different Colors and Patterns
If you want to add more interest to your layered bow, try using different colors and patterns. Mixing up the colors of the ribbon will give your project a unique touch while mixing up the pattern can make it look even more eye-catching. Experiment with different combinations until you find one that works best for your project!
6 . Use a Template
Using a template can help you make sure that all your bows will have the same shape and size. There are various templates available online, so it’s easy to find one that works for your project.
Frequently Asked Questions
What Precautions Should I Take When Making a Layered Bow With Ribbon?
It’s important to take certain precautions when making a layered bow with ribbon to make sure that the end result looks great. Here are some tips for success: Make sure you have enough ribbon to complete the entire bow. Calculate how much each strand should be before you cut it, and then double-check again.
Be sure to measure the ribbon and cut it precisely, as this will make or break the look of your bow. You should also be careful when tying the knots, as they need to be even in order for the layered bow to look its best. Finally, always use a good quality ribbon that won’t fray or tear easily. With a little practice, you’ll be a pro at making layered bows with ribbon!
What Are Some Ways to Dress Up a Layered Bow With Ribbon?

Once your basic layered bow is complete, there are plenty of ways that you can dress it up. You can add sparkly ornaments or pins for a festive look. Adding different colors of ribbons can create interesting patterns and designs.
You can also use feathers, sequins, or any other tiny embellishments that you like. There are no limits when it comes to sprucing up a layered bow with ribbon! Have fun experimenting to create unique looks for each project.
What Are Some Other Uses for Ribbon in Crafts?
Ribbon is a versatile material that can be used in all kinds of craft projects. It’s perfect for tying bows, but you can also use it to make tassels, wreaths, and ruffles. The ribbon is great for wrapping up gifts or decorating gift boxes. You can also use ribbon to create a whimsical wall hanger.
Conclusion
Congratulations! You now know how to make a layered bow with ribbon. A layered bow is always a great addition to any gift-giving occasion—it adds a special touch and makes the gift even more eye-catching and unique. With patience, creativity, and practice, you can learn to make beautifully crafted bows that will stand out and be sure to wow anyone lucky enough to receive them.
Best of all, making a layered bow with ribbon only requires a few basic supplies which can be easily obtained online or at your local craft store. So why not add some sparkle to an ordinary gift-wrapping session by creating handmade bows? It will certainly add something special that will brighten up someone’s day!