
If you’re looking for a fun and unique way to celebrate Valentine’s Day or an upcoming wedding shower, a heart piñata is the perfect solution. Piñatas are always a hit with both kids and adults, so why not use one to add some excitement to your next event?
Plus, making a piñata is a great way to get creative and showcase your DIY skills. In this blog post, I’ll provide you with 11 easy-to-follow steps on how to make a heart piñata that’s sure to bring smiles to everyone’s faces.

What is Heart Pinata?
A heart piñata is a festive party game that involves trying to break an object filled with candy. The goal of the game is for participants to break the piñata and collect the treats inside. Heart piñatas are popular during Valentine’s Day celebrations, but you can also make one to celebrate other special events like bridal showers or birthdays.
11 Step-by-step Guidelines on How to Make a Heart Pinata
Step 1: Gather Your Supplies
The first step in making a heart piñata is to gather all the necessary supplies. You’ll need:
- Paper Mache Mix
- Cardboard Heart Template
- Glue
- Scissors
- String or Twine
- Paint (optional)
- Filler (candy, confetti, etc.)
Step 2: Cut Out Your Heart
Using the cardboard, cut out two identical heart shapes. These will be the front and back of your piñata. Use a ruler to ensure that both hearts are the same size and shape. When you’re done, set both hearts aside. It’s a good idea to get creative with the shape of your piñata.

You can use the traditional heart shape, or you could try something more unique like a diamond. But if you’re just starting out, a classic heart shape is always a good choice.
Step 3: Create the Sides
Cut out long strips of cardboard to use as the sides of the piñata. They should be as long as the distance from the bottom of the heart to the top curve and wide enough to bend inward about 2-3 inches on each side. This will create a pocket to fill with candy.
Make sure that all of the sides are the same size and shape, using a ruler to help you measure them accurately. This will help your piñata look more uniform and symmetrical. But if you’re feeling adventurous, you can also get creative with the shape and size of your piñata.
Step 4: Glue the Sides to the Heart
Using glue, attach the strips of cardboard to each side of the heart shapes. These strips will form the sides of the piñata. Make sure the sides are evenly spaced and glued securely to the cardboard heart. This will help keep your piñata from falling apart when it’s being broken.
If necessary, use tape to further secure the sides of your piñata. But be careful not to make it too tight; you still want the piñata to break easily.
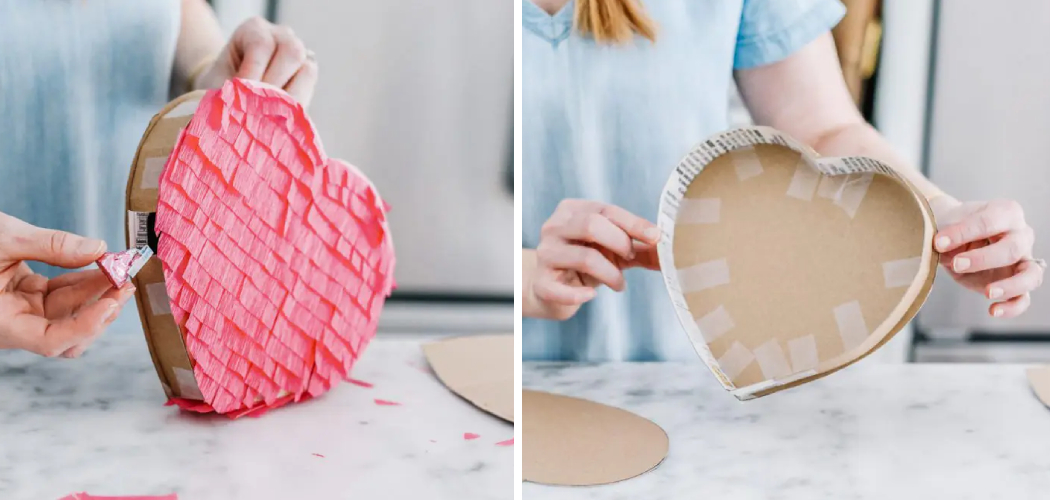
Step 5: Fill the Piñata
Fill the piñata with candy or small toys. Once you have your fillings inside, tape the piñata together. Make sure it’s secure so that the contents don’t fall out. It’s also a good idea to use string or twine to further secure the sides of your piñata.

This will help make sure it doesn’t come apart too easily when it’s being hit. It’s also a good idea to leave enough room on the inside of your piñata for airflow. This will help make sure your piñata doesn’t burst open too quickly when it’s being broken.
Step 6: Add the Hanger
Tape or hot glue a long piece of string or rope to the top of the piñata. Make sure it’s securely attached as it will support the weight of the piñata. This string should be long enough that you can hang it from the ceiling.
This will make it easier for your guests to swing and hit the piñata without having to move too far away. But be careful not to make it too long; you don’t want your piñata to be too high for guests to reach.
Step 7: Begin Decorating
Start decorating your piñata by covering it with tissue paper. Use different colors to create a unique and eye-catching design. Cut the tissue paper into small, fringed strips, and glue them onto the cardboard using a brush and glue mixture.
However, make sure not to go overboard with the decorations – you don’t want your piñata to be too heavy. It should be just heavy enough to break when hit. But if you want to add more decoration, you can always add glitter or beads to the piñata.
Step 8: Continue Decorating
Repeat the process with different colors and continue until the piñata is fully covered in tissue paper. Add any additional decorations you see fit. You can also add stickers, pompoms, or even feathers to enhance the look of your piñata. If you’re feeling extra creative, you can also paint the piñata with acrylic paints. It’s a great way to make your piñata look extra special.

Step 9: Cut the Opening
Once your heart piñata is fully decorated and the glue has dried, use scissors to cut a small hole at the top where you attached the rope or string. This will be the opening where you can fill the piñata with candy or toys.
This will also make it easier for your guests to grab the treats when the piñata breaks open. It’s important to make the hole small enough that it won’t be too easy for the candy or toys to fall out.
Step 10: Seal the Opening
Once you’ve filled the piñata, seal the opening with tape, making sure it’s tightly secured. Use more tissue paper to cover the tape so that it blends into the rest of the piñata. It’s important to make sure the opening is completely sealed before you hang your piñata. This will prevent candy or toys from falling out too early.
Step 11: Hang and Enjoy!
Finally, hang your heart piñata from a sturdy object such as a tree branch or door frame. Have fun and enjoy watching it get beaten open! Always make sure to supervise your guests when playing with the piñata. You can also use a stick or bat for extra safety.
Now you have everything you need to start on how to make a heart pinata for making your own heart piñatas! With these step-by-step guidelines, you’ll be able to create beautiful and unique piñatas that are perfect for any special event. Have fun and get creative with your piñatas!
Frequently Asked Questions
Q. What Kind of Candy Should I Use in My Piñata?
A. You can use a variety of types of candy, depending on the occasion. Popular choices include lollipops, gummy bears, jellybeans, and any type of chocolate. You can also fill your piñata with small toys or confetti for a fun surprise instead! Whatever you choose to fill your piñata with, make sure it’s secure before hanging it up.

Q. What Other Decorating Ideas Can I Use For My Piñata?
A. You can get as creative as you want when it comes to decorating your piñata! Consider using different colors of tissue paper and ribbons, or adding stickers and glitter to enhance the look. If you’re feeling extra creative, you can even paint your piñata with acrylic paints. Whatever decoration you choose, make sure it’s securely attached so it doesn’t fall off when your guests are swinging at it!
Q. How Long Does It Take to Make a Piñata?
A. The amount of time it takes to make a piñata will depend on the size and complexity of your design. Generally speaking, it usually takes between one to two hours to make a piñata. However, if you’re making a larger or more detailed piñata, it may take longer. Make sure to plan ahead and give yourself enough time to complete your project before the event!
Q. What Else Should I Keep in Mind When Making a Piñata?
A. Make sure your piñata is firmly secured and that the hole for filling it is small enough to prevent candy or toys from falling out too soon. It’s also important to make sure your string or rope for hanging the piñata isn’t too long otherwise, it may be difficult for your guests to reach.
Finally, remember to always supervise your guests when they are playing with the piñata and use a stick or bat for added safety. With these tips in mind, you’ll be sure to have a fun and safe piñata-making experience!
Conclusion
In conclusion on how to make a heart pinata, making a heart piñata is a fun and easy way to spice up any festive occasion. With these 11 easy steps, you’re sure to make a beautiful and memorable piñata that will wow your guests. Just remember to have fun and get creative with your tissue paper designs. Happy crafting!