
Are you an avid crocheter who is always on the lookout for new ways to take your projects to the next level? Have you ever wondered how handmade crocheted garments keep their shape and stay neat so well? Are you feeling stuck in a creative rut and unable to find any innovative methods of blocking your projects? If so, then you’re in luck!
Today we’re going to be discussing how to make a crochet blocking board – an incredibly versatile yet curiously simple tool that will transform the way you craft forever!

From novice crafters looking for tips on their first project, all the way through experienced artisans eager to upgrade their game with sophisticated designs; we’ll provide all the knowledge and materials needed for success. So read on if you want a lesson in creating stunning pieces every time!
What is a Crochet Blocking Board?
A crochet blocking board is a tool used to help you shape and smooth the edges of your crocheting projects. After finishing a project, it’s important to block it in order to give it an even finish and keep its shape.
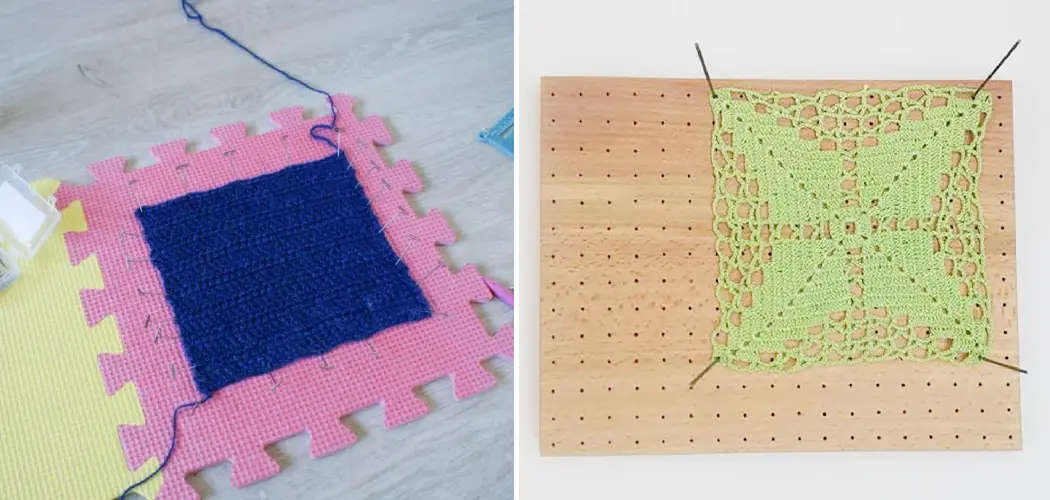
Blocking involves using pins (or sometimes wires) and dampening the fabric before stretching and shaping it into place. Crochet blocking boards are a great way to do this, as they provide a secure and stable surface to block your fabric on.
The Benefits of Using a Crochet Blocking Board
Using a crochet blocking board instead of pinning directly onto your fabric offers several advantages:
1. Easy to Use
A crochet blocking board is easy to use – all you need to do is lay your project on the board and pin it in place. This makes the process much simpler than having to use pins directly on your fabric!
2. Professional Finish
Using a crochet blocking board will help you achieve a professional finish. It’s perfect for keeping your work neat and tidy, with clean edges and no stray pins.
3. Versatile
A crochet blocking board is incredibly versatile – you can use it to block any type of fabric, from cotton to linen to wool! You can also use the same board for multiple projects, so it’s a great investment if you plan on doing lots of crocheting.
Important Things to Keep in Mind While Making a Crochet Blocking Board
Now that you know the benefits of using a crochet blocking board, let’s take a look at some of the important things to keep in mind when making one.
1. Materials
The materials you use to make your blocking board depend on the type of fabric and project you plan to block. You’ll need a lightweight but sturdy material such as foam core or corrugated cardboard. You’ll also need pins and a damp cloth to block your project.

2. Size
When choosing the size of your blocking board, make sure it’s big enough for your project! Measure the dimensions of your project before deciding on the size of your board.
3. Security
Make sure your blocking board is secure – especially if you plan to use it for multiple projects! You don’t want your project slipping off the board while you’re blocking it. Securely attach pins to the corners of the board and use a damp cloth to anchor your project in place.
4. Time
Blocking can take some time, so make sure you factor this into your project timeline. It’s usually best to block right after your project is complete before storing it away for a later date.
What You Need to Making a Crochet Blocking Board
Before you get started, there are a few materials that you’ll need to have on hand in order to make your own crochet blocking board. These include:
- Foam board
- Craft knife (or scissors)
- Straight pins
- Ruler or measuring tape
- Marker or pen
- Cardboard (optional)
- Ironing pad (optional)
10 Steps on How to Make a Crochet Blocking Board
Step 1: Measurement
Start by measuring and cutting your foam board. Use a ruler or measuring tape to measure the dimensions of your project, then use a craft knife (or scissors) to cut the board accordingly. When cutting, make sure to leave a few extra inches on each side of the board so you have enough space for pinning.

Step 2: Pinning
Next, use straight pins or rust-proof wires to hold the fabric in place as you block it. Place pins at all corners and along any edges that need blocking. Make sure to leave a few inches between pins to ensure that your project doesn’t move around while blocking.
Step 3: Marking
Mark the board with a ruler or measuring tape, so you can easily keep track of any changes in size. This will also help you easily identify which side is up when pinning multiple projects on the same board.
Step 4: Installing Cardboard (optional)
If desired, you can also install a layer of cardboard on top of your foam board. This will make it easier to block delicate fabrics and create sharper edges. Secure the cardboard in place with pins at each corner.
Step 5: Applying Heat (optional)
If you’re using a cotton fabric, you can also apply heat to help stretch it into shape. Place an ironing pad under the board and use a steam iron set on low heat to apply steam directly to the fabric. This will reduce friction and help soften the material.

Step 6: Padding
For extra padding, consider adding foam or batting to your board. This will help give a more even finish and reduce any creases in the fabric. Secure the padding with pins at each corner.
Step 7: Dampening
Dampen the fabric before stretching it into shape using a damp cloth or spray bottle filled with water. Make sure you don’t over-dampen the fabric, as this can cause it to stretch too much.
Step 8: Blocking
Now comes the fun part – blocking! Gently pull the fabric into shape and use pins at each corner to secure it in place. Make sure not to pull too tightly, or you may damage your project.
Step 9: Drying
Leave your project to dry for a few hours or until it’s completely dry. This will help ensure that the shape and size remain consistent once it’s finished. While it’s drying, make sure to check the pins every few minutes and adjust them as necessary.
Step 10: Finishing
Once your project is completely dry, remove the pins and admire your work! You’ve just created a professional-looking crochet blocking board – congratulations! Now, you can use this board for any future projects you have in mind.
Now that you know how to make a crochet blocking board, you can take your crocheting to the next level. With this simple tool, you’ll be able to create beautiful and professional-looking projects with ease!

8 Common Mistakes to Avoid When Making a Crochet Blocking Board
Making a crochet blocking board isn’t especially hard, but there are some mistakes that can be easily made. To make sure your project is successful and the results you’re looking for happen, here are 8 common mistakes to avoid when making one.
- Not using the right size needles. If you’re using needles that are too big for the yarn of your project, it won’t block correctly. Similarly, if the needles are too small, you may have difficulty getting your piece to lay flat.
- Not using enough pins or blocking wires. It’s important to use enough pins and wires when blocking a crochet project so that it will stay in place without shifting while the fibers relax.
- Not measuring your project correctly. The best way to block a crochet project is to measure the finished size you want it to be and then use blocking pins or wires spaced evenly throughout your work to achieve that size.
- Applying too much moisture when wet-blocking. If you’re going with a wet block, it’s important not to apply too much moisture, as this can cause the fibers to shrink or stretch out of shape.
- Not working the edges properly. The edges of a crochet project are just as important as any other part and should be pinned firmly in place when blocking to ensure they remain straight and neat.
- Leaving pins in for too long. Once a crochet project is blocked, you should remove the pins as soon as possible so that they don’t leave any impressions in the fibers.
- Not blocking evenly. Making sure your project is blocked evenly will ensure that all parts maintain their shape and are not pulled out of shape by one section being blocked more tightly than another.
- Not pinning securely enough. If the pins aren’t inserted securely enough into the project, they may come loose during blocking and cause uneven results.
Blocking a crochet project can be a great way to ensure that all of your hard work will turn out perfectly. Following these tips should help you get it right the first time! If you have any other questions about how to make a crochet blocking board, don’t hesitate to contact us for assistance.

6 Safety Measures to Follow When Making a Crochet Blocking Board
Making your own blocking board is an economical and effective way to keep your projects nice and neat. However, it is important to note that there are certain safety measures you should follow in order to ensure the best results. Here’s a guide on how to make a crochet blocking board safely:
- Always use non-flammable fabrics such as cotton, wool, or acrylic. Do not use any other materials like plastic, paper, or metals, which could easily catch fire. Also, when using a steam iron, make sure to use it on the lowest setting and keep a fire extinguisher nearby.
- Do not use any pins or needles with sharp points, as they can snag the yarn or fabric. Instead, opt for flat-headed sewing pins or plastic blocking pins, which will help secure your project in place without damaging the yarn or fabric.
- Use a soft cloth or yarn to cover the board when blocking your crochet projects, as this will help prevent any damage from occurring.
- When pressing down on the project, do not press too hard, which can cause dents or creases in the fabric. Instead, just hold it in position until it is completely dry before moving on to the next area.
- When stretching fabric, be sure to do it evenly in all directions. This will help ensure that the project keeps its shape and looks neat when finished. Also, if you’re using pins to secure the project in place while it’s being blocked, be sure to not pull or stretch it too much.
- Finally, always read and follow the instructions on the yarn label when blocking your crochet projects, as this will give you a better idea of how to block the fabric correctly and safely.
By following these safety measures on how to make a crochet blocking board when making your own crochet blocking board, you can be sure that your projects will turn out looking neat and perfect every time.

Conclusion
All in all, a crochet blocking board is an invaluable tool for any crocheter. This project, though simple, can really make a difference when you are putting the finishing touches on your projects. This crafty finishing technique will help you level up your crochet game!
With just a few everyday items, such as foam core board, and a few minutes of your time, you can put together the ideal blocking board that will upgrade your crocheting experience.
No matter what project you’re working on, from Afghans to hats and shawls, having a quality crocheting add-on like this can be incredibly helpful. So why wait? Get started on making your own crochet blocking board today!
Just follow the steps on how to make a crochet blocking board outlined above, and you’ll have a great blocking board in no time. So lace up those shoes, roll up your yarn, and start blocking all of your custom creations.