

Are you looking for a unique and beautiful way to spruce up your home’s decor? If so, why not make a crayon wreath! This fun craft project is perfect for both children and adults alike.
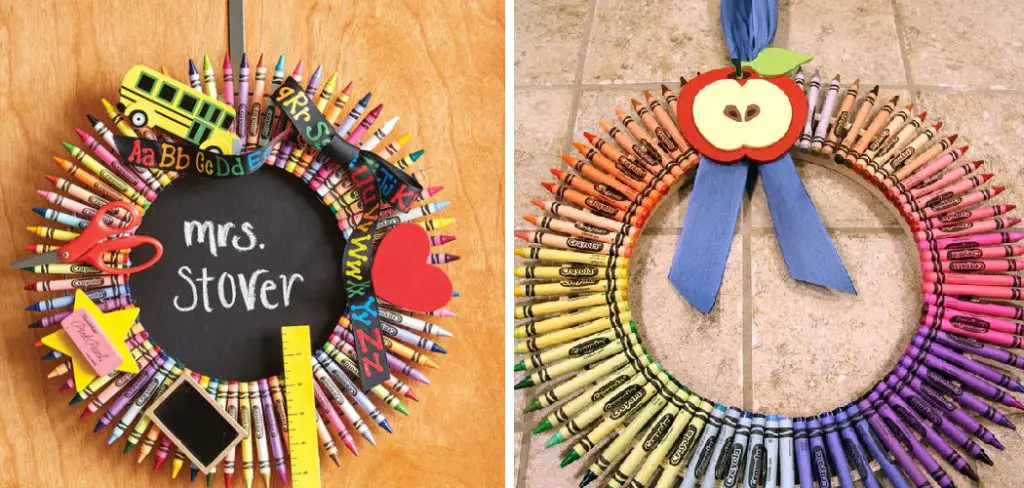
Not only will it provide plenty of eye-catching color to your wall or door, but the creative process itself can be highly enjoyable as well! In this guide, we’ll show you how easy it is to make your own gorgeous crayon wreath – no special art skills required! So if you’re ready to get crafting, keep reading! A crayon wreath is just the project! Not only will it bring out your inner child, but this colorful piece of art also adds an original touch to any room in your home.
With some basic supplies and minimal effort, you’ll have an eye-catching conversation starter in no time. Read on to find out how to make a crayon wreath.
Why May You Want to Make a Crayon Wreath?
1 . To Add a Pop of Color to Your Home
A crayon wreath is a unique and vibrant decoration that can instantly brighten up any room. Whether you choose bold and bright colors or soft pastels, the result will be a beautiful piece of art to hang on your wall.
2 . To Showcase Your Creativity
Making a crayon wreath allows you to express your creativity and make something truly one-of-a-kind. You can experiment with different color combinations, patterns, and designs to create a wreath that reflects your personal style.
3 . To Create a Personalized Gift
A crayon wreath makes for a thoughtful and personalized gift for someone special. You can tailor the colors and design to match their taste or interests, making it a truly unique and heartfelt present.
4 . To Upcycle Old Crayons
Instead of throwing away old or broken crayons, you can repurpose them into a colorful and eye-catching wreath. This is not only an environmentally friendly option, but it also adds a touch of nostalgia to your décor.
5 . To Involve Kids in a Fun Activity
Making a crayon wreath can be a fun and creative activity to do with kids. They can help sort and arrange the colors, or even create their own mini wreaths for their rooms. It’s a great way to bond and spend quality time together.
6 . To Celebrate a Special Occasion
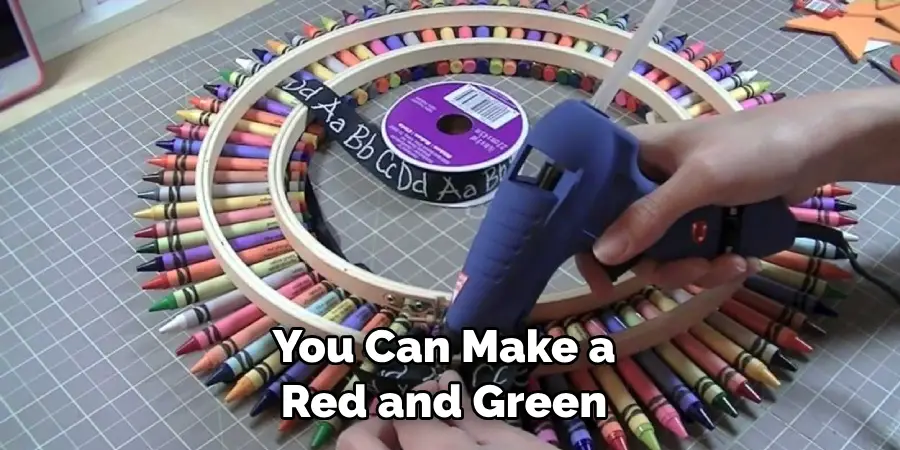
A crayon wreath is not just a seasonal decoration, it can also be used to celebrate a special occasion. For example, you can make a red and green wreath for Christmas or a pink and white one for Valentine’s Day.
How to Make a Crayon Wreath in 6 Easy Steps
Step 1: Gather All The Tools
The very first step is to gather all the required tools and materials needed to make a crayon wreath. These include:
- A foam or straw wreath form
- 50-60 Crayola crayons (different colors)
- Hot glue gun and glue sticks
- Ribbon for hanging
- Scissors
Step 2: Preparing the Wreath Form
To prepare the wreath form, first cover it with any color of ribbon or fabric of your choice. This will add a pop of color to the final product and also provide a base for gluing the crayons.
Step 3: Sort and Arrange Crayons
Sort the crayons according to their colors and arrange them in a pattern that you like. You can either place them randomly or in a color-coded order.
Step 4: Gluing the Crayons
Using a hot glue gun, carefully glue the crayons onto the wreath form. Start from one side and work your way around until all the spaces are filled. Make sure to press each crayon down firmly to ensure they stick well. Also, make sure to leave some space between the crayons for the ribbon.
Step 5: Add a Ribbon
Once all the crayons are glued onto the wreath form, take a ribbon and tie it into a bow. Glue this bow onto one side of the wreath, leaving enough room for hanging. You can also add any other decorations you like at this point.
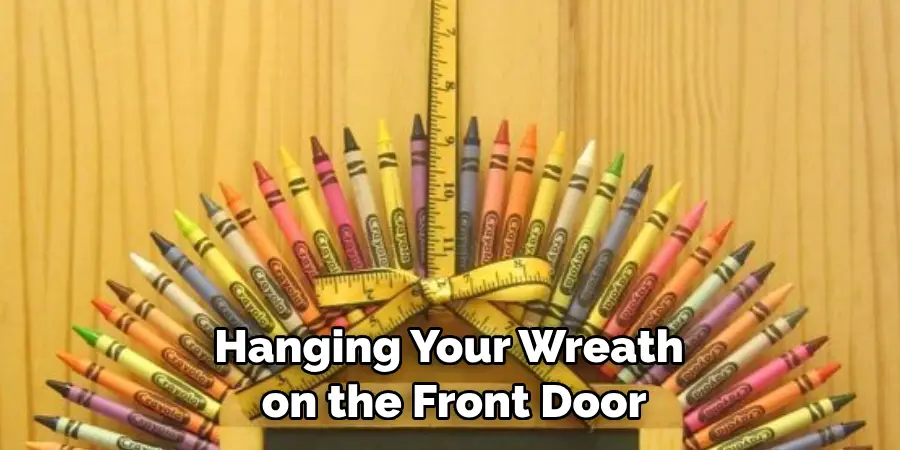
Step 6: Hang and Display
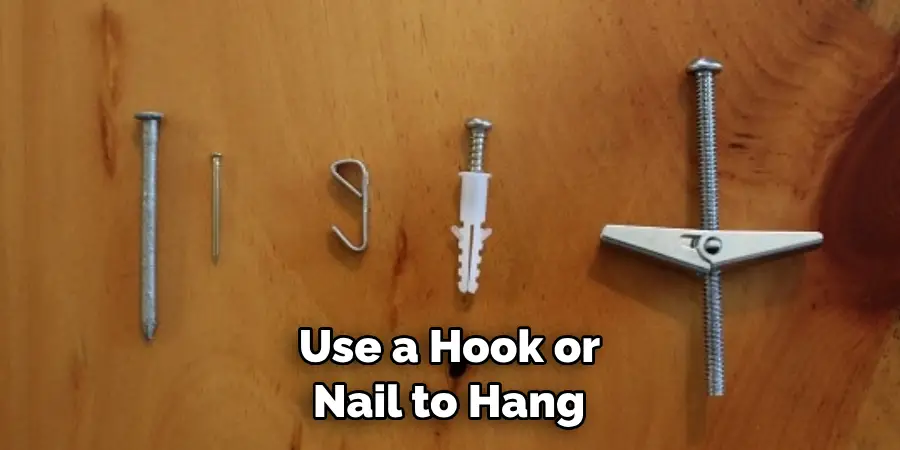
Finally, your crayon wreath is ready to be hung and displayed! Use a hook or nail to hang it on your front door, above the mantle, or anywhere else you’d like. It will surely bring some color and creativity to your home decor!
Tips for Making Your Crayon Wreath Even Better
1 . Use Different Shades of One Color
For a more cohesive and elegant look, try using different shades of one color instead of a rainbow of colors. This will create a stunning ombre effect on your wreath.
2 . Personalize with Glitter or Gems
Add some sparkle and shine to your wreath by adding glitter or gems to the crayons. This will make your wreath stand out and give it a unique touch. Also, you can personalize it further by adding your name or a special message using letter stickers or stencils.
3 . Hang with a Command Hook
To avoid damaging your door or wall, use a command hook to hang your wreath. This will also make it easier to switch out wreaths for different seasons or occasions. Also, make sure to secure the ribbon tightly to the wreath form for added durability.
4 . Use Different Shapes and Sizes
Instead of using a traditional round wreath form, try using a square or heart-shaped one. You can also experiment with different sizes to create a unique and eye-catching display. You can even make mini crayon wreaths and use them as ornaments on your Christmas tree.
5 . Get Creative with Placement
Don’t limit yourself to just hanging your wreath on the front door. You can get creative with placement and use it as a centerpiece for a table setting, above the fireplace, or on a gallery wall. Let your imagination run wild!
With these tips and ideas, you can easily make a beautiful and personalized crayon wreath that will add a touch of color and creativity to your home decor. So gather your supplies and get crafting!
Frequently Asked Questions
What Precautions Should I Take When Making a Crayon Wreath?
When making a crayon wreath, there are a few precautions you should take to ensure your safety and the success of your project. Use protective gear: Since you will be working with hot glue and sharp objects, it is important to protect yourself by wearing gloves and safety glasses. Be careful when handling hot glue and scissors: Hot glue can cause burns, so be cautious when using it. Also, be mindful of the sharp edges of the crayons as you cut them to avoid any accidents.
How Long Does It Take to Make a Crayon Wreath?
The time it takes to make a crayon wreath may vary depending on your level of experience and the complexity of your design. On average, it takes about 2-3 hours to complete a crayon wreath from start to finish. However, this is just an estimate and may take longer or shorter depending on individual circumstances.
How Can I Personalize My Crayon Wreath?
There are many ways to personalize your crayon wreath to make it unique and special. You can use crayons in your favorite colors or even mix different shades together for a more vibrant look. You can also add other decorative elements such as ribbons, flowers, or other small trinkets to make it truly one-of-a-kind.
Can I Use Other Types of Glue Besides Hot Glue?

While hot glue is the most commonly used adhesive for making a crayon wreath, you can also use other types of glue such as craft glue or super glue. However, keep in mind that these glues may not be as strong and may not hold up over time. It is recommended to test a small area first before committing to using a different type of glue.
Can I Make a Crayon Wreath with Children?
Yes, making a crayon wreath can be a fun and creative activity to do with children. However, adult supervision is recommended when working with hot glue and scissors. You may also want to consider using non-toxic or washable crayons if young children will be involved in the project.
Conclusion
Overall, tackling a crayon wreath project is a great way to spend an afternoon. Not only is it educational and fun for the whole family, but it’s also a great way to make something meaningful out of everyday household items.
Now you know how to make a crayon wreath! Use this simple guide as your starting point, then get creative with the design – the possibilities are truly endless! Plus, when you’re done, you’ll have a handcrafted decoration that will bring color to any space in which it’s hung.
So grab some glue gun sticks and crayons and unleash your artistry – it’s time to make something beautiful!