
The festive season is upon us. While there are endless possibilities for decorating your home with Christmas ornaments, why not add a touch of originality by making your own Christmas cone?

This is a simple yet creative DIY Christmas decoration that is easy to make. In this article, we will guide you step by step on how to make a christmas cone so that you can bring your unique ideas to life.
Can You Make a Christmas Cone?
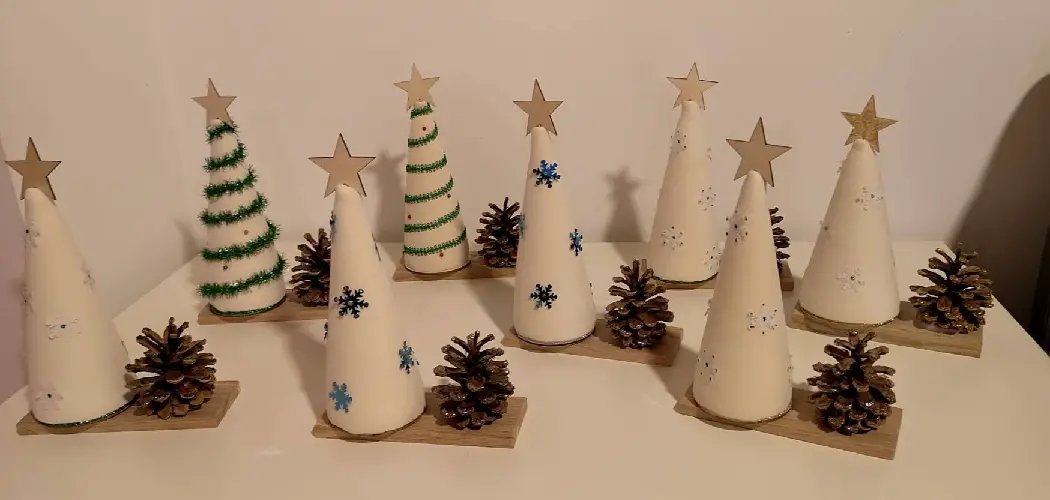
Christmas is in the air, and decorations are a major part of the celebrations. One of the favorite decor items people love to use during Christmas is the Christmas cone. A Christmas cone is an elegant, easy-to-make decoration element that adds charm and brightness to the festive ambiance. Making a Christmas cone is easy; all you need are some craft paper, glue, and a marker.
You can customize these cones by adding embellishments, glitter, or even a sprig of holly. If you’re feeling adventurous, try making these cones in varying sizes and make a centerpiece that will catch everyone’s eye. So put on your craft hat and get ready to add a touch of creativity to your home this Christmas season.
Why Should You Make a Christmas Cone?
The holiday season is here, so it’s time to start thinking about Christmas decorations. If you’re looking for an easy and fun DIY project, consider making a Christmas cone! These festive cones can be made with various materials like felt, paper, or pinecones. You can personalize them with different colors, patterns, and embellishments to fit your holiday decor.
Not only do Christmas cones add a charming touch to your home, but they also make great gifts for family and friends. Crafting them is a great way to spend quality time with loved ones during the holiday season. So why not try it and make your own Christmas cone this year?
The Ultimate Guide on How to Make a Christmas Cone
Step 1: Gather Your Supplies
The first step in making your Christmas cone is gathering all the necessary supplies. You will need a foam cone, wrapping paper or tissue paper, scissors, glue, and any decorative materials you want to add.

You can choose to use different types of wrapping paper or tissue paper, but make sure to choose a festive design that will complement the rest of your Christmas decorations.
Step 2: Measure and Cut the Paper
Measure the foam cone to determine the paper size you will need to cover it. Cut the wrapping paper or tissue paper to size, ensuring it is large enough to cover the cone with enough excess paper to fold over the top.
Once the paper is cut to size, apply a layer of glue around the base of the foam cone, starting at the bottom, and attach the paper to it, smoothing it out as you go. Continue gluing and wrapping the paper around the cone until the entire cone is covered.
Step 3: Add Decorative Elements
Now is the time to get creative and add your own touch to the Christmas cone. You can use any type of decoration, such as ribbons, bows, tinsel, or even ornaments. Attach them to the cone using glue or adhesive tape.
Step 4: Small Details Count
It’s often the small details that make the biggest impact, so don’t forget to add those finishing touches to your Christmas cone. A small tag with a festive message or a miniature pine cone can create a beautiful finishing touch to your creation.
Step 5: Display Your Cone
You’ve put in the effort to create your very own Christmas cone; now it’s time to display it in your beautiful home. You can use your cone as a centerpiece on your coffee table or side table or even place it on your fireplace mantel. You can also make and display multiple cones to create a unique arrangement. The possibilities are endless!

Step 6: Personalize Your Cone
One of the best things about making your own Christmas cone is the ability to personalize it according to your style and preferences. You can choose different colors, patterns, and decorations to match your personal taste or the overall theme of your Christmas decor.
Step 7: Enjoy!
Lastly, don’t forget to enjoy your beautiful and unique Christmas cone. Take pride in the fact that you made it yourself, and let it add a special touch to your holiday decorations. And don’t be afraid to experiment and try different techniques or materials for future cones! The more you practice, the better you’ll become at making these festive decorations.
That’s it! You’ve now learned how to make a Christmas cone. With these simple steps, you can create your own personal touch for the festive season and impress your friends and family with your creativity. So why not gather your supplies and get started on making your very own Christmas cone today? Happy crafting!
Some Considerations Things When You Need to Make a Christmas Cone
It’s not just about decking the halls and putting up the tree when the holiday season rolls around. Many people love to adorn their homes with homemade crafts. One popular DIY project is creating a Christmas cone. These charming decorations can be hung on the door or on the mantel, but there are a few things to consider before crafting. First, choose the right materials.

You’ll need wrapping paper, ribbons, and any decorations you want to add. Secondly, plan your design. Do you want a classic red and green color scheme or something more modern? Once you’ve got your materials and design in mind, you’re ready to start creating your beautiful Christmas cone. With a little effort, you’ll have a magical addition to your holiday decor!
5 Benefits of Making a Christmas Cone
1. Easy to Make
Making a Christmas cone is an easy and fun activity for the whole family. You only need basic supplies, such as construction paper, scissors, glue, and decorations. You can also use items from around the house, such as fabric scraps, ribbons, buttons, and other small trinkets. Once you have gathered all of your materials, it is just a matter of assembling them into a cone shape and decorating them with your chosen items.
2. Customizable
Christmas cones are highly customizable and can be made to fit any style or theme that you desire. You can choose from different colors of construction paper or fabric scraps for the base of the cone and then add decorations in whatever style you like. This makes them perfect for creating unique gifts for friends and family members or even decorating your home during the holiday season.

3. Inexpensive
Making Christmas cones is also inexpensive, as most of the materials needed are likely already lying around your house or can be picked up at a local craft store for very little money. This makes it a great activity for those on a budget who still want to get creative with their holiday decorations or gifts without spending too much money.
4. Fun Activity
Making Christmas cones is also a fun activity that people of all ages can enjoy. Children will love helping to assemble the cones, while adults may enjoy getting creative with their designs and decorations. It’s also an excellent way to spend quality time together as a family during the holidays while making something special that everyone will enjoy looking at throughout the season.
5. Great Gifts
Once finished, Christmas cones make excellent gifts for friends and family! They are thoughtful yet affordable presents that show how much thought went into them when they were made by hand with love. Plus, they provide lasting memories as they can be hung up yearly to remember those special times spent together making them!
6 Common Mistakes People Make When Trying to Make a Christmas Cone
1. Not Using Enough Glue
When making a Christmas cone, it is important to use enough glue to hold the cone together. If the glue does not adhere properly, the cone may collapse and ruin your hard work. To ensure that your cone will stay together, spread an even layer of glue on each side of the paper before attaching them together.
2. Not Cutting the Paper Evenly
The shape of your Christmas cone will depend on how evenly you cut the paper. If one side is longer, it can cause your cone to be lopsided or even collapse when you try to stand it up. To avoid this problem, use a ruler or another straight edge when cutting the paper so that both sides are even in length.

3. Not Making a Sturdy Base
A sturdy base is essential for keeping your Christmas cone upright and stable. If you do not add enough support at the bottom of your cone, it may topple over easily when touched or bumped into something else. To create a more secure base, use heavier cardstock or multiple layers of paper instead of just one thin sheet.
4. Not Decorating Properly
Decorating your Christmas cone is one of the most fun parts of making it! However, if you don’t take care when adding decorations such as ribbons and bows, they may become tangled and ruin the look of your finished product. To prevent this from happening, attach each decoration securely with glue or tape before moving on to another one.
5. Not Adding Enough Support Inside
For your Christmas cone to keep its shape after being filled with treats or gifts, it needs extra support inside to hold everything in place. You can create extra support by using cardboard pieces cut into triangles and wedging them between each layer of paper before gluing them together; this will help keep everything in place once you start filling up your cone with goodies!
6. Not Finishing It Off With a Bow
The final step in making a perfect Christmas cone is adding a bow at the top! This simple yet elegant touch can bring out all your hard work and make it look like professional decorators made it themselves! Make sure to choose a ribbon color that complements the rest of your decorations for an eye-catching finish that will impress everyone who sees it!
Conclusion
A Christmas cone is an affordable and easy DIY decoration to make, and it’s an excellent way to add a personal touch to your Christmas décor. With just a few supplies, you can create a beautiful and unique decoration that will bring a festive feel to your home.
So why not try it and create your own Christmas cone this year? The best part is that you can personalize your cone however you like and add your own creative flair to it! Thanks for reading our post about how to make a christmas cone.