
Knitting a scrunchie is an easy and fun way to express your creativity while producing something practical and stylish. A scrunchie can be used as a hair accessory and for numerous other purposes, such as tying up cords or keeping track of small items in your bag. Plus, it makes the perfect handmade gift.

Knitting a scrunchie can be an affordable way to add unique style to your wardrobe. It is also a great way to practice and refine your knitting skills as you work with different yarns, colors, and stitches. Not only do homemade scrunchies look fantastic, but they are also incredibly durable since the knitted fabric lasts longer than elastic bands. Read this blog post to learn how to knit a scrunchie.
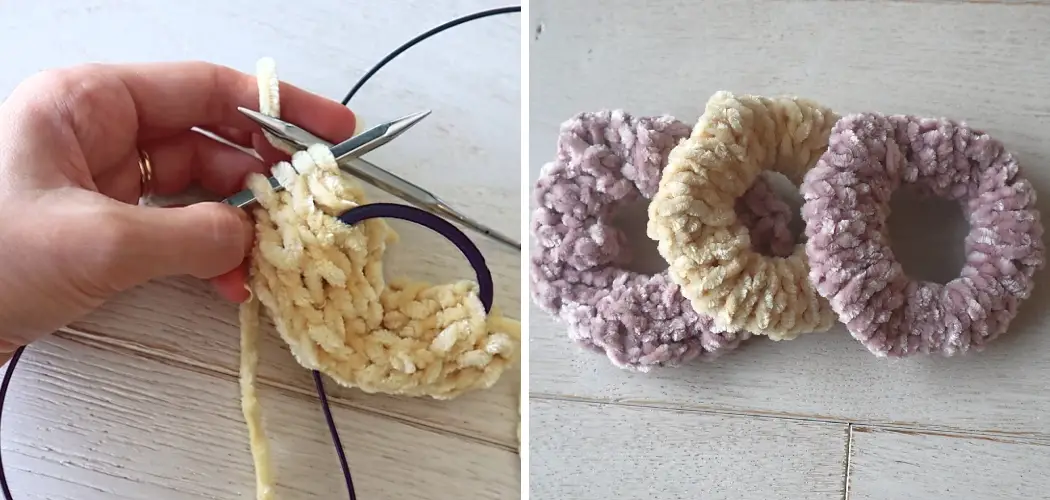
Step-by-step Instructions for How to Knit a Scrunchie
Step 1: Inspect Your Yarn
Before you start knitting, inspect the yarn for any knots or tangles. Once all is in order, begin by winding the yarn around your finger until it forms a loop big enough to fit around your wrist.
Step 2: Cast On Your Stitches
You use knitting needles cast on ten stitches with the yarn loop. Ensure the stitches are not too tight or loose for a comfortable fit. Knit your scrunchie by alternating knit and purl stitches until it measures 1.5 inches in width from edge to edge. To ensure an even-looking pattern, make sure that you count the rows of stitches as you go.
Step 3: Increase Your Stitches
Once you reach the desired width, increase your stitches by three and continue knitting until it measures 3 inches in width from edge to edge. When you have reached the desired width, bind off your stitches. Leave at least 6 inches of yarn for weaving in and out of the edges.
Step 4: Sew Your Scrunchie Together
Fold your scrunchie into a circle and sew it with a yarn needle. Start from one corner and make sure to keep a consistent stitch throughout. Using the remaining yarn, weave it through the edges of your scrunchie using a yarn needle. Move your needle in and out around the edges until all loose ends are securely tucked away.

Step 5: Gather Your Scrunchie
Gather your scrunchie in the middle using a yarn needle to make it look nice and full. Pull the thread until you have reached the desired size for your scrunchie. Once you are happy with the size of your scrunchie, secure your gathering thread by knotting it to the base of your scrunchie.
Stand back and admire your beautiful new scrunchie! You can show off your newfound skills by wearing it around your wrist or styling it in your hair. Or, if you’re feeling generous, wrap it up and give it away as a gift. No matter what you decide to do with it, you’ll be sure to make a great impression on your handmade scrunchie.
Tips for How to Knit a Scrunchie
- Choose the right yarn for your project – ensure that you select a yarn that won’t break easily and will last through multiple uses
- Always read the instruction manual before beginning your project – familiarize yourself with the pattern directions so you don’t get confused during the knitting process
- Have a good understanding of basic knitting stitches, as this will help give your scrunchie the strength and shape you’re looking for
- Use knitting needles appropriate to the size yarn you have chosen – this will guarantee even stitches that are not too loose or tight
- Keep track of where you are in the pattern as well as what part of the scrunchie you are currently making
- Make sure you measure your scrunchie as you knit to ensure it is the size and shape you desire
- When finished, reinforce any weak points or areas that may snag easily to give your scrunchie a longer life.

Once you’ve followed the above steps on knitting a scrunchie, be creative with color combinations and patterns to make a unique design that expresses your style.
What Supplies Do You Need to Knit a Scrunchie?
Before you begin knitting a scrunchie, you must ensure you have all the necessary materials. The supplies you need are:
- A ball of yarn
- Knitting needles
- Scissors
- A tapestry needle or sewing needle
Invest in special tools designed specifically for knitting projects, such as a row counter and stitch markers. These tools can make knitting a scrunchie easier and more enjoyable.
How Long Will It Take You to Finish Knitting a Scrunchie?
Knitting a scrunchie is an easy but time-consuming project. Depending on your skill level, it can take one hour to several days. If you’re a beginner, start with the basic scrunchie pattern or opt for a simpler design like an elastic bracelet. With some patience and practice, you can eventually create more complex designs.

To get started, you will need a few simple supplies: yarn, knitting needles in the size you choose, and a scrunchie hook or latch needle. Once you have gathered all your materials, it’s time to cast on (start knitting). To do this, wrap the yarn around your needles as often as the pattern indicates. Then, starting from the right side of the needle, slide the first stitch off onto the left-hand needle and repeat for all stitches on your right-hand needle.
Do You Need to Buy Any Additional Supplies for Knitting a Scrunchie?
You can knit a scrunchie with just the supplies you already have in your home. You will need a pair of knitting needles and some yarn or thread to start. If you want to ensure that your scrunchie lasts for years, buy high-quality materials such as wool yarn and metal or bamboo knitting needles. You should also buy some stitch markers to keep track of your rows and loops. Finally, if you’d like to add a bit of flair to your scrunchie, consider picking up some beads or sequins in vibrant colors.
How Do You Make Sure That Your Scrunchie Looks Perfect Every Time?
Making a perfect scrunchie requires attention to detail and patience. It’s important to ensure that each step is completed properly to ensure an even, neat result. Here are some tips for ensuring your scrunchie looks flawless:
- Use high-quality yarn so that your scrunchie will be durable and long-lasting.
- Test the yarn to ensure it’s strong and doesn’t break before starting your project.
- Ensure you use the correct hook size for your scrunchie – too small or too big, and it won’t turn out properly.
- When sewing the ends together, be careful not to pull too tight – it should be gathered but not overly so.
- Use a stitch marker to mark the beginning of each round as you’re working and adjust accordingly.
- When cutting off the yarn, ensure all ends are well secured to avoid loose pieces or fraying.
- Give your scrunchie a good block when you’re finished, and it’ll be sure to look fabulous.

With these tips in mind, you’ll be able to create beautiful scrunchies every time. So grab your hook and some yarn and start crafting your perfect scrunchie.
What Techniques Should You Use to Make Sure Your Scrunchie is Nice and Tight?
Several techniques can help you create a snug fit when knitting a scrunchie. If you have access to circular knitting needles, they can be used to cast the number of stitches required for the desired circumference of your finished scrunchie. This method will produce an even tension important for achieving a constricted elastic look.
Another helpful technique is to use two strands of yarn held together while knitting. This extra layer of thickness helps the scrunchie maintain its shape and fits snugly around your wrist. When using this method, it’s important to be sure that both strands come from the same dye lot to achieve an even color throughout the entire piece.
Finally, using an elastic thread inside the scrunchie is a good idea. Sewing this thread in the same direction as you knit will guarantee that the finished product has enough stretch and is not too loose or tight.
Which Fabric is Best for Scrunchies?
When choosing fabric for your scrunchie, you should opt for materials with some elasticity, such as cotton or wool. These fabrics are ideal because they provide the necessary stretch and shape without becoming too loose or tight over time.

Acrylic yarn can also be a good option as it is durable and won’t lose shape easily. However, silk yarn is the way to go if you want a super-soft feel. It’s important to note that some fabrics may require special needles and other tools to create your scrunchie’s desired shape and size.
What Else Can You Do with a Scrunchie?
Once you’ve created a scrunchie, you can use it in various ways. A classic scrunchie is perfect for holding back your hair, but you can wear it as a bracelet or even wrap it around your neck as an accessory. You can also personalize your scrunchie by adding beads and other embellishments to make it unique.
Scrunchies are also great gifts for friends and family. You can create a truly one-of-a-kind present using different colors and patterns. No matter how you wear it, a scrunchie is an easy and fun way to access your look.
What Are Some Other Scrunchie Projects You Can Try?
If you’ve mastered the basics of knitting a scrunchie and are looking for something more challenging, there are plenty of other projects to try. Once you’ve become comfortable with basic knitting techniques, you can also make a knitted scarf, cowl, or shawl.
All these projects require the same techniques used in knitting a scrunchie, and they are perfect for keeping you warm during colder months. Another great project is to make a knitted bag. This might seem daunting at first, but it can be a fun and rewarding project with some practice. There are plenty of online tutorials to help guide you through the process of creating your unique bag.
Conclusion
In conclusion, Knitting a scrunchie is an easy and enjoyable project that can help you explore the knitting world while creating something functional and fashionable. With just a few supplies like needles, yarn, and scissors, anyone can knit a stylish scrunchie quickly.
But before you start, read up on basic knitting techniques to ensure your finished product looks as beautiful as you had imagined. This article has been beneficial for learning how to knit a scrunchie. Make Sure the preventive measures are followed chronologically.