
Ironing daisy patches is an essential skill that every person should know. Whether you are a DIY enthusiast, a fashion lover or simply someone who wants to keep their clothes looking crisp and neat, knowing to iron daisy patches is a must. Not only does ironing your clothes make them look more presentable, but it also helps maintain the fabric’s quality and longevity.

The main advantage of ironing daisy patches is the ability to customize and personalize your clothing. Daisy patches are a great way to add a touch of fun and uniqueness to any garment, whether it’s a t-shirt, jeans, or even a backpack. Another advantage of ironing daisy patches is its simplicity. It requires minimal tools and skills, making it accessible for anyone to try. All you need is an iron, a piece of cloth, and your chosen daisy patch. Read this blog post to learn how to iron daisy patches.
Materials You Will Need
- Iron
- Ironing Board
- Clean towel
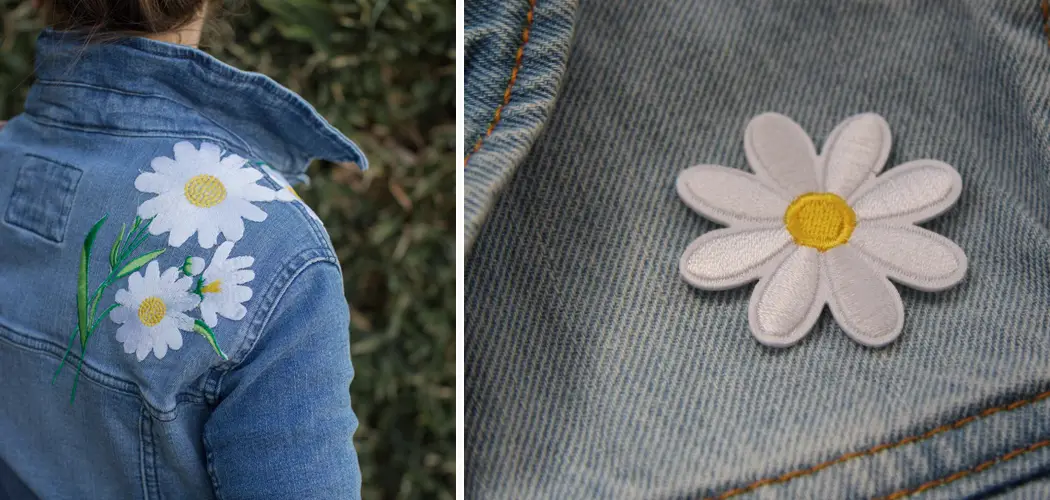
- Daisy patches
- Water spray bottle
- Cloth/teflon sheet (optional)
- Heat resistant surface (tray, pan or board)
- Lightweight cotton fabric (to use as a press cloth)
- Sewing pins (optional)
- Needle and thread
Step-by-Step Instructions for How to Iron Daisy Patches
Step 1: Inspect the Patch
Before beginning to iron your daisy patch, it is important to inspect it closely for any loose threads or damage. If there are any loose threads, trim them carefully with a pair of scissors. If you notice any damage that cannot be fixed by ironing, consider sewing the patch onto your garment instead.

Step 2: Prepare Your Materials
To properly adhere your daisy patch, you will need a few key materials: an iron, an ironing board or heat-resistant surface, and a thin towel or cloth. The towel or cloth is used to protect both the patch and your garment from direct heat.
Step 3: Heat Your Iron
Plug in your iron and set it to the appropriate temperature for the fabric of your garment. If you are unsure, start with a low heat setting and gradually increase it as needed. Lay your garment on the ironing board or heat-resistant surface.
Carefully position the daisy patch on top of the desired location on your garment. To ensure that the patch does not move during ironing, you can use pins or fabric adhesive to hold it in place.
Step 4: Cover the Patch
Place the thin towel or cloth over the daisy patch. This will prevent direct heat from damaging the patch and ensure that your iron does not come into direct contact with any adhesive on the back of the patch.
Gently press down on the iron, making sure to cover the entire patch. Move the iron in a circular motion for about 10-15 seconds, or until you can see that the patch is starting to adhere to your garment.
Step 5: Check Adhesion
Carefully lift up the towel or cloth and check if the patch has adhered properly. If it hasn’t, place the towel or cloth back over the patch and continue ironing until it has fully adhered.
Once the patch is fully adhered, turn off your iron and allow it to cool for a few minutes. This will ensure that the adhesive has properly set.

Step 6: Remove Towel or Cloth
After the patch has cooled, carefully remove the towel or cloth from the patch. If there is any residue left on the towel or cloth, you can gently wipe it off with a damp cloth.
You have successfully ironed your daisy patch onto your garment. Now you can proudly show off your personalized piece of clothing featuring a beautiful daisy design. Remember to always follow the care instructions on your garment to ensure that the patch stays in place for a long time.
Safety Tips for How to Iron Daisy Patches
- Before ironing any patch, it is important to read and follow the instructions provided on the label. This will ensure that you are using the correct heat setting for your fabric and patch.
- To protect your iron as well as your patch, it is recommended to use a pressing cloth between them. This will prevent any damage to the iron or patch, especially if they are made of delicate materials.
- Always use a flat and stable surface when ironing patches. This will prevent any accidents and ensure that your patch is applied evenly.
- When ironing daisy patches onto clothing or bags, it is best to do so on the inside of the garment or bag. This way, if there are any mistakes or mishaps, they will not be as visible on the outside.
- When using a steam iron, make sure to turn off the steam function. Excessive moisture can cause the patch to shift or wrinkle.
- Be cautious when applying heat to delicate fabrics such as silk or satin. Lower heat settings and shorter ironing times may be necessary to avoid damaging the fabric or patch.
- Always let the patch cool completely before handling it or attempting to move it. This will ensure that the adhesive has fully adhered to your fabric and prevent any shifting of the patch.
By following these safety tips, you can ensure a smooth and successful ironing process for your daisy patches. Remember to always read and follow the instructions provided with your patches and handle them with care.

What is the Best Way to Prepare Your Fabric Before Ironing on a Daisy Patch?
Before ironing on a daisy patch, it is important to properly prepare your fabric. Here are some tips to ensure that your patch adheres correctly and looks great:
- Wash and dry your fabric before ironing on the patch. This will remove any dirt or wrinkles that may interfere with the adhesion of the patch.
- If you are using a new fabric, it is recommended to prewash it before applying the patch. This will prevent any shrinkage or changes in texture that may affect the appearance of your patch.
- Make sure the fabric is completely dry before ironing on the patch. Any moisture can interfere with the adhesion process and cause the patch to shift or wrinkle.
- If you are using a fabric with a high synthetic content, it is recommended to use a pressing cloth between the iron and fabric. This will prevent any melting or damage to the fabric.
Remember to always test a small area of your fabric before fully applying the patch, especially if you are using delicate or unfamiliar fabrics. By properly preparing your fabric, you can ensure that your daisy patch adheres correctly and looks great on your garment or accessory.
What is the Best Way to Store and Care for Your Ironed-on Daisy Patches?
When ironing on daisy patches, the key to a successful application is knowing how long to hold the iron on the patch. This can vary depending on several factors such as the type of fabric, heat setting of your iron, and the type of adhesive backing on your patch. In this section, we will discuss some general guidelines for holding the iron on your daisy patch to ensure it fully adheres.
First, it’s important to note that the iron should always be set to the appropriate heat setting for your fabric. This will not only prevent damage to your fabric but also help the adhesive on your patch bond better. If your iron is too hot, it can melt or burn the backing of your patch, and if it’s not hot enough, the patch may not fully adhere.
Next, you want to make sure your fabric is clean and free of any wrinkles or creases. Lay the fabric on a flat surface and smooth out any bumps with your hands or a lint roller. This will ensure a smooth and even surface for the patch to be ironed onto.

How Can You Prevent Your Iron From Damaging the Daisy Patch or Fabric While Applying Heat?
When ironing on daisy patches, it is important to know how long to hold the iron for in order for the patch to fully adhere. This can vary depending on the type of fabric used and the instructions provided by the patch manufacturer. Generally, it is recommended to hold the iron on the patch for 10-15 seconds, using medium heat and applying pressure evenly. This will ensure that the patch is securely attached to the fabric without causing any damage.
Once your daisy patches are ironed on, it is important to properly store and care for them in order to maintain their quality and longevity. It is recommended to wash the garment inside out and air dry it instead of using a dryer, as heat can loosen the adhesive on the patch. Additionally, avoid ironing over the patch again as it may cause it to peel off or lose its shape. To prevent your iron from damaging the daisy patch or fabric, there are a few things you can do. Firstly, make sure to use a pressing cloth between the iron and the patch to protect both surfaces.
Conclusion
In conclusion, ironing daisy patches is a simple and effective way to add a touch of charm to any clothing or accessory. By following the steps outlined in this blog, you can easily create your own personalized daisy patches and attach them to items like jackets, bags, or even hats. It’s important to remember that when it comes to ironing on patches, preparation is key.
Make sure to select a suitable fabric, pre-heat your iron, and have all necessary materials on hand before beginning the process. I hope reading this post has helped you learn how to iron daisy patches. Make sure the safety precautions are carried out in the order listed.