
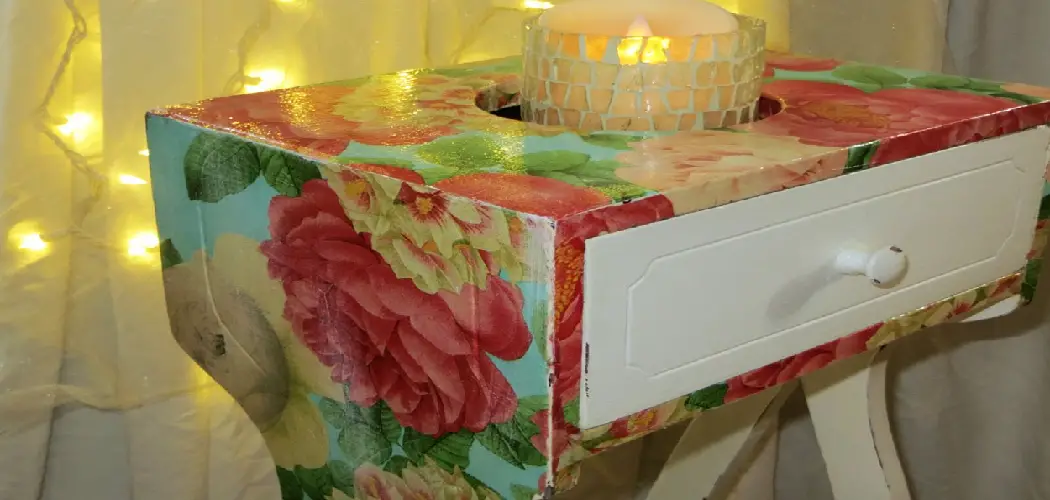
Have you ever wanted to decorate your home in a unique way that doesn’t involve paint and wallpaper? Decoupage is the perfect craft for adding color, texture, and interesting designs into the décor of any room. Not only can it be done at a relatively low cost, but it also creates an eye-catching piece that’s sure to draw attention from anyone who visits.

Plus, when done right decoupage can look like it was professionally crafted! If you’re curious about how this crafting technique works on wood, read on; we’ll explain just what decoupage is and show you step by step-by-step how to decoupage on wood and achieve stunning results.
What is Decoupage?
Decoupage originated in France back in the 17th century and translates to “cutting” or “to cut.” It’s a technique that involves cutting out images, patterns, or shapes from paper and adhering them to another surface using glue or varnish. This can be done on various surfaces such as wood, glass, metal, or even ceramics. The end result is a collage-like effect that can range from subtle and elegant to bold and vibrant.
Tools and Materials You Will Need to Decoupage on Wood
To get started with decoupage on wood, you’ll need the following materials:
- Wooden surface (such as a box, tray, or frame)
- Decorative paper (such as scrapbook paper or tissue paper)
- Scissors
- Mod Podge or white glue
- Foam brush or paintbrush
- Sandpaper or sanding block (optional)
Step-by-step Guidelines on How to Decoupage on Wood
Step 1: Choose Your Wooden Surface
The first step is to choose the wooden surface you want to decoupage on. This can be anything from a small box or picture frame to a larger piece of furniture such as a dresser or table. Make sure the surface is clean and dry before starting. Choosing a smooth surface will make the decoupage process easier.

Step 2: Prepare Your Decorative Paper
Once you have your wooden surface ready, it’s time to prepare your decorative paper. You can use any type of paper for this, such as scrapbook paper or tissue paper. Cut out the images, patterns, or shapes you want to use in your design. Make sure the pieces are slightly bigger than what you want on your surface, as they will be trimmed later.
Step 3: Arrange and Glue Your Paper Pieces
Next, arrange your paper pieces on the wooden surface to create your desired design. Once you have a layout that you’re happy with, start adhering the pieces onto the wood using Mod Podge or white glue. Use a foam brush or paintbrush to apply the glue evenly on both the surface and the paper. While arranging and gluing, make sure to smooth out any air bubbles or wrinkles for a clean finish.
Step 4: Add Multiple Layers
For a more intricate design, add multiple layers of paper. Simply repeat the previous step by arranging and gluing your paper pieces one layer at a time, making sure to let each layer dry before adding the next. This will create depth and dimension to your decoupage design.
Step 5: Seal Your Decoupage
Once you’re satisfied with your design, seal the decoupage by applying a layer of Mod Podge or white glue over the entire surface. This will protect your design from any wear and tear. You can choose to add multiple layers of sealant for added durability. Make sure to let each layer dry completely before adding another.

Step 6: Optional Finishing Touches
If desired, you can add some finishing touches to your decoupage design. This can include sanding the edges for a distressed look or adding some embellishments such as buttons or beads using glue or hot glue and a glue gun.
Following these steps, you can create beautiful and personalized decoupage designs on wood that are sure to add a unique touch to your home décor. So why not give it a try and see the endless possibilities of decoupage on wood? Happy crafting!
Additional Tips and Tricks to Decoupage on Wood
1. Experiment with different types of paper for your decoupage projects. You can use tissue paper, napkins, wrapping paper, magazine cutouts, or even old book pages.
2. To achieve a vintage look, tear the edges of the paper instead of cutting them neatly.
3. Use a light coat of white acrylic paint over your project before starting to decoupage. This will help create a cohesive background and seal the wood.
4. For a glossy finish, apply several coats of varnish or Mod Podge over your decoupage project.
5. To add texture to your decoupage project, try using lace, fabric, or tissue paper with raised patterns.
6. You can also use stamps and ink to add designs and dimensions to your decoupage project.

7. If you are decoupaging a large surface, work in sections and make sure to smooth out any air bubbles or wrinkles as you go.
8. Don’t be afraid to layer your paper pieces for a more dynamic look.
9. To create a distressed look, sand the edges of your project after it has dried and before applying the final coat of varnish or Mod Podge.
10. Remember to clean your brushes and work surfaces with warm soapy water after completing your project. This will help prevent the glue from drying and ruining your tools.
Following these tips and tricks will not only enhance your decoupage skills but also allow for more creativity and personalization in your projects. Have fun and happy crafting!
Things You Should Consider to Decoupage on Wood
1. Consider the Type of Wood You Will Be Using:
There are different types of wood that can be used for decoupage. Some woods may work better than others, and it’s important to choose the right one for your project. For example, softwoods like pine are easier to work with and have a smoother surface for decoupage, while harder woods like oak may require more preparation and sanding.
2. Prepare the Wood Surface:
Before starting your decoupage project, it’s important to properly prepare the wood surface. This includes sanding down any rough areas, filling in any cracks or holes, and ensuring the surface is clean and free of dust or debris. This will help create a smooth and even surface for your decoupage design.
3. Choose the Right Decoupage Medium:
Decoupage medium is a type of adhesive used to attach paper or fabric designs onto a surface. There are various types of decoupage mediums available, such as matte, gloss, and satin finishes. It’s important to choose the right one for your project depending on the desired look and feel.
4. Use High-Quality Images:
When choosing images for your decoupage project, it’s important to use high-quality images. This will ensure that the final product looks crisp and professional. Low-resolution or blurry images may not transfer well onto the wood surface. This is especially important when using images with fine details or small text.
5. Experiment with Different Techniques:
Decoupage on wood allows for a lot of creativity and experimentation. Don’t be afraid to try out different techniques, such as layering images, using tissue paper for a translucent effect, or adding embellishments like glitter or beads. The possibilities are endless when it comes to decoupage on wood.

6. Protect Your Finished Project:
Once your decoupage project is complete, it’s important to protect it from wear and tear. You can use a sealant or varnish to protect the surface and make it more durable. This will also help prevent any peeling or fading of the decoupage design over time. Consider using a waterproof sealant if your project will be exposed to moisture.
Following this consideration will ensure a successful decoupage project on wood. Remember to have fun and let your creativity shine through in your designs! Happy decoupaging!
Frequently Asked Questions
How Long Does It Take for Decoupage on Wood to Dry?
The drying time for decoupage on wood can vary depending on the type of surface, the type of decoupage medium used, and the thickness of the layers. Generally, it takes around 24 hours for the project to fully dry. It’s important to follow the instructions on the decoupage medium for specific drying times and techniques.
Can I Decoupage on Already Finished Wood?
Yes, you can decoupage on already finished wood, but there are a few things to keep in mind. The surface should be clean and free of any wax or oils. You may also need to lightly sand the surface to create a better bond for the decoupage medium. It’s also recommended to use a sealant or varnish over the finished project to protect the design.
What Can I Use as a Decoupage Medium Besides Mod Podge?
Mod Podge is a popular decoupage medium, but there are other alternatives available such as white glue mixed with water, gel medium, or even homemade decoupage glue. Experiment with different mediums to find the one that works best for your project.
Can I Use Decoupage on Outdoor Wood Projects?
Decoupage can be used on outdoor wood projects, but it’s important to use a waterproof sealant and ensure that the project is protected from harsh weather conditions. It’s also recommended to use high-quality images and a strong decoupage medium to ensure the design stays intact for longer periods of time.
Is Decoupage on Wood Waterproof?
Decoupage on wood can be made waterproof by using a waterproof sealant. This will protect the surface from moisture and make it more durable. It’s important to note that while the sealant will help prevent water damage, it may not completely waterproof the wood. Always take precautions to protect your decoupage project from exposure to water.
Conclusion
All in all, knowing how to decoupage on wood opens up a world of possibilities for creating unique and personalized home decor, gifts, and more. By considering the type of wood, preparing the surface, choosing the right decoupage medium, using high-quality images, experimenting with techniques, and protecting your finished project, you can create beautiful and long-lasting designs on wood. So gather your materials and let your creativity run wild with decoupage on wood! Happy crafting!