
Cutting tulle fabric is a delicate and essential step when working with dresses or garments that require a touch of ethereal beauty. Tulle, known for its lightweight and sheer nature, requires special attention to achieve clean and precise cuts.

Whether you’re creating a wedding gown, a ballerina-inspired dress, or adding tulle accents to an existing garment, mastering the art of cutting tulle is crucial for achieving a professional finish. In this article, we will guide you through the step-by-step process of how to cut tulle on a dress, sharing valuable tips and techniques to ensure accurate and seamless cuts.
From selecting the right tools to securing the fabric and achieving precise lines, this guide will equip you with the knowledge and skills to work confidently with tulle and create stunning, graceful garments.
Importance of Proper Tulle Cutting for Dressmaking
When it comes to making a beautiful dress, tulle is often an essential ingredient. It adds the perfect amount of texture and volume to any garment, giving it a unique flair. However, proper cutting technique is key for achieving the desired results when working with tulle. If done incorrectly, you risk ruining the entire dress – so it’s important to get it right! Here are some tips on how to cut tulle for dressmaking:
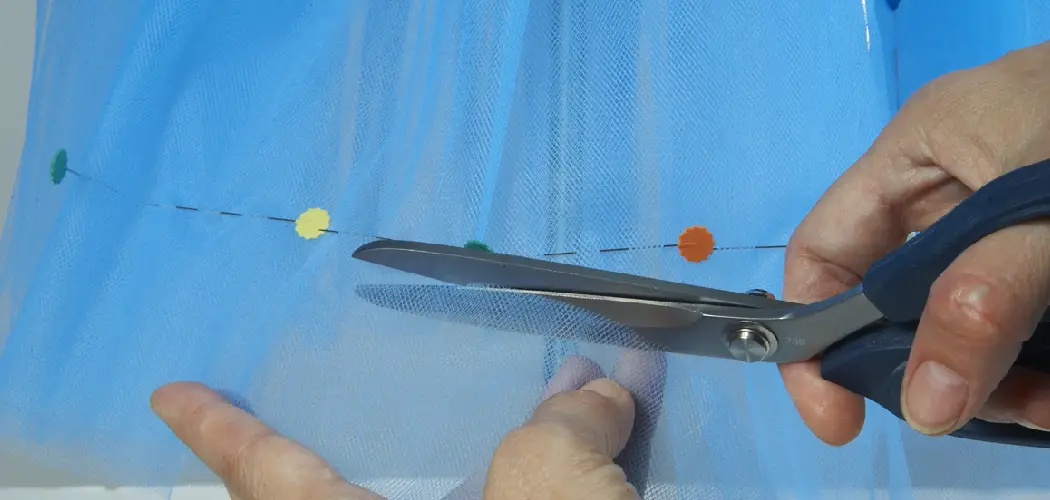
First things first, make sure that your scissors are sharp enough to cut through the delicate fabric easily. Dull blades will cause you more trouble than they’re worth – resulting in fraying edges and uneven cuts. Additionally, use your rotary cutter for long straight lines as it will give you a clean, sharp cut.
When cutting the tulle, be sure to mark your pattern onto the fabric before you start. This way, you’ll have a clear guide of where you should be cutting and how much tulle to remove. Make sure that your lines are straight and precise – this is essential for achieving symmetrical results! Also, when cutting curved edges, make small snips along the line rather than one long cut. This will help keep your curvature consistent throughout the piece.
Finally, as you work with the fabric make sure to pull gently on both sides so it doesn’t stretch or tear during the process. Tulle can be tricky to manage due its delicate nature, so be sure to take your time and handle with care.
Characteristics of Tulle Fabric

Tulle is a lightweight, sheer fabric typically made of silk, nylon, or rayon. It has an incredibly soft feel and resembles netting. This makes the fabric pliable and lightweight enough to be used in a variety of applications such as for gowns, veils, bridal appliques, tutus, wedding decorations and more.
It’s also very versatile — tulle comes in various colors and patterns to suit any project. Its airy texture can create interesting shapes when gathered or draped around the body, giving it a romantic look that’s perfect for special occasions.
First, it’s important to use the right type of scissors. You’ll need sharp fabric scissors specifically designed for cutting tulle fabric. These are usually smaller than regular scissors so that they can easily maneuver through the delicate material without snagging or tearing it.
Additionally, you may also want to have a pair of dressmaker’s shears — larger scissors designed for cutting thicker fabrics like denim — on hand in case you run into any trouble when trying to cut your tulle piece.
Once you have your tools ready, lay out the fabric and smooth out any wrinkles or bunches with your hands before getting started. Place pins along both edges of the section you’d like to cut and make sure they’re securely in place.
This will ensure that the fabric doesn’t shift when you begin to cut. Now, take your scissors and carefully start cutting along the edge of the pins. Make sure to keep a steady hand so that you don’t accidentally snip any areas of the tulle that aren’t meant to be cut.
10 Methods How to Cut Tulle on a Dress
Method 1: Choose the Perfect Tulle for Your Vision:
Begin your tulle-cutting journey by carefully selecting the ideal tulle for your dress project. Consider factors such as the desired drape, stiffness, transparency, texture, and color. Explore various tulle options, ranging from soft and flowing to crisp and structured, to find the one that best complements your design vision. Experiment with different tulle varieties, such as nylon, silk, or polyester, to achieve the desired effect.
Method 2: Prepare a Conducive Work Area:
Create a serene and organized work area that allows you to focus on the intricacies of cutting tulle. Clear a clean and spacious surface free from dust and debris. Lay out a large cutting mat or a smooth, non-slippery surface to provide stability and protection for both the tulle and your cutting tools. Keep your work area well-lit to ensure accurate visibility during the cutting process.
Method 3: Gather the Essential Tools:

Before you commence cutting, gather the necessary tools to ensure a smooth and efficient workflow. Sharp fabric scissors or shears specifically designed for delicate fabrics are essential for clean and precise cuts.
Additionally, have pins or pattern weights on hand to secure the tulle, a ruler or measuring tape for accurate measurements, and a fabric marker or chalk to mark cutting lines. These tools will help you achieve the desired precision and maintain control while cutting tulle.
Method 4: Ensure Secure Placement of the Tulle Fabric:
Before making any cuts, take precautions to secure the tulle fabric in place. To prevent shifting or distortion, pin the tulle at regular intervals along the edges, ensuring the pins are placed away from the cutting lines. Alternatively, use pattern weights to hold the tulle in position while cutting. This step is especially crucial when working with multiple layers of tulle or intricate patterns.
Method 5: Mark Cutting Lines with Clarity:
To guide your cutting process, use a ruler or measuring tape to mark cutting lines on the tulle. For straight cuts, draw a clear and straight line using a fabric marker or chalk. If you are cutting curved or intricate shapes, trace the pattern or template onto the tulle using a temporary fabric marker or chalk. Ensure that the markings are visible and easily removable after cutting.
Method 6: Employ Scissor Techniques with Finesse:
When cutting tulle, it is important to use sharp fabric scissors or shears to achieve clean edges. Hold the scissors at a slight angle to the fabric and make small, precise cuts rather than attempting long continuous cuts. This technique allows for better control and minimizes the risk of snagging or tearing the delicate tulle fabric.
Method 7: Cut Layers with Meticulous Attention:

If your dress design incorporates multiple layers of tulle, it is best to cut each layer separately. This approach ensures greater accuracy and control, allowing you to cut each layer according to the desired pattern or shape. Take your time aligning the layers during cutting to achieve seamless coordination and symmetry.
Method 8: Consider Seam Allowance for Flawless Construction:
When cutting tulle for garment construction, it is important to consider the required seam allowance. Add the necessary seam allowance to your cutting lines, ensuring that the tulle pieces are cut slightly larger than the final desired dimensions. This additional fabric allows for precise stitching, seam finishes, and adjustments during the construction process.
Method 9: Handle Bias Cuts with Special Care:
In certain dress designs, you may need to cut tulle on the bias to achieve the desired effect. Bias-cut tulle exhibits a graceful drape and fluidity, but it requires special care to avoid excessive stretching or distortion of the fabric. Pin or weigh down the fabric securely before cutting, making small, precise cuts along the bias to maintain the fabric’s integrity and shape.
Method 10: Explore Creative Cutting Techniques:
To infuse your dress with uniqueness and creativity, consider exploring unconventional cutting techniques with tulle. Experiment with asymmetrical cuts, layered ruffles, scalloped edges, or intricate shapes. Remember to sketch and plan your designs before executing the cuts, and embrace the freedom to innovate and express your artistic vision..
Things to Consider When Cutting Tulle on a Dress
1. Fabric Weight

Tulle is a lightweight fabric, so when cutting it for a dress, ensure you opt for the lightest weight available. This will help to give the dress movement and flow more easily without becoming too rigid.
2. Length
Measure carefully before cutting to make sure that the desired length of the skirt or dress is achieved. Consider where any ruffles, pleats or tiers may need to be placed in relation to each other when deciding on length.
3. Hemline
Cutting tulle can create frayed edges unless hemming is done properly first. If needed, use a zigzag stitch or pinking shears along the edges prior to cutting to prevent unraveling later on.
4. Finishing
Finally, choose a finishing method to complete the dress. For an elegant look, French seams work particularly well with tulle fabric as it conceals the seams and gives a neat finish. Alternatively, a baby hem can be used to give a delicate edge to the skirts of dresses.
Some Common Mistakes When Cutting Tulle on a Dress
When cutting tulle on a dress, it is important to not rush the process. Cutting too quickly can lead to mistakes that may be hard to correct and ruin the look of the dress. Here are some common mistakes people make when cutting tulle on a dress:
1. Failing to Use Quality Scissors

Quality scissors will ensure that you get a clean cut with no fraying or jagged edges. Avoid using dull or cheap scissors as they won’t give you an even, professional-looking finish.
2. Cutting Too Much Fabric
To avoid this mistake, measure twice and cut once! Be sure to double check your measurements before proceeding with the cut so you don’t have any regrets. Additionally, when cutting the fabric, it is best to do so one layer at a time. Don’t try to cut through all of the layers of tulle at once or else you could end up with an uneven length.
3. Not Cutting Along a Straight Edge
Tulle should be cut along a straight line that follows the grain of the fabric in order to ensure a smooth finish. If you don’t follow this rule, your edges will appear jagged and uneven. A ruler can come in handy here as it allows you to draw a guideline for your scissors before beginning the cut.
4. Making Uneven Cuts
Uneven cuts are one of the most common mistakes people make when cutting tulle. To avoid this, use the same motion for each cut and try to keep your scissors perpendicular to the fabric as much as possible. If you are having trouble keeping your cuts even, it may be helpful to draw a guideline on the fabric using a ruler before beginning.
By following these tips and avoiding common mistakes, you can ensure that your tulle will be cut perfectly! With a little bit of practice and patience, you can achieve professional-looking results.
Conclusion
With the right tools and a steady hand, cutting tulle on a dress doesn’t have to be an intimidating process. Following our easy step-by-step instructions will help you achieve the look you desire in no time! Investing in high quality tulle and fabric scissors is key to successful dressmaking, and for this job especially, the sharper the blades, the better the results.
Have faith in your own abilities and take care of your fabric intricately – just taking a few seconds longer while setting up can save you priceless hours in the long run. Now that you’ve been guided through how to cut tulle on a dress, grab your supplies and have some fun with fashion by getting creative and personalized with details like intricate layers or elaborate frills of tulle. So don’t hesitate – start cutting and watch as your beautiful creation comes alive!