
Are you looking to create a unique, flowing dress that will get noticed? Have you heard of cutting pieces on the bias and are curious how to do it yourself? Look no further! Cutting on the bias introduces movement into a garment by taking advantage of the natural stretchiness created by diagonal grain lines. With this technique, you can produce garments that hug your curves in all the right ways and give designs a more modern look.

Whether you’re a beginner or an experienced sewist, this guide will walk you through how to cut a dress on the bias, allowing you to create beautiful and unique garments with ease.
In this post, we’ll walk through each step necessary for cutting a dress on the bias so that you have everything needed for making sophisticated custom-fit clothing with ease.
What Will You Need?
First, you’ll need to gather all the necessary materials before starting. To cut a dress on the bias, you will need the following supplies:
- Fabric (preferably lightweight and drapey, such as silk or rayon)
- Dress pattern
- Scissors
- Pins
- Sewing machine and notions (thread, measuring tape, etc.)
Once you have all these supplies ready, let’s dive into the steps for cutting on the bias.
9 Easy Steps on How to Cut a Dress on the Bias
Step 1: Understand the Bias Grainline
The bias grainline is a diagonal line that runs at a 45-degree angle from the straight grain of the fabric. This line has more stretch and drape compared to the straight grain, making it perfect for creating garments with a flowing, elegant look. Additionally, cutting on the bias also prevents the fabric from fraying, as the diagonal grain is more robust.
Step 2: Prep Your Fabric
Before you begin cutting, you’ll need to prep your fabric. Make sure the fabric is well-ironed and smooth, as wrinkles can disrupt the accuracy of your cuts. Lay your fabric flat, preferably on a large cutting table or a clean floor space. Align your fabric so that the selvage edges are parallel to you. If your fabric has prints or patterns, consider their orientation when laying out the fabric.

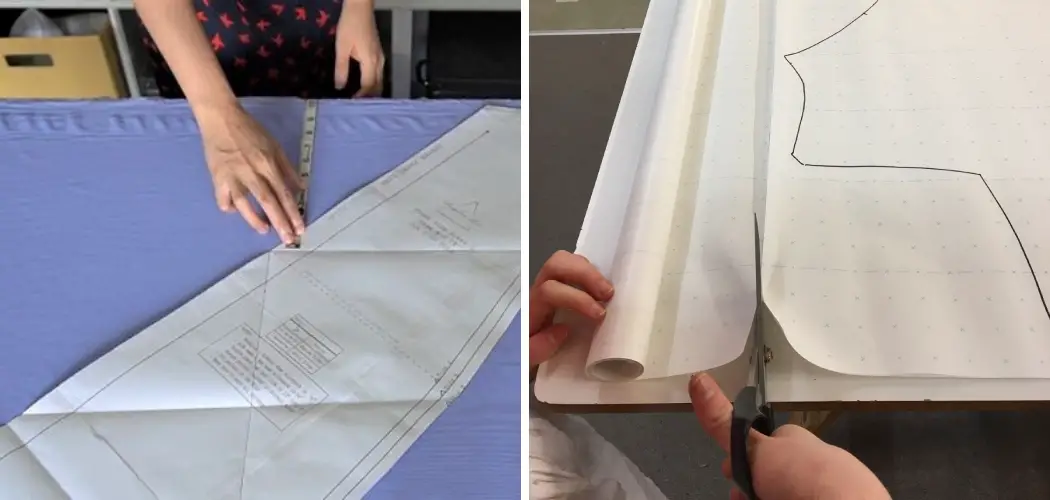
Step 3: Marking the Bias Grainline
Now that your fabric is prepped, it’s time to find and mark the bias grainline. First, take your ruler or measuring tape and measure the width of your fabric from selvage to selvage. Halfway across, make a small mark.
Then, from this middle point, draw a line at a 45-degree angle across the fabric – this is your bias grainline. You can use a fabric marker or chalk to choose a readily visible color against your fabric. This line will guide placing your pattern pieces and making your cuts.
Step 4: Position Your Pattern
With the bias grainline marked, you can now position your pattern. Lay your dress pattern pieces on the fabric so that their grainline markings align with the bias grainline you’ve observed. Be sure to leave space between each pattern piece for seam allowances.
Use your pins to secure the pattern pieces to the fabric. Ensure the pins run perpendicular to the pattern edge, allowing you to cut more accurately and safely. Check again to ensure everything is aligned correctly. Misalignment here could lead to a garment that doesn’t fit properly or hang right.
Step 5: Cut Your Pattern
Now that everything is in place, it’s time to begin cutting. Using a pair of sharp fabric scissors, carefully cut around each pattern piece, ensuring you’re cutting through both the pattern and the fabric. Remember to include your seam allowances in your cuts.
Ensure your cuts are clean and precise, as jagged or uneven edges can affect the fit and look of your dress. Once all pieces are cut, you can remove the pattern and pins. Remember that fabric cut on the bias can stretch and change shape easily, so handle your newly cut pieces with care.
Step 6: Sew Your Pattern Pieces Together
Now that your pattern pieces are cut, it’s time to assemble your dress. Begin by aligning your piece’s right sides together, ensuring the edges meet. Use pins to secure the pieces, placing them perpendicular to the edge to avoid disrupting the bias grainline. Next, using your sewing machine, stitch the pieces together according to your pattern instructions.

Remember to backstitch at the beginning and end of each seam to secure your stitches. Be gentle and patient in this process, as fabric cut on the bias can stretch easily. After each seam, press it open to maintain a smooth and flat appearance on your dress. Continue this process until all pieces of your dress are sewn together.
Step 7: Try on the Dress
After you have sewn all the pieces together, it’s time for the first fitting. Carefully try the dress, paying attention to how it fits and drapes on your body. Remember, clothes cut on the bias will hang differently than those cut on the straight grain. Look for any areas needing adjustments, like the bust, waist, or hip area. Move around a bit to see how the dress flows and stretches with your movements.
Step 8: Make Any Necessary Adjustments
After trying on the dress, some areas need some tweaking for a perfect fit. The waist needs to be taken in a little, or the bust area needs to be let out. Using your pins, mark the spots on the dress that need adjustments.
Take the dress off and make the necessary alterations, always remembering to sew slowly and carefully to maintain the integrity of the bias cut. After adjusting, try the dress on again to ensure you’re happy with the fit. If more adjustments are needed, repeat this process until you achieve the desired fit.
Step 9: Hem the Dress
Once you are satisfied with the fit of your dress, the next step is to hem it. Measure the desired length of your dress and mark it with a fabric marker or chalk. Then, fold the fabric at the marked line towards the wrong side of the dress and press it flat with an iron. This will create a clean edge for the hem.

Pin the folded fabric in place and sew along the edge with a straight stitch. Remember to remove the pins as you go along and backstitch at the seam’s beginning and end to secure your stitches. After sewing, press the hem again with your iron to give it a final, smooth finish.
By following these steps, you have a beautiful dress cut on the bias that fits and drapes perfectly.
5 Additional Tips and Tricks
- Always Use Sharp Shears: Cutting on the bias requires accurate and clean cuts. Ensure to always use a pair of sharp fabric scissors or shears for the best results.
- Handle With Care: The fabric cut on the bias is prone to stretching and distortion. Be mindful of this as you handle your pieces, especially when sewing.
- Consider Using a Rotary Cutter: For added precision, consider using a rotary cutter instead of scissors. This tool makes smooth, continuous cuts along your pattern pieces.
- Stay-stitching is Your Friend: To prevent your pieces from stretching out of shape, consider adding a line of stay-stitching along the edges of your pattern pieces before assembling your dress.
- Practice on a Less Expensive Fabric First: If this is your first time cutting on the bias, you should practice on a less expensive fabric before you cut into your chosen dress fabric. This will help you understand how the material behaves when cut on the bias and can help prevent costly mistakes.

With these tips and tricks, you can confidently cut a dress on the bias and create a stunning, custom-fit garment.
5 Things You Should Avoid
- Avoid Rushing: Cutting and sewing on the bias requires patience and precision. Rushing through the process may lead to inaccurate cuts and a poorly fitting dress.
- Pay Attention to Grainlines: It’s crucial to align your pattern pieces correctly with the bias grainline. Ignoring this can result in a garment that doesn’t hang or fit perfectly.
- Avoid Dull Scissors: Dull scissors can lead to jagged and uneven edges, which can affect the final look of your dress. Always ensure to use sharp cutting tools for clean and precise cuts.
- Be Sure to Complete the Fitting Process: Trying on the dress multiple times and making necessary adjustments is critical to achieving a perfect fit. Avoid the temptation to skip this critical step.
- Avoid Rough Handling: Fabrics cut on the bias can stretch easily. Rough handling, like pulling or tugging, can distort the shape of your pieces, so handle your fabric with care.

You can ensure a successful and beautiful bias-cut dress by avoiding these common mistakes.
5 Different Design Ideas
- Flowy Maxi Dress: Use a lightweight and flowy fabric like silk or chiffon to create a beautiful, full-length bias-cut dress. Add ruffles or layers for extra movement and elegance.
- Simple Slip Dress: For an effortless and chic look, consider making a slip dress on the bias using a smooth and silky fabric such as satin or charmeuse. This style is perfect for a night out or as a layering piece under a sheer dress.
- Wrap Dress: Create a flattering and versatile wrap dress by cutting the fabric on the bias at an angle to create diagonal stripes. This design will elongate your silhouette and add visual interest to your dress.
- Asymmetrical Hem Dress: Play with different hem lengths by cutting your dress on the bias at different angles. This will create an exciting and unique asymmetrical hemline.
- Color-blocked Dress: Cut your dress on the bias using two contrasting fabrics to create a bold color-blocked effect. This is a great way to add personality and creativity to your garment.
Experiment with these design ideas and have fun creating your custom bias-cut dress.
Conclusion
With these easy steps, you can confidently cut a dress on the bias with poise and accuracy. This technique is a valuable crafting skill that can create wonderfully unique pieces for your wardrobe or give an elegant twist to existing garments. As you practice this craft, you will amaze yourself with the gorgeous designs and shapes you can produce.
So, why wait? Don’t rush into the world of fabric manipulation and start experimenting immediately – who knows, before long, you could find yourself creating bespoke pieces for personal or professional use! As always, if this blog has been helpful to you, please share it with others using social media platforms, giving them access to the same knowledge.
We hope that this article on how to cut a dress on the bias was helpful in getting your creative juices flowing so happy making!