
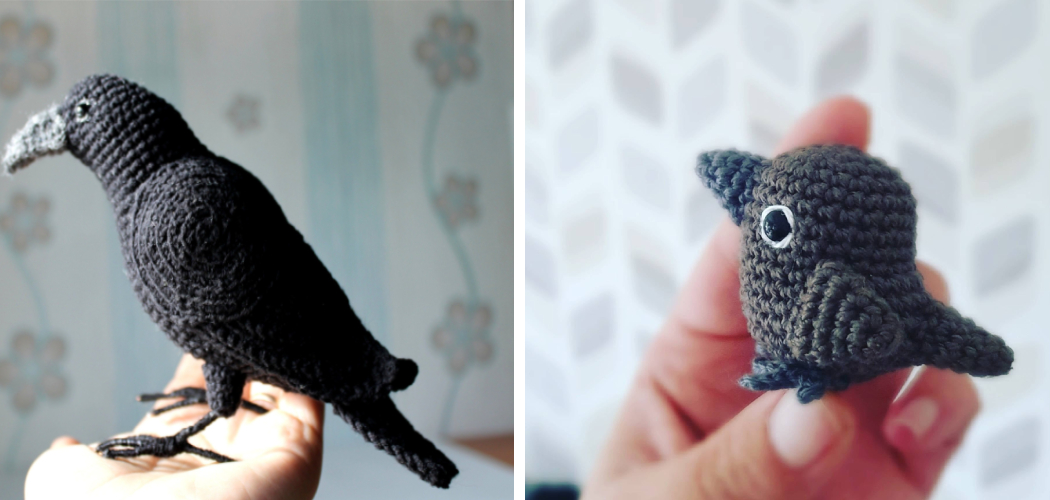
Do you have an interest in learning how to crochet a crocheted crow? If so, then you’ve come to the right place! Whether you’re a beginner or an expert, this blog post will help guide you through every step of the process.
With easy-to-follow instructions and tips on connecting stitches and working with yarn colors, we’ll make sure that making your own crocheted crow is easier than ever before.

Whether it’s for a crafty home project or as a gift for someone special, this post on how to crochet a crow will teach you everything needed to make your very own crocheted creation. So grab some hooks & yarns and let’s get started!
Why Do You Need to Crochet a Crow?
Crocheting a crow is a great way to create a unique and eye-catching decoration for your home or office. Whether you hang it up on the wall or use it as an ornament, crocheting crows will add a touch of character and charm to any space!
In addition, learning how to crochet can be a fun and relaxing activity. Not only will you be able to make something beautiful, but it will also give you a sense of accomplishment and pride since the finished product was entirely made by you!
What You’ll Need
Before starting your crocheted crow project, here are some items that you’ll need:
- A Crochet Hook (Size 5 or 6)
- Worsted Weight Yard (Choose two colors)
- Tapestry Needle
- Polyfill Stuffing
- Scissors
10 Step-by-step Guides on How to Crochet a Crow
Step 1: Create the Core Body
Start your project by creating a 6-stitch foundation chain. Once you have that, begin to single crochet along the chain until you reach the end (six stitches). Make sure to always start with two loops on your hook, and make sure each stitch is tight. Otherwise, your crow project won’t turn out the way you’d expect.

Step 2: Increase for the Wings
Once you’ve completed the core body, it’s time to increase stitches in order to create two wing sections. To do this, single crochet twice into each stitch until you reach the end of the row (12 stitches).
After completing that row, chain two and turn your work (you will now be crocheting in the opposite direction). Single crochet once into each stitch until you reach the last one, then double crochet twice into that last stitch. This will create a nice, rounded edge.
Step 3: Create the Head and Beak
Continue working in single crochet until you reach your fourth stitch from the end of the row (four stitches). This will be the center of your crocheted crow’s head. To make sure it remains in place, chain two and turn your work. Now, single crochet twice into the same stitch for the head, then single crochet once in each of the following two stitches.
For the beak, chain one and turn your work. Single crochet twice into that first stitch before continuing to single crochet until you reach the end of the row (four stitches).
Step 4: Join Both Sides Together
Once you’ve finished creating the head and beak, it’s time to join both sides of your crocheted crow together. To do this, start by folding your work in half so that the bottom edges line up. Then, insert your hook into both of the corresponding stitches on each side before making a slip stitch to join them together.
Step 5: Add the Wings
Now that you’ve joined both sides of your crocheted crow together, it’s time to add wings. To do this, chain one and then single crochet twice into the first stitch (right by the beak). Repeat this until you’ve reached the end of the row (12 stitches).
Once you’ve reached the end of the row, chain two and turn in your work. Single crochet once in each stitch until you reach the last one, then double crochet twice into it to create a nice rounded edge.

Step 6: Add eyes & other details
To make your crocheted crow really come to life, use black yarn to embroider two eyes onto the head and beak. You can also add other details, such as a small tuft of feathers or even some wings if you’d like. It’s up to you! This is also a great time to add some more personality to your crocheted crow. It might be a good idea to experiment with different yarns and colors to give your crow its own unique look.
Step 7: Create the Tail
To create your crocheted crow’s tail, chain four at the end of the row (which should be opposite of where the wings are). Then, single crochet twice into each stitch until you reach the end of the chain (eight stitches).
After that, chain one and turn your work. Single crochet once in each stitch across the row before connecting both sides of your crocheted crow’s tail together using a slip stitch.
Step 8: Crochet Feet
For the feet, chain four at the other end of the row (which should be opposite of where the wings are). Then, single crochet twice into each stitch until you reach the end of the chain (eight stitches).
After that, chain one and turn your work. Single crochet once in each stitch across the row before connecting both sides together using a slip stitch.
Step 9: Fill and Close the Crow
Once you’ve finished creating your crocheted crow, it’s time to fill it with stuffing. To do this, carefully stuff the body as evenly as possible before closing up with a slip stitch. But be sure not to overfill it!
After that, use an invisible stitch or slip stitch to join the edges of the wings together. This will give your crocheted crow a realistic look.
Step 10: Sew in Remaining Yarns
Once you’ve finished filling your crocheted crow, it’s time to sew in any remaining yarns. To do this, simply cut off the excess yarn and use a tapestry needle to weave in the loose ends. Always make sure to make your stitches tight and secure, otherwise, they may come undone in the future.

Following these ten simple steps on how to crochet a crow, you’ll be able to make your very own crocheted crow in no time. With a little bit of patience and practice, you can create something unique and beautiful that you’ll be proud to show off! Good luck, and happy crocheting!
Do You Need to Get Support From a Professional?
If you run into any trouble while attempting to crochet a crow, you can reach out to a professional for help. There are many online tutorials and classes available, which will guide you through the crocheting process step-by-step. Additionally, there are even videos that demonstrate how to properly make crows so that they look their best!
Crocheting can be a great way to relax and express your creativity. With the right guidance, you’ll be able to make beautiful projects that will last for years to come!
Frequently Asked Questions
Q: What Kind of Materials Do I Need to Crochet a Crow?
A: You’ll need a crochet hook (size 5 or 6), worsted-weight yarn (in two colors), tapestry needle, polyfill stuffing, and scissors. It’s also helpful to have a stitch marker handy. But these are all items that can easily be found online or in a craft store.

Q: How Long Does It Take to Crochet a Crow?
A: Depending on your experience level and the size of your crow, it can take anywhere from 45 minutes to several hours. As you get more comfortable with the technique, you’ll be able to work faster and create crows in no time!
Q: How Do I Make My Crow Look More Realistic?
A: You can add details such as feathers, wings, and eyes to make your crow look more realistic. Additionally, you may also want to consider using two colors of yarn for the body or adding texture through different stitches. Experiment with different techniques until you find what works best for you!
Q: What Else Can I Crochet Using This Technique?
A: You can use the same technique to make a variety of birds including owls, eagles, and parrots. Additionally, you could also use it to create animals such as cats, dogs, or even dragons! The possibilities are endless – just let your creativity take over!
Conclusion
Today, you have all the knowledge and tools you need to successfully crochet a beautiful crow. Once you complete this project, you can proudly display it for your friends and family to enjoy. Don’t forget to explore your creativity with different colors and patterns throughout the process.
Crocheting is a fun activity you can do in your spare time, so why not give it a try? Take pride in your handmade work of art when it is done, and you may even discover that crocheting has become one of your hobbies. The possibilities are endless so express yourself through your creative endeavor. Now hop on those crocheting needles and let’s get started! Thanks for reading this article on how to crochet a crow.