
Have you ever looked up at a lamp in your home and thought, “That shade is looking a bit drab and faded. I wish there was an easy way to update it!”? Well, fear no more – covering your old lampshade frame is a simple, budget-friendly way to refresh the look of your lighting.

Whether your style leans a modern farmhouse or boho chic, repurposing a tired shade is a creative project you can accomplish in just an afternoon. There are so many textile options available that will make your lamp feel like a whole new design element in the room.
In this post on how to cover lampshade frame, I’ll walk through various lampshade cover materials to consider, as well as tips and tricks for measuring, cutting, and attaching the fabric to achieve a polished DIY transformation. By the time you finish, that old lamp will be given new life and you’ll be loving how it ties the whole space together. Let’s get started!
What is a Lampshade?
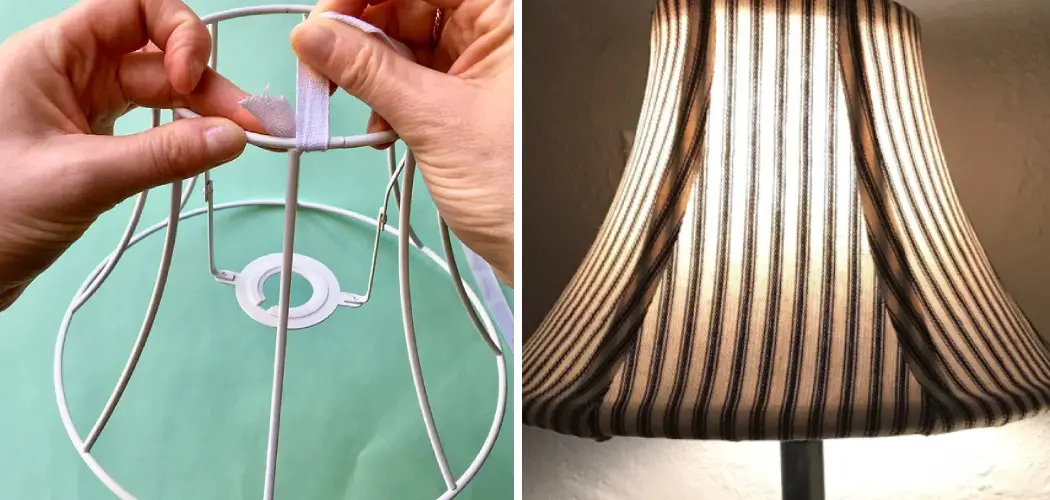
Just to make sure we’re all on the same page, a lampshade is a cover that diffuses and directs light from a bulb, typically attached to a base by a harp (a shade holder with two small clips) or other hardware. The frame of the shade can be made from metal, plastic, or paper and may have ribs or spokes for support.
Lampshades come in all shapes and sizes, from the classic drum and empire to more whimsical hexagon or oval options. The type of frame you have will dictate any limitations on what fabrics can be used, as well as how much fabric is needed.
Needed Materials
Given that the main material used to cover lampshade frames is fabric, this is a great opportunity to repurpose old sheets or tablecloths. If you’re purchasing new fabric, make sure you have enough for the size and shape of your shade. Here are the materials needed:

- Lampshade Frame
- Fabric of Choice (at Least 1/2 Yard)
- Scissors or Rotary Cutter and Mat
- Ruler or Measuring Tape
- Fabric Glue or Spray Adhesive, Double-sided Tape, or Hot Glue Gun
- Clips to Hold Fabric in Place (Clothespins or Binder Clips)
- Tracing Paper and Water Soluble Marking Pen
- Iron and Ironing Board
11 Step-by-step Guidelines on How to Cover Lampshade Frame
Step 1: Gather Materials
Assemble all the materials listed above and find a clean, flat workspace to spread them out. You may want to lay down a drop cloth or old sheet to protect your surface from any glue or adhesive spills. But make sure you have enough space to spread out your fabric and work comfortably. It’s also helpful to have a lampshade base nearby, as you’ll want to periodically test the fit and look of your cover while working.
Step 2: Measure Your Lampshade
First things first – let’s make sure we know the measurements of the shade we’re covering. Using a measuring tape or ruler, determine the height and circumference (distance around) of your shade. If you’re working with a hexagon or oval shade, measure the width and length at the widest points. Add 1 inch to both height and circumference measurements to account for seam allowance and allow room for attaching fabric.
Step 3: Trace Your Pattern
Using tracing paper and a water-soluble pen, trace your lampshade’s pattern onto the paper. Make sure to mark the top and bottom edges of the shade, as well as any points where the frame curves or changes direction.

If your pattern is too large for one sheet of paper, tape additional sheets together until you have a complete tracing. You can also use a rotary cutter and mat to lay out the fabric, trace your pattern directly onto it, and cut the fabric at once.
Step 4: Cut Out Fabric
Place your tracing paper on top of your chosen fabric and pin or weigh it down with something heavy like books or cans. Use scissors or a rotary cutter to cut along the traced lines, adding an extra 1 inch to all edges for seam allowance. Remove the paper and set aside. But keep your fabric in place – you’ll need it for the next step!
Step 5: Attach Fabric to Lampshade
Now we’re ready to bring our shade and fabric together! Starting at one end, apply a thin layer of glue or adhesive along the edge of the lampshade frame. Roll the shade onto the fabric, making sure that any seams or edges line up neatly.
You can use clips to hold the fabric in place while drying, or carefully press and smooth out any wrinkles or bubbles with your hands. If you’re using a hot glue gun, make sure to work quickly as the glue dries fast.
Step 6: Fold Over Edges
Once the fabric is attached along one edge, start wrapping it around the shade, attaching it with glue or adhesive as you go. When you reach the end of your fabric, fold over the raw edge and secure it in place with glue. You may need to trim any excess fabric at this point if it hangs too far below the bottom of your shade.
Step 7: Trim Excess Fabric
Now that one side is secured, move to the opposite side and repeat the process, rolling the shade as you work. You may need to trim the excess fabric at the top or bottom of your shade if it bunches up or overlaps too much. Make sure any folds or seams are neat and straight before securing with glue. However, if you do end up with some extra fabric or seams that aren’t perfect, don’t worry – we’ll cover those up in the next step.

Step 8: Finish the Top and Bottom Edges
Once your fabric is attached to both sides of the shade, you can return to the top and bottom edges. Fold over any raw edges, trim them to fit if needed, and secure them with glue. If you’re using a double-sided tape or spray adhesive, make sure to apply it carefully and evenly so that the fabric is smooth and flat. It may be helpful to use a ruler or flat edge to press down and smooth out any wrinkles.
Step 9: Add Trim (Optional)
If you want to add some extra flair to your lampshade, consider adding trim such as ribbon, lace, or pom-poms. You can attach the trim with glue or a hot glue gun along the edges of the shade or create a decorative pattern. Just make sure to measure and cut the trim carefully before attaching it. Although trim is optional, it can hide any imperfections and give your lampshade a more finished look.
Step 10: Allow Time to Dry
Depending on the type of adhesive you use, your lampshade may need some time to dry completely. Make sure not to move or handle the shade too much while it’s drying, as this can cause wrinkles or shifts in the fabric. If needed, use clips or clothespins to keep the fabric in place until it’s fully dry and secure.
Step 11: Test Fit on Lampshade Base
Before putting your lampshade back on its base, make sure to test the fit and look of your new cover. Adjust any folds or seams if needed, and trim off any loose threads or excess fabric. Once you’re happy with the final product, place your lampshade back on its base and enjoy the new look of your refreshed decor!

And remember – if you ever want to change up your lampshade again, now you know how to cover it with ease using these simple steps.
Following these guidelines on how to cover lampshade frame, you can cover any lampshade frame and create a custom look that perfectly complements your decor. So why not give it a try and see how easy and fun it is to transform your old or plain lampshades into unique pieces of home decor? Get creative with different fabrics, trims, and patterns to make your lampshades truly one-of-a-kind!
Do You Need to Use Professionals?
Covering a lampshade frame is a simple DIY project that can be easily completed at home with the right materials and tools. However, if you are not confident in your crafting skills or don’t have the time to do it yourself, there are professionals who offer services for covering lampshade frames. They have the expertise and experience to create a perfectly fitted cover for your shade and may also have a wider range of fabric options to choose from.
Ultimately, it depends on your personal preference and budget whether or not you decide to work with a professional for this project. So, make sure to evaluate your options before making a decision. Whether you choose to DIY or seek professional help, the result will be a beautifully covered lampshade that adds character and charm to any room. So go ahead and give it a try! Happy crafting!
Frequently Asked Questions
Q1: What Type of Fabric Should I Use to Cover a Lampshade Frame?
A1: Any lightweight and flexible fabric will work, such as cotton, silk, or linen. However, it’s best to avoid fabrics that are too thick or heavy as they can be difficult to wrap around the frame and may not allow enough light to pass through.

Q2: Can I Use a Different Adhesive Besides Glue?
A2: Yes, you can use adhesive spray or double-sided tape as an alternative to glue. Just make sure to apply it carefully and evenly for best results.
Q3: How Do I Cover a Lampshade with Trim?
A3: To add trim to your lampshade, simply attach it along the edges or create a decorative pattern with it. Make sure to measure and cut the trim carefully before attaching it with glue or a hot glue gun.
Q4: Do I Need to Remove the Old Fabric from My Lampshade?
A4: It’s recommended to remove any old fabric from your lampshade before covering it with a new one. This will ensure a smooth and clean surface for your new fabric to adhere to. It’s also a good idea to clean the frame before starting the covering process.
Conclusion
Finally, if you want to make sure your lampshade is unique and fully customized to your liking, you may want to consider covering the frame yourself. With a few basic crafting supplies and the helpful instructions provided above – you’ll have that beautiful, custom-made shade made in no time! And don’t forget, if you’re at all stuck along the way or just need a bit of extra help – there are tons of how-to videos available online that can assist!
So go ahead and take the plunge – who knows; you could be part of a new trend of do-it-yourself lampshade makers! It’s only up to you. Good luck with creating that perfect shade for your space! Thanks for reading this article on how to cover lampshade frame.