
Are you looking for an easy and efficient way to clean your Cricut Matts? Keeping your mats in good condition is essential for obtaining the highest quality results. Whether you’re a DIYer, crafter, or pro vinyl cutter – having clean mats is critical!

Cricut mats are designed to have a sticky surface, which can attract dust particles and debris. Over time, this build-up can cause your projects to slip or become damaged. However, with regular cleaning and proper maintenance, you can extend the life of your Cricut Matts and save yourself from having to purchase new ones.
Here’s a step-by-step guide on how to clean cricut matts so that they last longer and get the job done right. Let’s get started with some useful tips and tricks on cleaning cricut mats!
Why Clean Your Cricut Matts?
Apart from keeping your projects in pristine condition, there are a few other benefits to cleaning your Cricut Matts regularly.
- Enhanced Adhesive: By removing the build-up of dust and debris, you can restore the sticky surface of your mats, making them more adhesive for your materials.
- Better Results: Having a clean mat ensures that your project stays firmly in place during the cutting process, resulting in more precise and clean cuts.
- Cost-effective: Regular cleaning can prolong the life of your Cricut Matts, saving you money in the long run as you won’t need to replace them as often.
These are just a few reasons why it’s essential to maintain the cleanliness of your Cricut Matts. Now, let’s move on to the steps you can follow to keep your mats in tip-top shape!
What You’ll Need
Before we jump into the cleaning process, here are a few supplies you’ll need to have on hand:
- Lukewarm water
- Mild dish soap or baby shampoo
- Soft-bristled brush or sponge
- Lint roller or adhesive remover (optional)
Once you have these items, you can start cleaning your Cricut Matts.
10 Easy Steps on How to Clean Cricut Matts
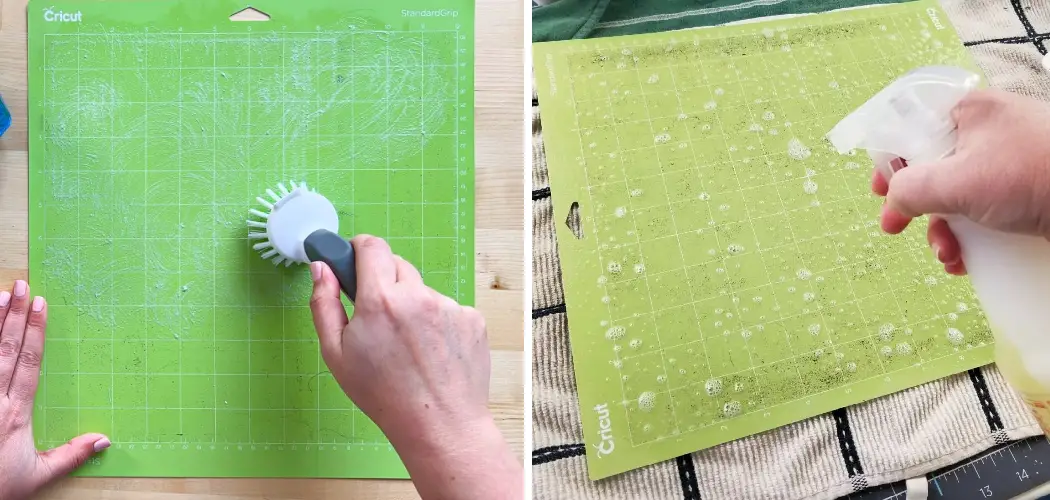
Step 1: Remove Debris
Start using a lint roller or masking tape to remove large debris and particles from your mat. This will make the washing process easier by reducing the amount of accumulated dust and dirt. Gently roll or press the tape across the entirety of the Cricut mat, ensuring you cover every inch. This step is crucial, as it helps preserve the mat’s stickiness while preparing it for a deeper clean.

Step 2: Apply Soapy Water
After removing the loose debris, it’s time to thoroughly wash your mat. Prepare a solution of lukewarm water and a few drops of mild dish soap or baby shampoo. Dampen your soft-bristled brush or sponge in the solution. Gently scrub the mat’s adhesive side, ensuring you cover all areas.
Be careful not to soak the mat thoroughly – a little moisture goes a long way! This step aids in dislodging any stubborn particles and restoring the mat’s adhesive properties.
Step 3: Rinse and Dry
Once you’ve scrubbed the mat thoroughly, it’s time to rinse it off. Hold the mat under lukewarm running water, ensuring to wash away all the soap. It’s important to use lukewarm water, as too hot or too cold water can damage the mat’s adhesive layer.
After rinsing, use a clean towel to pat the mat dry. Do not rub the mat, as it can damage the adhesive. Lastly, leave your mat to air dry completely before using it again. This step is crucial because any remaining moisture can affect the mat’s stickiness and the quality of your projects.
Step 4: Restore Stickiness
Once your mat is completely dry, it’s time to restore its stickiness. You can achieve this by applying a thin layer of adhesive restorer, which can be purchased from a craft store. Remember to apply it uniformly across the surface, ensuring even coverage.
Once used, allow it to sit for about 20-30 minutes or until it is scorched. After this, your mat should feel sticky, and ready for your next project. This step is vital, as it helps to restore the mat’s original adhesive properties, ensuring your materials stick well during the cutting process.
Step 5: Add Extra Adhesive (Optional)
If you feel that the adhesive restorer did not provide enough stickiness, you can add extra adhesive. To do this, use a spray adhesive or a repositionable glue. Spray evenly from top to bottom or apply the glue using an old credit card in sweeping motions across the mat’s surface. After applying, wait for 10-15 minutes to allow the adhesive to dry before using it.

Step 6: Store Correctly
Storing your Cricut mats properly after each use and cleaning can also contribute to longevity. Always keep them in a cool, dry place away from direct sunlight, as exposure to heat and light can affect the adhesive’s effectiveness. Cover the adhesive side with the original clear plastic cover that came with the mat or use a mat cover to prevent dust accumulation.
Lay the mat flat or hang it by the top hole to avoid bending or warping. Proper storage maintains the mat’s condition and keeps it ready for your next project.
Step 7: Regular Maintenance
To ensure the longevity of your Cricut mats, it’s encouraged to establish a regular cleaning routine. Depending on how frequently you use your mats, you should conduct a thorough cleaning once a week or every other week. In between major cleanings, use a scraper tool or an old credit card to remove residual material after each project.
Regular maintenance keeps your mats in the best possible condition and always ready for your next crafting adventure. Regular cleaning also reduces the chance of any damage to your projects, ensuring precision and quality in every cut.
Step 8: Reevaluate Your Mat’s Condition
After following steps 1 to 7, it is a good idea to stop and assess the condition of your mat. Check the adhesive quality by pressing a small material onto the mat. If it sticks well, then your mat is in good shape, and you can continue with your projects. However, if the material does not adhere properly, you may need to repeat the cleaning process or consider replacing your mat.
Remember, working with a mat that no longer holds materials properly could lead to inaccurate cuts and potentially ruin your projects. Be sure to replace your Cricut mat when necessary to ensure the best results.
Step 9: Keep in Mind the Type of Mat
Different types of Cricut mats are designed for other materials; hence, the cleaning methods and frequency may vary slightly. For example, a fabric mat may require more frequent cleaning than a standard grip mat.
Similarly, if you use a firm grip mat for heavy-duty materials, you may need a more potent adhesive remover or restorer. Always ensure you understand the recommendations for your specific mat type to keep it in the best condition for the longest time.
Step 10: Enjoy Your Revitalized Mat
Congratulations! You’ve now successfully cleaned and restored your Cricut mat, extending its life and ensuring it’s ready for many more creative projects. Remember, a well-maintained mat is critical to achieving precise cuts and impeccable designs. So, keep up with your cleaning routine and enjoy your revitalized Cricut mat’s enhanced efficiency and effectiveness. Happy crafting!
By following these simple steps, you can easily clean and maintain your Cricut mats, ensuring they stay in top condition for all your crafting needs. Remember always to use the appropriate tools and cleaning agents for your specific mat type and regularly assess its condition to ensure the best results.

5 Additional Tips and Tricks
- Use a Plastic Scraper: A plastic scraper is a handy tool for removing stuck-on materials. Gently scrape off excess debris without applying too much pressure to prevent damage to the mat.
- Avoid Harsh Cleaning Agents: Strong cleaning agents can harm the adhesive on the Cricut mat. Instead, use mild soap, water, or a specialized Cricut mat cleaner.
- Air Dry: Allow your Cricut mats to air dry entirely after cleaning. Do not use a heat source to speed up the process, as it may warp the mat.
- Resty Your Mat: If your Cricut mat has lost its stickiness after cleaning, you can use a repositionable adhesive spray to regain it.
- Regular Cleaning: To maintain the longevity of your Cricut mats, ensure to clean them regularly. Frequent light cleaning is better than infrequent heavy cleaning.
With these additional tips and tricks, you can keep your Cricut mats clean and in perfect condition for all your crafting needs.
5 Things You Should Avoid

- Avoid Using Sharp Instruments: Do not use sharp instruments like a metal scraper or knife to clean your Cricut mat, as these can cause serious damage to the adhesive surface.
- Avoid Soaking the Mat: Do not wash your Cricut mat in water or any other liquid. This could affect the adhesive on the mat, making it less sticky and effective.
- Avoid Abrasive Cleaning Pads: Do not use brushes to clean your mat. These can scratch the surface and affect the mat’s stickiness.
- Avoid Direct Sunlight: After cleaning your mat, avoid leaving it to dry in direct sunlight. Extended exposure to sunlight can cause the mat to warp.
- Avoid Using Oil-based Products: Oil-based products can break down the adhesive on the mat. Stick to using mild soap and water or a specialized Cricut mat cleaner for the best results.
By avoiding these common pitfalls, you can ensure that your Cricut mats stay in top condition and provide the best results for all your crafting projects.
Can You Use Alcohol Wipes to Clean Cricut Mat?
Alcohol wipes can effectively remove debris and dirt from Cricut mats, but they should be used cautiously. Alcohol can be harsh on the adhesive and may cause it to break down over time. If using alcohol wipes, use them sparingly and follow up with a light cleaning using mild soap and water. It is always best to stick to recommended cleaning methods to avoid damaging your Cricut mat.

Additionally, keep in mind that the type of Cricut mat you have may also determine the effectiveness of alcohol wipes. Some mats have a stronger adhesive than others, so it is essential to test on a small area before using them on the entire mat. Always use caution when trying new cleaning methods to prevent unwanted damage or wear and tear on your valuable Cricut mats.
How Often Should Mats Be Cleaned?
The frequency of cleaning your Cricut mats depends on how often you use them. If you are a frequent user, cleaning your mats every 4-6 uses or as needed is recommended. However, if you only use your mats occasionally, regular light cleaning can be done every few months to maintain their longevity and effectiveness.
It is essential to keep an eye on the condition of your mats and clean them as needed to ensure they provide optimal results for all your crafting projects.By following these additional tips and tricks, avoiding common mistakes, and using recommended cleaning methods, you can keep your Cricut mats in top condition and ready for all your crafting needs.

Conclusion
In conclusion, there is no “one size fits all” way of cleaning your Cricut matts. However, by following the simple steps of removing dirt and debris from your matts with either water or a lint roller and then utilizing air dry or warm towel drying techniques, you can ensure that the delicate vinyl on your Cricut mats is properly taken care of so that you get the best results for any future craft projects.
Hopefully, the article on how to clean cricut matts has provided helpful tips and tricks to keep your mats in pristine condition. Remember, everyone has different needs when caring for their Cricut matts, so take time when selecting a cleaning method to suit those needs best.
And finally, don’t forget to always consult the Cricut user manual for additional tips on cleaning and maintaining these precious crafting tools properly. Start cleaning your Cricut mat today and show off your newfound crafting skills tomorrow!