
If you are a fan of knitting, you know that double pointed needles (DPNs) are indispensable when knitting small, circular projects like hats, mittens, socks, or gloves. However, cast-on stitches may feel a little bit intimidating, especially for beginners. Worry not! In this blog post, we will go through the step-by-step process of how to cast on double pointed needles. By the end of this guide, you will be well-equipped to confidently start your next DPN knitting project.

Can You Cast on Double Pointed Needles?
Yes, you can cast on double pointed needles! While many knitters may use circular needles for larger projects, double pointed needles are great for smaller items like socks or mittens.
Casting on with double pointed needles is a bit different than with straight needles, but with a little practice, it becomes quite easy. The key is to keep your stitches evenly spaced on all four or five needles, which can take some getting used to. But once you’ve cast on, you can seamlessly start working in the round and create cozy, handmade items. So don’t be afraid to give double pointed needles a try!

Why Should You Cast on Double Pointed Needles?
Double pointed needles might seem daunting to some, but they offer many benefits to knitters. They can be used for small circumference projects such as socks and gloves and provide flexibility and ease in creating intricate designs and patterns. Unlike circular needles, there are no cords to fuss with, allowing you to focus solely on your knitting.
Additionally, double pointed needles can often result in a more polished and professional finish to your projects. While it may take some practice to get accustomed to using them, once you do, you’ll find that double pointed needles are a valuable tool for any knitting enthusiast.
How to Cast on Double Pointed Needles: A Comprehensive Guide
Step 1: Gather Your Materials
The first step to casting on double pointed needles is gathering all the materials you need for the project. You will need your DPNs, yarn, and a tapestry needle. Ensure that your DPNs are the same size as the yarn you chose for your project. Otherwise, you may have either too tight or loose stitches that will not match your pattern.
Step 2: Make a Slip Knot
Once you have gathered all the materials you need for your project, make a slip knot at the end of your yarn. To do so, form a loop with your yarn and pass it over your thumb, then pass a strand of yarn behind the loop and bring it to the front, pulling it through the loop. Tighten the knot by pulling both ends of the yarn. Ensure the slip knot is not too tight or loose, just enough to fit onto your DPN.
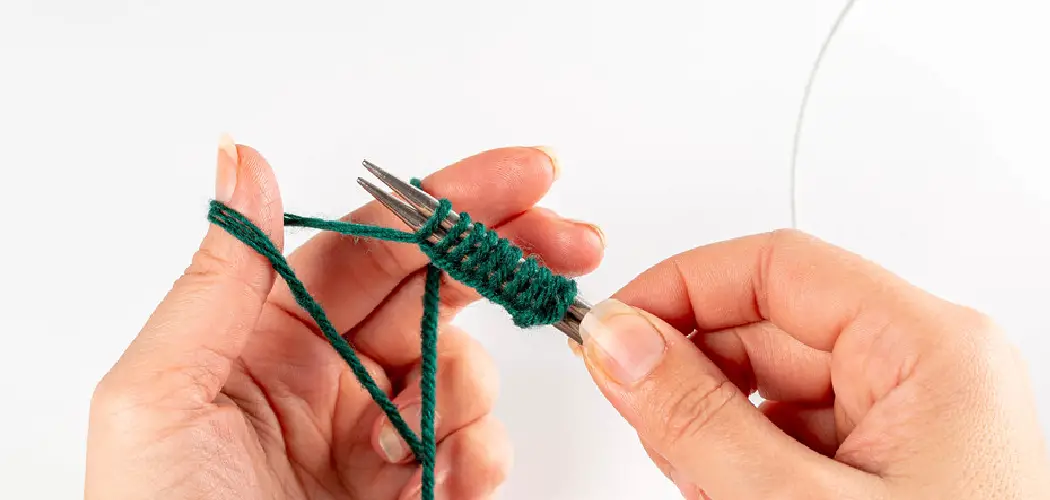
Step 3: Start Casting On
Now that you have made your slip knot, it is time to start casting on your stitches. Hold your DPN with the slip knot on it, and hold it in your right hand. With your left hand, hold the yarn, leaving a 5 to 6-inch tail. Take the DPN on the right, insert it into the slip knot, and wrap the yarn around it. Pull it through the slip knot, forming a stitch. Repeat this process until you have the required number of stitches as outlined in your pattern. Don’t worry if your stitches appear uneven or too tight; just make sure they are not too loose.

Step 4: Join in the Round
Once you have the desired number of stitches, you can join the round. Be careful not to twist your stitches. Take your fourth needle and insert it into the first stitch of your cast-on row. Hold your cast-on stitches in your left hand, and with your right-hand needle, knit the first stitch using the working yarn attached to your ball of yarn. This is where you will start knitting in the round.
Your stitches should now be arranged in a circle.
Step 5: Start Knitting
With your stitches joined in the round, it is time to start knitting. Hold the working yarn in your right hand and use your left-hand needle to guide the stitches onto your DPNs as you knit. Ensure each stitch is snug but not too tight on the needles. Continue knitting in the round until you have completed the first round.
Step 6: Mark Your First Stitch
To help keep track of your rounds, placing a stitch marker on the first stitch of your cast-on row is helpful. You can use a commercial stitch marker or make one yourself with a piece of yarn or scrap fabric. This will help you stay organized and know when you have completed one full round.

Step 7: Continue Knitting
Now that you have successfully cast on your stitches and joined in the round continue knitting following your desired pattern. Be mindful of your tension as you knit to ensure even, consistent stitches. With practice, casting on double pointed needles will become second nature, and you’ll be able to tackle all kinds of projects with ease.
That’s it! You’ve now learned how to cast on double pointed needles in just seven simple steps. Remember to gather your materials, make a slip knot, start casting on, join in the round, start knitting, mark your first stitch, and continue knitting until you have completed your desired project.
5 Considerations Things When You Need to Cast on Double Pointed Needles
1. Needle Size
When selecting double pointed needles for your project, it is important to choose the right needle size. You should always use a needle size that is recommended for the type of yarn you are using. This will ensure that your stitches are even and your fabric has the right drape or elasticity.
Additionally, using a larger needle than recommended can result in loose stitches, leading to puckering or gaps in your fabric.
2. Length
The length of the double pointed needles you choose will depend on the type of project you are working on. If you are knitting a hat or mittens, then shorter needles are usually best as they will be easier to maneuver around small circumference projects. For larger projects such as sweaters or afghans, longer needles may be necessary to accommodate more stitches at once.
3. Material
Double pointed needles come in various materials, including bamboo, metal, and plastic. Each material has its own unique properties, which can affect how your project turns out. Bamboo needles tend to be lightweight and warm to the touch, while metal needles provide excellent stitch definition and durability. Plastic needles are often less expensive than other materials but may not be as durable over time.
4. Point Shape
The shape of the point on double pointed needles can also affect how easy it is to work with them and how well they hold onto stitches when knitting in the round. Sharp points make it easier to pick up stitches and knit without slipping off, while blunt points can help keep delicate yarns from splitting or fraying while knitting with them. It is generally best to experiment with different types of points until you find one that works best for your particular project and technique preferences.
5. Number of Needles
Finally, when selecting double pointed needles, it is important to consider how many you need for your project. Generally speaking, most projects require four or five double-pointed needles depending on their size and complexity level; however, some projects may require more if they have an increased number of stitches per round or if they involve intricate patterns such as cables or lace work which require additional support from extra sets of double pointed needles.
Some Common Mistakes People Make When Trying to Cast on Double Pointed Needles
Casting on double pointed needles is a technique that is often used in knitting. It can be a bit tricky, especially for beginners, and mistakes can happen. One of the most common mistakes people make is casting on too tight. This can cause frustration and difficulty as you try to knit your first few rows. Another mistake is not properly dividing the stitches evenly between the needles.

This can result in an unbalanced stitch count and uneven knitting. Additionally, not keeping track of which needle you started on can lead to confusion and mistakes down the line. However, with practice and patience, these mistakes can be avoided, and casting on double pointed needles can become a breeze.
Conclusion
In conclusion, casting on double pointed needles doesn’t have to be a daunting task. With some practice and patience, anyone can master this technique. The key is to take your time and don’t worry if you make a mistake. Just keep practicing, and eventually, it will become second nature.
Once you have perfected the art of casting on double pointed needles, you will be able to tackle any small, circular knitting project with ease, from hats to socks and everything in between! Thanks for reading our post about how to cast on double pointed needles.