
Do you want to give your garden a one-of-a-kind look and add more life to it? Then it’s time for you to let your imagination run wild and age some terracotta pots with baking soda! Terracotta pots are often seen as plain or boring, but they don’t have to stay that way. With just a little bit of effort, you can transform them into beautiful aged pieces that will turn heads in any garden. A personalized touch puts the finishing touches on any yard!

Plus, this easy process won’t cost a lot – all you need is baking soda and standard craft supplies like paint brushes and sponges. Follow along as we walk through the step by step instructions on how to age terracotta pots with baking soda today!
What is Baking Soda?
Before we get into the details of how to age terracotta pots with baking soda, let’s understand what it actually is. Baking soda, also known as sodium bicarbonate, is a chemical compound that has been used for centuries in cooking and cleaning.
It’s an all-purpose household staple that can be found in almost every kitchen pantry. However, baking soda also has several other uses, including as an effective and environmentally friendly way to clean and deodorize.
Needed Materials
Given that this is a simple and fun project, the materials you need are very basic. Most of them can be found in your kitchen or at a local craft store.
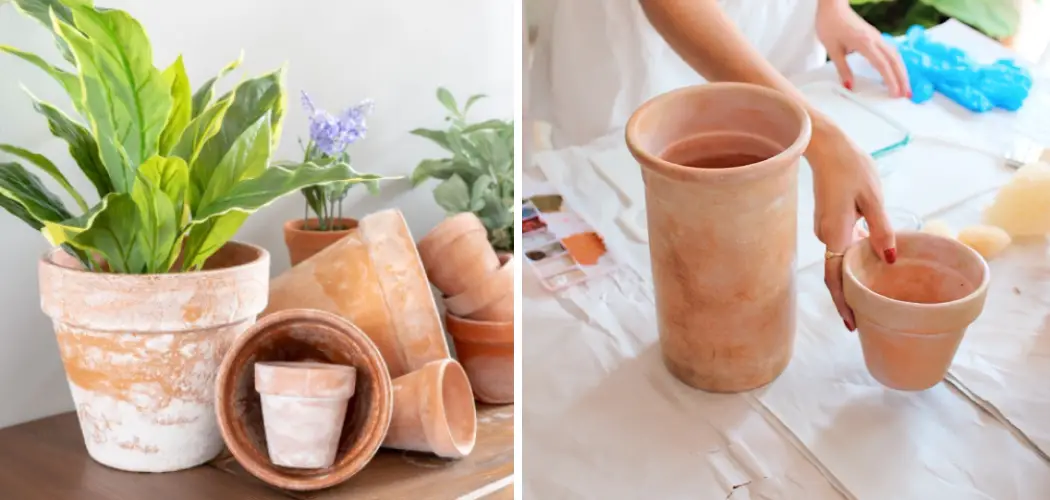
- Terracotta Pots – Make Sure They Are Clean and Dry Before Starting.
- Baking Soda
- White Paint (Optional)
- Water
- Paintbrushes and Sponge
- Sealer (Optional)
- Paper Towels
- Newspaper or a Drop Cloth to Protect Your Work Area
11 Step-by-step Guidelines on How to Age Terracotta Pots With Baking Soda
Step 1: Set Up a Workspace
Cover your work area with newspaper or a drop cloth to protect it from any spills or messes. It’s always better to be safe than sorry! You can also lay out some paper towels to place your pots on while they dry. But, if you can work outside, go for it!

This project can get a bit messy, and working outdoors will ensure proper ventilation. It’s also a great way to enjoy the beautiful weather while getting creative. You can even invite some friends over and make it a fun DIY project to do together.
Step 2: Mix Baking Soda With Water
In a small bowl or cup, mix together equal parts baking soda and water until it forms a paste-like consistency. You can always adjust the ratio depending on how thick you want your aging solution to be. It’s okay if it’s a bit runny – we’ll get to that in the next step.
Remember, one part baking soda to one part water is the standard mixture. You can always make more if needed depending on the number of pots you are aging. It’s always better to have too much than not enough.
Step 3: Apply Mixture to Pots
Once your mixture is ready, use a paintbrush or sponge to apply it to the terracotta pots. If your mixture is too thick and does not spread easily, you can add a little bit more water until you get the desired consistency. Apply the mixture in a thin layer all over the pot, making sure to cover any cracks or crevices for an even look. It might look a bit messy at first, but don’t worry, we’ll clean it up in the next step.
Step 4: Wipe Off the Excess Mixture
After you have applied the mixture all over your pot, use a damp paper towel or sponge to gently wipe off any excess solution. This will create a more natural and aged effect by leaving some areas with a thicker layer of mixture than others. If you want a more subtle look, make sure to wipe off more of the solution.
For a more aged and weathered look, leave some areas with a thicker layer of mixture. But remember, there is no right or wrong way to do this – it’s all about your personal preference!
Step 5: Let Pots Dry
Once you are satisfied with the look of your pots, set them aside to dry. It usually takes around 30 minutes for the mixture to dry completely. But if you want a more textured and layered effect, you can add more layers of the mixture and let it dry in between each layer.

Just make sure not to go overboard, as too many layers may result in a flaky finish. You can also use a hairdryer on low heat to speed up the drying process. It’s important to let the pots dry completely before moving on to the next step.
Step 6: Optional – Paint
If you want to add some color to your aged pots, now is the time! Using white acrylic paint, lightly brush the bottom of your pot to create a distressed and aged look. This will also help add depth and dimension to the pot.
For a more vibrant look, you can experiment with different colors or even use stencils to create unique designs. Remember, this step is completely optional – your pots will still look beautiful without any additional paint.
Step 7: Optional – Seal Your Pots
To ensure your newly aged pots last longer, you can choose to seal them with a waterproof sealer. This will protect the aging effect and prevent it from washing off in rainy weather or during watering. However, if you plan on using the pots for indoor plants, this step is not necessary.
It’s all about personal preference and where you plan on placing your aged pots! It’s also a great way to customize and personalize your pots even further.
Step 8: Add Your Plants
Once your pots are completely dry, it’s time to add some beautiful plants and give them a new home. The contrast between the aged terracotta pots and the vibrant green plants will create a stunning and eye-catching display in any garden or home.
It’s also a great way to repurpose old pots and give them a new life. You can choose to plant herbs, flowers, succulents, or any other plants that suit your style and taste. You can even create a themed set of aged pots for different areas in your garden. The possibilities are endless!

Step 9: Personalize Your Pots
To add a personal touch to your aged terracotta pots, you can use paint pens or markers to write names or messages on them. This is especially fun if you plan on gifting the pots or using them for specific plants. You can also add decorative elements like ribbons, twine, or small figurines to make your pots even more unique and special. It’s a great way to showcase your creativity and make the pots truly one-of-a-kind.
Step 10: Experiment with Different Techniques
Now that you know the basics of how to age terracotta pots with baking soda, don’t be afraid to experiment! There are several techniques and variations you can try to achieve different looks.
For example, you can mix in some coffee grounds with your baking soda and water mixture to create a more textured and aged effect. You can also try using different kinds of paints or dyes for a unique finish. The possibilities are endless!
Step 11: Enjoy Your Beautiful Aged Pots
Congratulations, you have successfully aged your terracotta pots with baking soda! Now it’s time to sit back, relax, and enjoy your new beautiful creations. Whether you use them as home decor or for your plants, these aged pots are sure to add a rustic and charming touch to any space. And the best part? You can always repeat this process whenever you want to refresh the aging effect on your pots.
Following these step-by-step guidelines, you can easily and affordably age your terracotta pots with baking soda. Not only is it a fun and creative activity, but it also allows you to repurpose old pots and give them a new life. So why not gather some supplies, put on some music, and get started on this easy DIY project? Your plants (and home decor) will thank you for it.

Additional Tips and Tricks
- If You Want a More Dramatic Aged Effect, You Can Add Some Vinegar to Your Baking Soda Mixture. This Will Create a Chemical Reaction That Will Result in a Rougher and More Textured Finish.
- For an Even More Weathered Look, You Can Lightly Sand the Dried Mixture on Your Pots With a Fine-grit Sandpaper. This Will Create a Worn and Aged Appearance.
- To Add Even More Character to Your Pots, Consider Adding Some Moss or Succulents Around the Rim or Base. This Will Give Them a Natural and Organic Touch.
- If You Are Planning on Using Your Aged Pots Outdoors, Make Sure to Use a Waterproof Sealer to Protect Them from Harsh Weather Conditions.
- Don’t Be Afraid to Play Around With Different Colors and Techniques. Mixing in Some Tea Leaves or Using Different Shades of Paint Can Create Unique and Stunning Results.
- Have Fun and Let Your Creativity Flow – There Are No Rules When It Comes to Aged Terracotta Pots!
Frequently Asked Questions
Q1. Do I Need to Use Terracotta Pots for This Technique?
A: Yes, this technique works best with terracotta pots as they have a porous surface that allows the mixture to seep in and create an aged effect. However, you can also try it on other types of clay or ceramic pots – just keep in mind that the results may vary.
Q2. Can I Use This Technique on Already Painted Pots?
A: Yes, you can use this technique on already painted pots. Just make sure to lightly sand the painted surface before applying the baking soda mixture to allow for better absorption and a more even finish.
Q3. How Often Do I Need to Repeat This Process?
A: The aging effect on your pots will gradually fade over time, but it largely depends on the climate and weather conditions in your area. If you notice the aged look starting to wear off, you can simply repeat the process whenever you want to refresh them.

Q4. Can I Use This Technique on Plastic or Resin Pots?
A: No, this technique only works on porous materials like terracotta, clay, and ceramic pots. It will not have the same effect on plastic or resin pots as they do not absorb liquids in the same way.
Conclusion
By now you’ve seen how easy it is to age terracotta pots with baking soda. You can easily transition from boring, plain pots to ones that look like they were handpicked by a seasoned gardener. Give it a try for yourself today and create the unique pot garden of your dreams!
But be sure to keep in mind the importance of safety when handling baking soda and preserve your new beautiful terracotta pot so it will last for many days! If you’re looking for creative ways to add interest and rustic charm to your living space this is an essential and economical DIY project worth exploring. Thanks for reading this article on how to age terracotta pots with baking soda
Expertise:
Crafting expert with a focus on innovative techniques and diverse materials.
Specialization:
- Textile arts (weaving, embroidery, and fabric dyeing)
- Woodworking and furniture design
- Mixed media and upcycling projects
Recognition:
- Featured in local art exhibits showcasing innovative craft projects
- Collaborated with community organizations to promote crafting workshops
- Received accolades for contributions to sustainable crafting initiatives
Mission:
- To inspire and empower crafters of all levels to discover their creative potential
- Encourages experimentation and self-expression through hands-on projects