
Transforming your embroidery masterpiece into a wearable or decorative patch adds a personalized and unique touch to your creations. Learning how to turn embroidery into a patch opens up a world of possibilities, allowing you to showcase your intricate needlework on various items such as clothing, bags, or accessories.

In this comprehensive guide, we will explore the step-by-step process of converting your embroidered designs into durable and versatile patches.
From selecting the right materials and stabilizers to mastering the techniques of securing the edges, this article provides valuable insights for both seasoned embroiderers and those new to the craft. Whether you’re aiming to customize your wardrobe or share your embroidery skills with others, turning your hand-stitched artwork into patches is a rewarding and enjoyable endeavor that bridges the realms of artistry and practicality.
Importance of Turning Embroidery into Patches
Embroidery has been used for centuries to add intricate designs and patterns to fabric. What started as a way to decorate clothing, has now evolved into an art form that is used in various industries such as fashion, interior design, and even marketing.
One of the popular uses of embroidery is in creating patches. Patches are pieces of fabric with embroidered designs that are then attached to clothing, bags, or other items. They have been around for a long time and were initially used as a way to identify individuals belonging to a particular group or organization.
In today’s world, patches still serve the same purpose but have also become a popular fashion statement. Many people collect patches from different places they visit or events they attend as a way to show their interests and experiences. Additionally, businesses have also started using embroidered patches as a marketing tool to promote their brand.
Basic Materials Needed for Patch Making
As mentioned in the previous section, turning embroidery into a patch is a great way to preserve and showcase your work. Not only that, but it also allows you to personalize your clothing or accessories with unique designs.

- Fabric: The first thing you will need is a piece of fabric that will serve as the base for your patch. This can be any type of fabric, but it is recommended to use a sturdy material such as cotton or denim.
- Embroidery thread: Next, you will need embroidery thread in various colors to create your design on the fabric. Make sure to choose high-quality thread that won’t easily break or snag.
- Embroidery hoop: An embroidery hoop will help keep your fabric taut while you work on your patch. It is recommended to use a hoop that is slightly larger than your design for easier stitching.
- Needle: A sharp needle with a large eye is necessary for embroidery. You can also use an embroidery needle specifically designed for thicker threads.
- Scissors: You will need a pair of sharp scissors to cut your fabric and thread.
- Iron-on adhesive: To turn your patch into an iron-on, you will need iron-on adhesive. This can be purchased at any craft store or online.
- Iron: An iron is necessary for attaching the adhesive to your patch and onto your desired clothing or accessory.
10 Methods How to Turn Embroidery into a Patch
1. Choose Your Design
The first step in turning an embroidery design into a patch is to choose the design you want to use. You can create your own design or purchase one from a stock image website. Once you have chosen your design, it’s time to start the process of turning it into a patch.
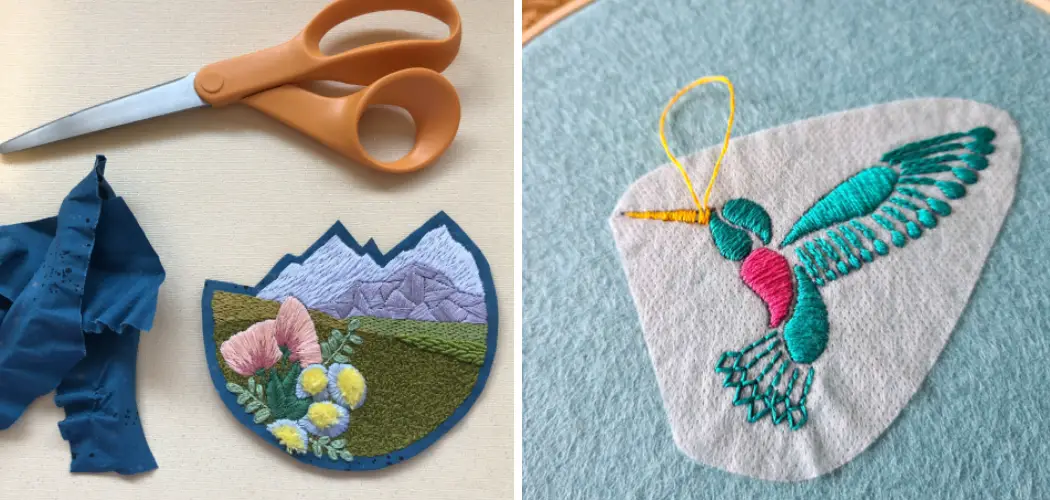
2. Trace and Cut Out Your Design
Once you have chosen your design, you will need to trace it onto fabric and then cut out the shape with scissors or an X-Acto knife. Make sure to leave at least 1/4 inch of extra fabric around the edges so that there is enough material for sewing and attaching the patch to whatever surface you are using.

3. Sew Around the Edges
Once you have cut out your design, you will need to sew around the edges of the patch in order to make sure that it holds its shape when attached to whatever surface it is going on. Use a strong thread such as upholstery thread and be sure not to pull too tight as this could cause distortion in the finished product.
4. Iron On Adhesive Backing
Once you have sewn around the edges of your patch, it’s time to apply some iron-on adhesive backing in order to make sure that your patch stays secure when attached to whatever surface it is going on. There are several different types of iron-on adhesive backing available, so make sure that you choose one that is suitable for your project.
5. Attach Patch To Surface
Now that your patch has been prepared with iron-on adhesive backing, it’s time to attach it onto whatever surface you are using. This could be clothing, bags or any other fabric item that needs a little bit of extra decoration!
Use an iron or heat press machine on medium heat setting if possible, and make sure not to leave any gaps between sections where air bubbles may form when cooling down after pressing down firmly with an iron or heat press machine .
6. Add Embroidery Details
If desired, add some additional embroidery details onto your patch before finally attaching it onto whatever surface you are using by stitching along all edges with strong thread such as upholstery thread again for added security and durability! You can also add some beads or sequins for extra sparkle if desired!
7. Secure Threads With Glue
After adding any additional embroidery details and stitching along all edges with strong thread, secure all threads by applying a small amount of glue over them before finally attaching your patch to whatever surface you are using! This will help keep everything secure while also preventing fraying from occurring over time due to much wear and tear!

8. Add Heat Transfer Vinyl Layer For Protection
If desired, add an additional layer of protection by applying heat transfer vinyl (HTV) over top of your completed embroidered patches before finally attaching them onto whatever surface they are being used on! This will help protect against fading from sunlight exposure as well as wear and tear caused by everyday use!
9. Attach Patches To Surface
Finally, attach all patches onto their respective surfaces using either an iron or heat press machine, depending on what type of material they are being applied to! Make sure not to leave any gaps between sections where air bubbles may form when cooling down after pressing down firmly with an iron or heat press machine!
10. Enjoy Your Finished Patches
Voila, now sit back and enjoy looking at your newly created patches! Whether they’re going on clothing items such as jackets or bags, these unique pieces will surely stand out wherever they go!
Although creating embroidered patches may seem like a daunting task, with the right materials and techniques, you can easily turn any embroidery design into a personalized patch to show off your creativity. So go ahead and try out these methods to create your own unique patches!
Things to Consider When Turning Embroidery into a Patch
When it comes to turning embroidery into patches, there are several things to keep in mind. From choosing the right fabric to attaching the patch securely, each step is important in creating a high-quality and durable patch. Below are some key considerations that can help you achieve the best results when making your own patches.

Choosing the Right Fabric
The first step in creating an embroidered patch is choosing the right fabric. This will be the base for your design and will greatly affect the overall appearance and durability of the patch. When selecting a fabric, consider its weight, texture, and color. Lightweight fabrics like cotton or twill are commonly used for patches as they are easy to sew on and provide a smooth surface for embroidery.
Design Considerations
Before starting your embroidery, it’s important to have a well-thought-out design. When turning embroidery into a patch, there are several factors to keep in mind for creating a successful design. First, consider the size and shape of your patch. Patches can come in a variety of shapes such as circles, squares, or custom shapes. The size will also affect the level of detail that can be included in the design.
Conclusion
Embroidery is such a unique and fun way to personalize clothing, accessories, and more with your own designs. Whether you choose to recreate family crests, favorite artwork or words of encouragement, the art of embroidery is sure to be enjoyed by many. Nothing quite beats the labor-intensive process of turning your own designs into a patch for months or even years of use.
With so many materials available at your disposal, the possibilities are endless when it comes to crafting amazing patch projects that can last for all time. Hopefully this blog post has provided you with enough advice and instruction so that now you feel comfortable taking on your own creations. Now go ahead and give it a try – there’s never been a better time to learn how to turn embroidery into a patch!
Expertise:
Crafting expert with a focus on innovative techniques and diverse materials.
Specialization:
- Textile arts (weaving, embroidery, and fabric dyeing)
- Woodworking and furniture design
- Mixed media and upcycling projects
Recognition:
- Featured in local art exhibits showcasing innovative craft projects
- Collaborated with community organizations to promote crafting workshops
- Received accolades for contributions to sustainable crafting initiatives
Mission:
- To inspire and empower crafters of all levels to discover their creative potential
- Encourages experimentation and self-expression through hands-on projects