
Do you want to give your chair a facelift? Sewing your own cushions is an easy and cost-effective way to revive any space in your home. With minimal materials, you can customize the size, color and pattern of chair cushions to fit with whatever look or feel you’re going for – from classic patterns like polka dots and stripes, to ornate florals and tropical prints that will really make a statement!

Whether it’s after an upholstery job or just for a quick seasonal update, learning how to sew these comfy additions doesn’t have to be daunting.
Follow our step-by-step guide on how to sew chair cushions, starting with research and choosing the right fabric all the way through creating boxed corners for easy shaping. And real talk: this craft project isn’t nearly as hard as it may seem – so what are you waiting for? Let’s get started!
Why Sew Your Own Chair Cushions?
Sewing your own chair cushions allows you to have complete control over the design and color scheme. You can easily match them to existing decor, or mix it up with a contrasting pattern or color for a more eclectic look. Plus, it’s a great way to add some personality and uniqueness to your furniture.
It’s also a cost-effective alternative to buying pre-made cushions, and you can ensure that the materials used are of high quality and will last. DIY chair cushions are not only functional, but they can also be a fun and creative project for any level of sewing experience.
Materials You Will Need
Before we jump into the steps, let’s make sure you have everything you need to complete this project. Here’s a list of materials:
- Fabric of Your Choice (Enough to Cover the Cushion Plus Extra for Seam Allowances)
- Coordinating Thread
- Upholstery Foam or Batting
- Scissors
- Sewing Machine (Although This Can Also Be Done by Hand)
- Measuring Tape or Ruler
- Pins or Clips
- Iron and Ironing Board (Optional, but Recommended for a More Polished Finish)
11 Step-by-step Guidelines on How to Sew Chair Cushions
Step 1: Research and Choose the Right Fabric
The first step in sewing chair cushions is to research and choose the right fabric for your project. Consider factors such as durability, colorfastness, and ease of cleaning. If you’re planning to use the cushions for outdoor furniture, make sure to choose a fabric that is weather-resistant and won’t fade in the sun.

For indoor furniture, you have more flexibility in terms of fabric choices. Try to choose a medium-weight fabric that will hold its shape well. It’s also important to keep in mind the color and print of your fabric, as this will affect the overall look of your furniture.
Step 2: Measure Your Chair Cushion
Next, measure your chair cushion using a measuring tape or ruler. Take note of the length, width, and thickness of the cushion. Add an extra inch to both the length and width measurements to account for seam allowances. This will ensure that your cushion cover fits snugly. But if you prefer a looser fit, add an extra inch or two for more wiggle room. It’s always better to have more fabric than less, as you can always trim it down later.
Step 3: Cut Out Your Fabric
Using your measurements, cut out two identical pieces of fabric for the top and bottom of your cushion cover. Remember to include the extra inch for seam allowances. If you’re using a thick upholstery foam, make sure to leave enough room for the thickness of the cushion.
You can also use batting as a filler instead, which will allow more flexibility in terms of fabric choices. But if you’re using batting, make sure to cut out four pieces of fabric instead of two.
Step 4: Pin or Clip the Fabric Together
Place the two pieces of fabric together with the right sides facing each other. If you’re using batting, place two pieces on top of one piece of fabric, and then place the remaining piece of fabric on top. This will create the front and back of your cushion cover. Pin or clip the fabric together along the edges, leaving a small opening for turning later. This will prevent the fabric from shifting while sewing.

Step 5: Sew Along the Edges
Using a sewing machine or needle and thread, sew along the edges of your cushion cover, leaving a quarter-inch seam allowance. Remember to backstitch at the beginning and end of your stitches for added durability. If you have curved edges, it’s recommended to use a zigzag stitch to prevent fraying. Leave the small opening you created earlier unsewn.
Step 6: Trim Excess Fabric and Turn Inside Out
Trim any excess fabric from the edges, making sure not to cut too close to the stitches. This will help reduce bulk and create cleaner corners. Once trimmed, carefully turn your cushion cover inside out through the small opening. Use a blunt object, such as a pencil or chopstick, to push out the corners for a more defined shape. You can also iron the cover at this point for a smoother finish.
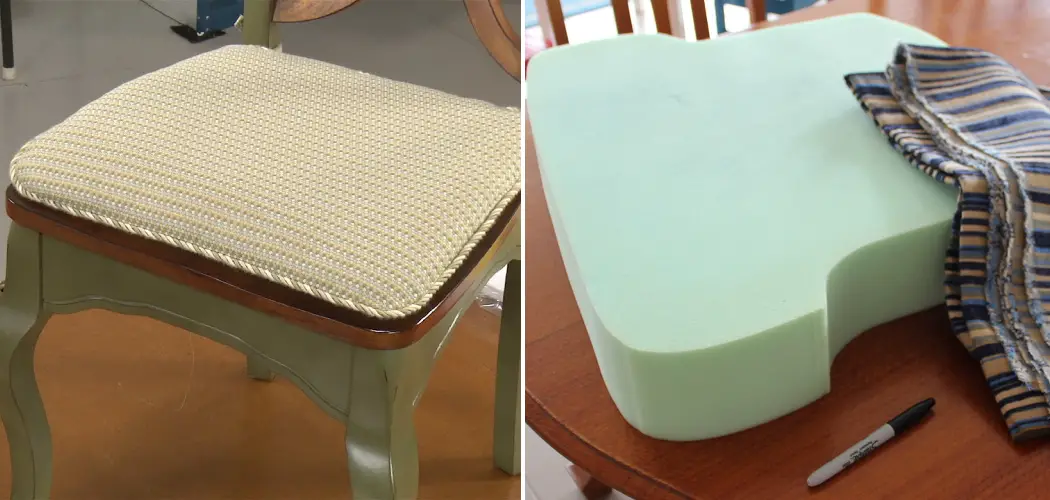
Step 7: Add Filler Material
If you’re using upholstery foam, simply insert it into your cushion cover through the small opening. If you’re using batting, stuff it into the cover until you reach your desired level of thickness. Make sure to smooth out any lumps or bumps for a more even look. Although optional, you can also add additional padding, such as a layer of felt or foam sheeting, to make your cushion more comfortable.
Step 8: Sew the Small Opening
Once you’ve added the filler material, carefully fold in the edges of the small opening and sew it closed using a ladder stitch. This will create an invisible seam and give your cushion cover a professional finish. But if you’re pressed for time, you can also use a simple whip stitch to close the opening. It won’t be as neat, but it will still do the job. This step can also be done by hand if you don’t have a sewing machine.
Step 9: Create Boxed Corners (Optional)
For a more structured look, you can create boxed corners on your cushion cover. To do this, fold the bottom edges of the cover towards each other until they meet in the middle. Use pins or clips to hold them in place. Then sew along the folded edge using a straight stitch. Repeat this step for the top edges. This will create a box shape at each corner of your cushion cover.

Step 10: Sew on Ties or Buttons (Optional)
For added functionality and style, you can sew on ties or buttons to keep your cushion in place on the chair. For ties, simply cut long strips of fabric and sew them onto the corners of your cushion cover. Make sure to sew them securely, as they will be pulled frequently.
For buttons, you can use fabric-covered buttons or regular buttons with a shank loop. Sew them onto the corners of your cushion cover and create corresponding loops on the chair.
Step 11: Enjoy Your New Chair Cushions!
Congratulations, you have successfully completed sewing your own chair cushions! Place them on your chairs and enjoy the comfort and style they bring to your space. Don’t forget to add any finishing touches, such as adding trim or piping, for a more personalized look. With these step-by-step guidelines, you can easily sew chair cushions for all of your furniture. Get creative with different fabrics and patterns to match your home decor.
Following these steps on how to sew chair cushions, you’ll be able to sew beautiful and functional chair cushions that will add a personal touch to your space. Whether it’s for indoor or outdoor use, you can create custom cushion covers to fit any shape or size of the chair. So go ahead and get sewing – your chairs will thank you!
Frequently Asked Questions
Q1: What Type of Fabric Should I Use for Chair Cushions?
A1: It is recommended to use a medium to heavy-weight fabric, such as upholstery fabric or outdoor fabric, for durability and support. However, you can also get creative with different fabrics based on your personal preference and style. Just make sure to use a high-quality, durable fabric that can withstand daily wear and tear.

Q2: Can I Use Store-Bought Cushions Instead of Filler Material?
A2: Yes, you can use store-bought cushions instead of filler material. However, keep in mind that the size and shape of your cushion cover will need to match the pre-made cushion for a proper fit. Also, using store-bought cushions may limit your fabric choices.
Q3: Do I Need to Pre-Wash My Fabric Before Sewing?
A3: It is recommended to pre-wash your fabric before sewing to prevent any shrinkage or color bleeding in the future. However, if you’re using a non-washable fabric, such as leather or vinyl, you can skip this step. Just make sure to follow the fabric manufacturer’s instructions for proper care and maintenance.
Q4: How Do I Clean and Maintain My Chair Cushions?
A4: To clean your chair cushions, remove the filler material if possible and spot-clean any stains using a mild soap and water solution. For tougher stains, you can use a fabric cleaner or take your cushions to a professional cleaner. It’s also important to regularly fluff and rotate your cushions to maintain their shape and prevent uneven wear. Proper maintenance will help prolong the life of your chair cushions.

Conclusion
Now that you know the basics of how to sew chair cushions, why not get sewing? Save some money and make your home more comfortable in just a few simple steps. Channel your creativity and bring a unique touch to any space with this easy project. With your newfound introduction to sewing, don’t limit yourself to chair cushions–imagine all the possibilities!
We encourage you to keep learning and experimenting with textiles and fabrics along the way. Have fun creating and making something beautiful out of your creativity! The end results are worth every stitch.