
In the age of disposable fashion, the art of Sashiko mending emerges as a testament to sustainability and creativity. Rooted in Japanese tradition, Sashiko, which translates to “little stabs,” is a form of decorative reinforcement stitching that transforms worn and torn garments into unique, visually striking pieces. Beyond its utilitarian purpose, Sashiko transcends mere repair, evolving into a captivating fusion of artistry and practicality.

This ancient needlework technique involves carefully orchestrated stitches, creating intricate patterns that tell stories of resilience and craftsmanship. In this guide, we delve into how to sashiko mend, exploring its rich cultural origins, the fundamental stitches that breathe new life into damaged fabrics, and the contemporary resurgence of this time-honored practice as a means of sustainable fashion expression. Whether you’re a seasoned artisan or a curious beginner, the journey into Sashiko promises not only the revival of garments but also a deep connection to the ethos of mindful, purposeful craftsmanship.
Importance and History of Sashiko Mending
Sashiko is a traditional Japanese embroidery technique that dates back to the Edo period (1603-1868). The word sashiko means “little stabs” or “little piercings”. It was originally used as a form of functional reinforcement for clothing, but has now evolved into a popular decorative stitching method. Sashiko mending has gained popularity in recent years due to its simplicity and versatility in repairing and beautifying garments.
Traditionally, sashiko was used by rural Japanese communities to mend or patch up clothing that had been worn out from everyday use. As resources were scarce, people would repurpose old garments by reinforcing them with sashiko stitching. This method not only extended the life of their clothes, but also added an aesthetic element to their utilitarian clothing.
Sashiko techniques were passed down from generation to generation, with each family creating their own unique patterns and designs. It was mainly practiced by women in farming communities, as they had the time and resources to dedicate to mending and embroidering.

Over time, sashiko became more than just a practical mending technique. It evolved into a form of creative expression and storytelling. The intricate stitching patterns often reflected the daily lives and memories of those who made them.
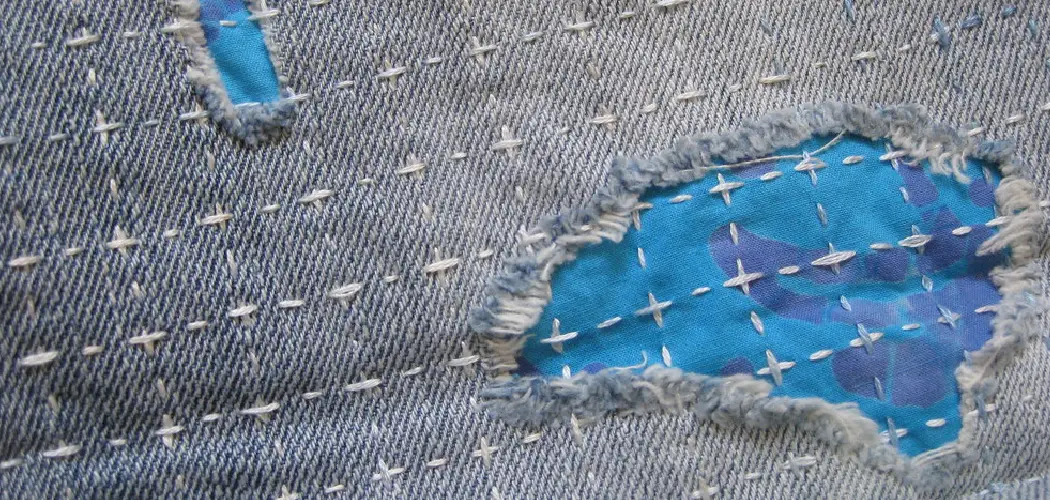
10 Methods How to Sashiko Mend
1. Prepare the Fabric
The first step in sashiko mending is to prepare the fabric. This involves cutting away any frayed or damaged edges and pressing the fabric flat. It is also important to ensure that the fabric is clean and free of dirt or other debris before beginning the mending process.
2. Thread a Sashiko Needle
Once the fabric is prepared, it’s time to thread a sashiko needle. These needles are specially designed for sashiko mending and have a large eye so that multiple strands of thread can be passed through them at once. To thread the needle, pass one end of the thread through the eye and tie a knot at the other end to secure it in place.
3. Choose a Pattern
The next step in sashiko mending is to choose a pattern for your project. There are many different patterns available, from traditional Japanese designs to modern geometric shapes. Once you have chosen a pattern, use an erasable pen or chalk pencil to transfer it onto your fabric.
4. Start Mending
Once you have chosen your pattern and transferred it onto your fabric, you can begin mending with sashiko stitching. To do this, use small straight stitches to follow along the lines of your pattern until you have covered all of the damaged areas on your fabric. Make sure that each stitch is even and consistent in size for best results.
5. Secure Your Stitches
Once you have finished stitching along your pattern, it’s important to secure your stitches so they don’t come undone over time. To do this, take a few extra stitches around each section of stitching to lock them into place before moving on to another area of mending.

6. Add Embellishments
If desired, you can add embellishments such as beads or buttons to give your project an extra special touch! Simply stitch these items onto your fabric using matching threads before continuing with more stitching or securing them with knots if necessary for extra security against wear and tear over time.
7. Finishing Touches
When all mending has been completed, finish off by trimming away any excess threads and pressing down with an iron if needed for best results! You may also wish to add additional decorative elements such as ribbons or lace trim around the edges of your project for an extra special look!
8. Use Different Colors
For added visual interest, try experimenting with different colors when doing sashiko mending! You could use one color throughout or mix up several colors for a truly unique design! Just make sure that whichever color you choose coordinates well with both the base fabric and any embellishments used too!
9. Sew Pieces Together
If needed, pieces can be sewn together using sashiko stitching as well! Simply line up two pieces of fabric right sides together (if applicable) and stitch along their edges using small running stitches in whatever pattern desired – just make sure that all seams are secured properly before moving on!
10. Wash & Wear
Finally, once all mending has been completed it’s time to wash & wear! Hand-washing is recommended for best results but machine washing should be fine too – just make sure not to dry clean as this could damage some fabrics & embellishments used during sashiko mending!
When
Things to Consider When Sashiko Mending
When it comes to mending clothes using the traditional Japanese method of Sashiko, there are a few things to keep in mind. This technique not only helps repair damaged or worn-out clothing but also adds an artistic touch to the item.
Sashiko menders typically use white thread on indigo-dyed fabric, creating a beautiful contrast that is unique to this method. However, if you want to add your own personal touch, feel free to experiment with different colored threads and fabrics.
Here are some other things to consider when practicing Sashiko mending:

Fabric Type
Sashiko works best on medium-weight woven fabrics such as denim, canvas or linen. The fabric should also have a tight weave to ensure the stitches hold up over time.
Thread Selection
Traditionally, Sashiko is done using white cotton thread. However, you can use any thick and durable thread like embroidery floss or crochet thread. Just make sure it has enough strength to withstand regular wear and tear.
Needle Size
It’s important to use a needle appropriate for the fabric type and thread size. A larger needle is recommended for thicker fabrics, while a smaller one works best for delicate fabrics.
Stitch Length
Sashiko stitches are typically longer than regular hand stitching, ranging from 3-6mm in length. The longer stitches add an interesting texture to the fabric and make it easier to fill in larger areas.
Common Mistakes to Avoid When Learning How to Sashiko Mend
Sashiko mending is a traditional Japanese embroidery technique that has gained popularity in recent years due to its simple yet beautiful design. The process involves stitching visible lines or patterns on fabric, typically using white thread on an indigo-dyed cotton fabric. While sashiko mending may seem easy at first glance, there are some common mistakes that beginners make and can be avoided with a few tips.
Not Preparing the Fabric Properly
One of the most important steps in sashiko mending is preparing the fabric before stitching. This includes washing and ironing the fabric to remove any sizing or wrinkles. If not done properly, the fabric may shrink or distort after stitching, resulting in uneven or distorted patterns. It is also essential to mark the stitching lines before beginning, as this will ensure a consistent and neat design.
Choosing the Wrong Thread
When it comes to sashiko mending, choosing the right thread is crucial. Traditional sashiko thread is usually made of cotton and twisted tightly, giving it strength and durability. Using regular sewing thread or thicker embroidery thread will not give the same results and may break easily. It is also important to match the thread color with the fabric, so it blends seamlessly.

Rushing Through Stitches
Sashiko mending requires slow and deliberate stitching to achieve precise lines and patterns. Beginners may be tempted to rush through stitches, resulting in uneven or messy designs. Taking your time and focusing on each stitch will not only improve the overall look of your work but also help you develop a steady hand and consistent stitching technique.
Conclusion
To sum up, sashiko mending can be a great way to repurpose existing fabric or clothes that have become worn or damaged. It’s an incredibly effective way of preserving the integrity of the materials and merging it with a modern decorative stitch. Plus, it can add a unique element to any fabric project.
Whether you’re planning on producing something straight from your own imagination or improving some of the items already in your wardrobe, sashiko mending is worth finding out more about! Now that you know how to sashiko mend, why not get creative and give it a go? You never know what cool stuff you could come up with!