
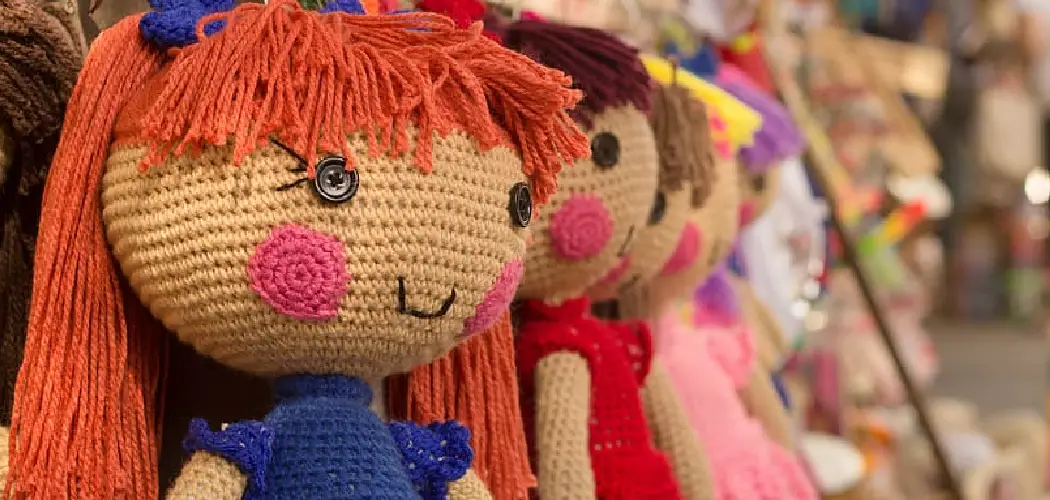
Do you remember making colorful yarn hair as a kid? Are you looking for a fun way to add personality and unique style to your favorite dolls? If so, yarn hair is the perfect solution! Being creative and decorating dolls with wispy, bright hairstyles was fun. In recent years, yarn art for dolls has become increasingly popular, leading to a surge of inspiring designs and intricate techniques. Although it might initially sound intimidating, adding yarn hair to a doll is simple.

It’s an easy project that will give any doll long, flowing locks of vibrant color that can be styled in countless ways! If you’re looking for a way to express your creativity while giving new life to an old doll, learning how to put yarn hair on it might be the perfect way!
You can quickly transform any doll into something extraordinary with just some basic supplies like yarn ribbons and glue. This tutorial will guide you through the basics step-by-step on how to put yarn hair on a doll so that no matter your skill level with crafting projects, you’ll have no problem mastering this beginner project in no time!
Necessary Items
Before you begin, be sure to gather all the necessary materials. You’ll need:
- A doll with an existing head of hair (made of plastic or another hard material)
- Yarn in your choice of color(s) and thickness
- Ribbon or lace for added decoration (optional)
- Scissors
- Glue suitable for use on dolls (fabric glue works well)
- A yarn needle (optional)
10 Steps on How to Put Yarn Hair on a Doll
Step 1: Preparing the Doll’s Head
First, you must prepare the doll’s head for the new hair. If your doll already has hair, carefully remove it by cutting or pulling it out. For dolls with molded hair, you can leave it as is or cover it with a wig cap (made from a stretchy fabric or stocking) to give the yarn hair a better base to grip. The wig cap will also make removing the yarn hair easier if you ever want to change up your doll’s look.

Step 2: Selecting and Cutting the Yarn
Next, choose which color(s) of yarn you want for your doll’s hair. You can use one or multiple colors for a fun and unique look. Cut the wool into pieces of equal length, as long or as short as you want, depending on how long you want the hair to be. Remember that the yarn will appear sharper when attached to the doll’s head, so you may want to cut the pieces a little longer than desired.
Step 3: Adding Ribbon or Lace (Optional)
If you want to add flair to your doll’s hair, now is the time to attach any ribbon or lace. Simply cut them into small strips and glue them onto the yarn before attaching it to the doll’s head. This step is optional but can add a nice touch to the overall look.
Step 4: Preparing the Yarn Strands
Next, you’ll want to separate the yarn strands into smaller bundles. Depending on how thick you want the hair to be, you can use 3-10 strands per bundle. It’s better to start with fewer strands and add more later if you want a fuller look.

Step 5: Gluing the Yarn Strands
Add a small bead of glue along the top of one of your yarn bundles. Then, carefully place it onto the doll’s head, starting at the back near the neck and moving towards the front. Be sure to leave a small space at the front hairline for later.
Step 6: Repeating the Process
Continue gluing bundles of yarn onto the doll’s head, working your way up towards the top. Be sure to overlap each bundle slightly so there are no gaps and the doll’s head is covered with yarn.
Step 7: Cutting the Yarn to Create Layers
Once you reach the top of the doll’s head, trim the yarn strands so they are all even. You can also cut them at different lengths to give the hair a more layered look. This step is optional but can add more texture and dimension to the hair.
Step 8: Styling the Hair
Now comes the fun part! You can style your doll’s new yarn hair in countless ways – braids, ponytails, twists, or even leave it down. Use your creativity to give your doll a unique hairstyle that reflects their personality. You can also add hair clips or accessories to enhance the look.
Step 9: Adding Bangs (Optional)
If you want your doll to have bangs, simply cut a separate piece of yarn and glue it onto the front of the doll’s head. You can trim it to any length and style it however you’d like. Bangs can add a cute and playful touch to the overall look.
Step 10: Letting the Glue Dry
After styling the hair, let the glue dry completely. Once it’s dry, gently comb or brush through the yarn strands to fluff them up and remove any excess glue. And voila! Your doll now has a unique and colorful hairstyle that’s sure to make a statement.
Learning how to put yarn hair on a doll is a fun and creative way to personalize your dolls. With just a few simple steps, you can give any doll long, flowing locks of vibrant color that can be styled in countless ways. So, next time you’re looking for a hobby or craft project, why not add yarn hair to your favorite dolls? It’s a great way to express creativity and give old toys new life.

8 Things to Avoid When Putting Yarn Hair on a Doll
1. Using Too Much Glue
Be careful not to use too much glue when attaching the yarn to the doll’s head. Too much glue can cause it to seep through the strands and create a sticky mess. Use just enough to hold the yarn in place.

2. Cutting Uneven Yarn Strands
Try not to cut all yarn strands the same length to achieve a more natural look. Cutting them at different lengths can give more dimension and texture to the hair.
3. Not Using a Wig Cap
If your doll has molded hair, using a wig cap when adding yarn hair on top is highly recommended. This will create a better base for the yarn to grip onto and make it easier to remove in the future.
4. Skipping the Ribbon or Lace
While this step is optional, adding ribbon or lace to the yarn can add a nice touch to the overall look of the doll’s hair. It also helps secure the wool and prevent it from unraveling over time.
5. Using Yarn That is Too Thick
When selecting yarn for your doll’s hair, avoid using too thick yarn. This can make it difficult to attach and style and may also weigh down the doll’s head.
6. Overlapping Yarn Strands Too Much
While overlapping the yarn strands is essential to ensure coverage, be mindful not to overlap them too much. This can create a bulky look and make it harder to style the hair.
7. Forgetting to Leave Space for Bangs
Leave a small space at the front hairline before gluing on the yarn bundles if you want your doll to have bangs. This will give you room to add them later without disrupting the rest of the hairstyle.
8. Using Yarn That is Too Long or Too Short
Cutting the yarn into equal lengths before attaching them to the doll’s head is essential for achieving a uniform look. Be mindful not to make them too long or too short, as this can affect the final result of the hairstyle. Have fun and be creative when putting yarn hair on your dolls. It’s a great way to add a personal touch and give them a unique look that sets them apart. Just remember to avoid these common mistakes for the best results.
5 Safety Measures When Working with Glue and Yarn
1. Use Non-Toxic Glue
When working on crafts, using non-toxic glue is essential to avoid harmful fumes or chemicals. This is especially important if children are involved in the project.
2. Keep Glue Away from Eyes and Mouth
Glue can irritate if it comes into contact with sensitive areas such as the eyes or mouth. Keep these areas clean, and avoid touching them with glue-covered hands.

3. Monitor Children When Using Glue
If children are involved in the project, supervise them and teach them how to use glue safely. It’s also a good idea to have adult assistance when using hot glue guns.
4. Handle Hot Glue Guns with Care
Hot glue guns can cause burns if not handled properly. Always use caution and keep them out of reach of children.
5. Clean Up Spills and Messes Promptly
If any glue spills or gets on surfaces other than the doll’s head, clean it up promptly before it dries and becomes more challenging to remove. This will also prevent any accidents from occurring if someone were to step on the glue. Remember to be careful when working with glue and yarn, and always prioritize safety while crafting.
Have fun creating unique hairstyles for your dolls! Remember, the possibilities are endless with this fun and creative technique of adding yarn hair onto a doll. So go ahead and give it a try, and see how you can transform your dolls with colorful, vibrant hair!
Frequently Asked Questions
Can I Use Different Types of Yarn for My Doll’s Hair?
Yes, you can use any type and color of yarn to create your doll’s hair. Just make sure it is not too thick or heavy. You can also mix and match different types of wool for a more textured look.
How Long Will the Yarn Hair Last?
With proper care, your doll’s yarn hair can last long. However, it may become frayed or matted over time, especially if played with frequently. If this happens, you can permanently remove the old yarn and add new strands to give your doll a hair makeover.
Can I Remove the Yarn Hair?
Yes, you can remove the yarn hair from your doll by gently pulling out the strands or using scissors to cut them off. This is why it’s essential not to use too much glue when attaching the yarn, so it’s easier to remove in the future.
Why Should I Avoid Cutting All the Yarn Strands to the Same Length?
Cutting all the yarn strands to the same length can give a stiff and unnatural look to your doll’s hair. You can achieve a more realistic and organic appearance by cutting them at different sizes. So be creative and have fun with it! Remember, practice makes perfect, so don’t worry if your first attempt could be better. Keep trying and experimenting until you find the ideal technique for your doll’s unique hairstyle.

Conclusion
Adding yarn hair to your dolls is a fun and easy way to give them a new look. With just a few materials and creativity, you can transform any doll into a unique masterpiece. With a few simple steps on how to put yarn hair on a doll, you too can add colorful yarn hair to your favorite dolls and create a statement piece that will have everyone talking.
Not only does this craft project allow for endless customization of the final product, but it can also be enjoyable for makers of all experience levels. So break out your scissors and get ready to experiment with various colors, shapes, and sizes– who knows where your subsequent doll-making pursuit will take you? Feel free to make bold choices when adding yarn hair to your doll! After all, staying true to one’s style is always better than trying to be like everyone else.