
Chenille, with its luxuriously soft texture and intricate appearance, has been a favored fabric for various crafts and textiles. The process of creating chenille involves transforming layers of fabric into a velvety pile that resembles caterpillar fur, lending a tactile and visual richness to projects.
From cozy blankets to fashionable accessories, knowing how to make chenille opens up a world of creative possibilities.
By combining layers of fabric, securing them with stitching, and then carefully snipping and fluffing the material, you can craft a beautiful and distinctive fabric that adds depth and warmth to your creations.

Whether you’re an experienced crafter or a novice intrigued by textile arts, learning the art of making chenille allows you to experiment with textures and create unique pieces that showcase both your craftsmanship and creativity.
What Is Chenille and Its Uses in Crafts and Textiles?
Chenille is a type of yarn that has a soft, fuzzy texture. It can be used for many different craft projects and textile products. Its unique texture adds an extra layer of texture and interest to whatever it is added to, making it a great accent material in crafting projects.
When chenille yarn is made, the fabric is woven together and then brushed or cut so that the fibers are all standing on end. This gives it its distinctive fuzzy texture. The yarn comes in many different colors, giving you lots of options for your projects. It can also be used to add interesting textures to garments, blankets, and decorative items like pillows and throws.
When using chenille yarn for a project, you should be aware of the fact that it can fray easily. To prevent this, use a stitch or two to secure the edges or wrap them with another type of fabric. This will help ensure that the chenille holds up over time. You can also make sure that your needle is sharp enough when stitching so as not to pull out any strands of the yarn.
Chenille can be used to create both modern and classic looks, depending on what type of project you have in mind. Whether used for a simple blanket or a garment, chenille adds an interesting texture that stands out from other fabrics and materials.
The Soft, Textured, and Luxurious Quality of Chenille Fabric
Chenille fabric is a luxurious, soft cloth that has an unmistakably textured feel. It can range from lightweight to heavy-weight and is best used for upholstery, bedding, pillows and throws, as well as apparel. It has a unique appearance due to the way it’s made – thousands of tiny threads form loops on the fabric’s surface, giving it a velvety appearance and incredibly soft feel.

When creating chenille fabric, you need to begin with yarn of your choice and then apply some clever weaving techniques. The main steps involve wrapping the yarn around several warp threads in a special way. This results in forming many tiny loops or tufts on the fabric’s surface.
The tufts are then cut, which causes all the loops to unravel and interlock with each other. This process creates a fabric that is durable, long-lasting, and filled with texture.
Chenille fabric is often used in home décor projects or special occasion apparel because of its softness and beauty. It can also be used for everyday clothing, such as t-shirts and leggings. If you’re looking to add a touch of sophistication and luxury to your projects, chenille fabric is the perfect choice. Plus, it’s easy to make – all you need are some spools of yarn and a few basic tools.
10 Steps How to Make Chenille
Step 1: Gather Your Materials
Prepare for your chenille-making adventure by gathering all the necessary materials. For this intricate craft, you’ll need a sturdy base fabric, such as cotton, flannel, or fleece, that will serve as the foundation for your chenille project. Additionally, select a contrasting fabric that will become the top layer, contributing to the chenille’s distinct texture.
To facilitate the process, arm yourself with sharp scissors for precision, straight pins for securing layers, a ruler for accurate measurements, and either a sewing machine or needle and thread for stitching. Finally, keep an iron nearby to press and set the chenille fabric.

Step 2: Choose Your Fabrics
Before embarking on your chenille project, give careful consideration to the fabrics you intend to use. Opt for a base fabric that aligns with the desired purpose of your final creation. If you’re envisioning a cozy blanket or a snug throw, fabrics like flannel or fleece might be ideal due to their warmth and softness.
For apparel items or accessories, cotton or lightweight denim could be more suitable. Once you’ve chosen the base fabric, select a contrasting fabric that complements it in both color and texture. This will be the fabric that transforms into the chenille texture, so choose wisely to achieve the desired visual and tactile effect.
Step 3: Cut the Base Fabric
With your fabrics selected, it’s time to prepare your base fabric. Measure and cut it to your preferred dimensions, keeping seam allowances in mind. To prevent fraying, take the extra step of hemming the edges of your base fabric. This preliminary preparation not only adds a polished look to your project but also contributes to its durability.
Step 4: Layer the Fabrics
Layering the fabrics is a crucial step in the chenille-making process. Lay the contrasting fabric on top of the base fabric, ensuring that the edges are aligned. To prevent shifting while sewing, secure the layers together with straight pins placed at regular intervals.
Step 5: Sew the Channels
Take your fabric layers to the sewing machine, or opt for hand-sewing if you prefer a more leisurely pace. Sew straight lines across the fabric, creating channels that are evenly spaced. These channels will dictate the width of your chenille loops and ultimately determine the luxuriousness of the final texture.

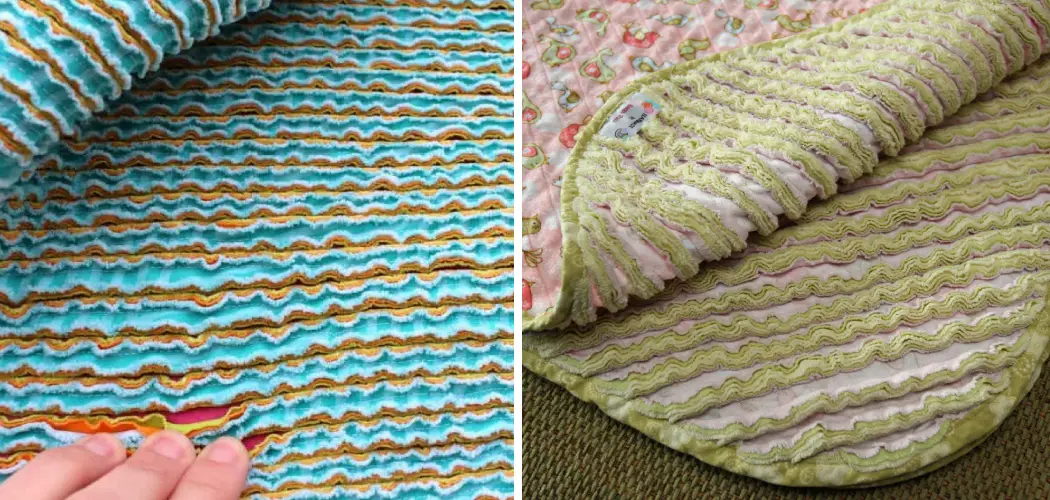
Step 6: Cut the Top Layer
This step marks the transition from flat fabrics to the characteristic chenille texture. Equip yourself with sharp scissors and carefully cut through the top layer along each stitched channel. Exercise caution to avoid cutting through the base fabric – your goal is to create strips of fabric that remain attached to the base.
Step 7: Fluff the Chenille
The magic of chenille starts to unfold in this step. Gently fluff the strips of fabric you’ve just cut, using your fingers to separate and loosen them. For a more refined touch, employ a soft brush to enhance the texture and create the plush appearance that defines chenille.
Step 8: Secure the Ends
To prevent your chenille masterpiece from unraveling, secure the ends of each channel with a few stitches. This not only fortifies the fabric strips but also lends a neat and professional finish to the edges.
Step 9: Press and Finish
Give your chenille fabric a smooth and polished look by gently ironing it on a low heat setting. This step not only eliminates any creases but also sets the fluffy texture in place. To achieve a refined and finished appearance, take a moment to trim any stray threads or uneven edges.
Step 10: Create Your Project
Now that you’ve created a unique and tactile piece of chenille fabric, the possibilities are endless. Consider transforming your chenille creation into cozy blankets, scarves, pillow covers, or even fashionable clothing items like vests or jackets. Sew the chenille fabric as you would with any other fabric, ensuring that the luxurious texture takes center stage in your design.
The Importance of Washing the Chenille Fabric to Enhance Its Texture
When it comes to crafting chenille fabric, washing the material is an essential step in creating a high-quality product. Washing can help remove dirt and debris from the fabric which can leave behind unsightly marks or discolorations when woven together.

Additionally, this process helps soften the threads of the fabric so that they lay flat and look more lustrous. Washing can also bring out the vibrant colors of chenille fabric, leading to a more eye-catching finished product.
To properly wash your chenille fabric, start by using gentle detergent and warm water to avoid damaging the material. Then, allow your fabric to soak for 5-10 minutes before gently agitating it in the water. Rinse several times with fresh warm water and lay flat to dry. After washing, you’ll be able to see the impressive texture of the chenille fabric clearly!
Some CommonMistakes to Avoid When Making Chanille
Making chenille can be tricky, and there are a few common mistakes that you should try to avoid.
First, cutting the yarn too short is a mistake that many people make. If you’re using yarn for your project, it’s important to have an inch or two of extra material as you measure out the right length for your chenille. This will give you some wiggle room for adjusting and trimming the ends later on.
Second, using an old hook can lead to difficulties in making chenille. It’s important to use a clean hook that hasn’t been used with other yarns, as this can affect the texture and overall quality of your project. Additionally, it’s best to use a metal hook that can better hold the yarn in place as you work.

Third, make sure to keep your tension consistent throughout the chenille process. Otherwise, your project will end up looking uneven or lopsided. With this in mind, it’s also important to use a yarn that is appropriate for your level of skill; if you’re a beginner, it’s better to start with a thicker yarn that is easier to work with.
Conclusion
In conclusion, chenille is a wonderful fabric to explore due to its unique texture and diverse range of colors. Even if you’re not an experienced knitter or crafter, making chenille is simple enough for beginners. From the different techniques to the materials needed, it’s easy to find step-by-step tutorials online that can walk you through the process.
Give Chenille a try today and experience a new craft project that’s sure to leave you wanting more. Need some ideas? Browse plenty of patterns here for inspiration! Whether you’re quilting, embroidering, or creating pillow covers and blankets, make your own cozy pieces with this classic fabric by learning the basics of how to make Chenille.