

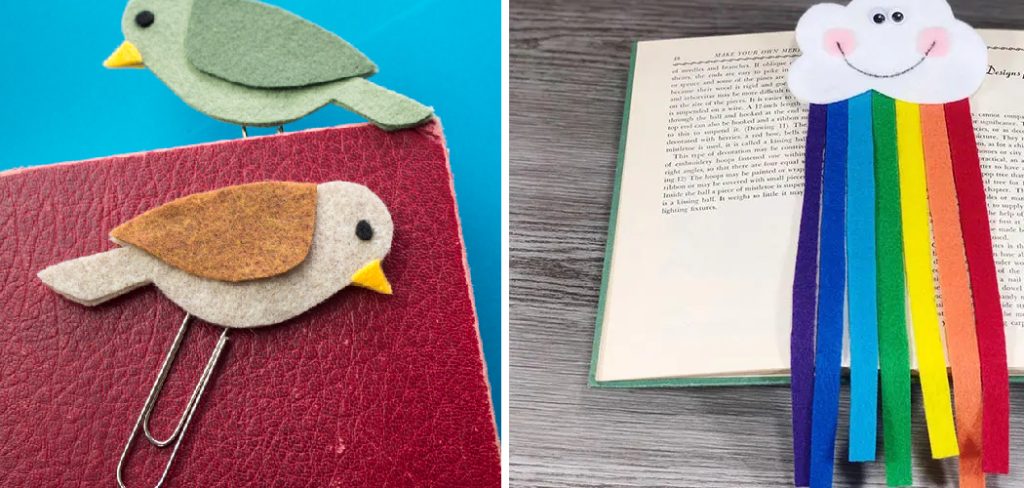
Are you looking to take your bookmark obsession to the next level? Felt bookmarks are a fun and creative way to keep your place in books, notes, and more. In this blog post, we’re going to cover how to make a felt bookmark that’s both beautiful and practical – plus, it makes a great gift!
Whether you’re a beginner or a pro, here are the supplies and steps needed to make your own unique felt bookmark. Always remember to be creative and have fun!
From choosing the right fabrics and materials to crafting your customized design – we’ve got all the information you need to create an awesome homemade felt bookmark. So grab scissors, glue, or stitches – and let’s get started!
What Will You Need?
Before making your felt bookmark, you’ll need to assemble the necessary materials. All of these items can be found at your local craft store.
- Felt: A few sheets of felt in different colors, plus some extra fabric or ribbon for decorations.
- Scissors: Sharp scissors will be necessary for cutting the felt.
- Glue: You’ll need a glue gun or fabric glue if you plan on attaching any decorations to your bookmark.
- Ruler/Measuring Tape: This will help ensure your bookmark is the desired size and shape.
- Optional items: Optional items such as beads, bows, buttons, sequins, and other decorations can also be used to add character to your bookmarks!
10 Easy Steps on How to Make a Felt Bookmark
Now that you have all of your materials ready, it’s time to start creating! Here are the steps for making a basic felt bookmark:
Step 1. Measure and Cut:
Start by measuring the length and width of your bookmark. Using your ruler or measuring tape, draw a straight line on the felt with a pen or marker, then cut it out. Generally, bookmarks should be about 4 inches wide and 8-10 inches long.
Step 2. Design:
Decide what shape and design you want your bookmark to be – whether it’s a rectangle, triangle, heart – or any other creative shape. Once you’ve chosen a design, cut two pieces of felt for each side of the bookmark so that they match in size and shape. It’s helpful to draw your design on one side of the felt before you cut it out.
Step 3. Glue/Stitch:
Now it’s time to glue or stitch the two pieces together. This is where fabric glue and a hot glue gun come in handy! It’s best to apply an even layer of glue around all edges for extra security. Alternatively, you can stitch the two pieces of felt together with a small needle and thread.
Step 4. Add Decorations:
You can now add decorations to your bookmark if desired – such as beads, bows, buttons, sequins, and other items. Use of fabric glue or hot glue to attach any additional elements. However, make sure not to use too much glue as it may damage the felt material.
Step 5. Trim Edges:
Once all decorations have been added, trim off any excess edges so that your bookmark is neat and tidy in appearance. This will also help keep the edges from the fray. You can use scissors, a craft knife, or an exacto blade for this step.
Step 6. Finish Off:
Finally, finish off your bookmark by adding a tassel (optional) or ribbon to the top as a finishing touch. Another popular option is to add a charm or pendant for extra decoration. It will make your bookmark look even more beautiful.
Step 7. Let it Dry:
Set aside your bookmark and let it dry completely before using it.
And there you have it – a homemade felt bookmark of your own! With just a few simple steps, you can make a unique, personalized bookmark that’s perfect for keeping your place in books or notes. Have fun crafting, and enjoy all of the compliments you receive on your beautiful creation!
Step 8. Give it Away:
Remember to share your creations with others! Felt bookmarks make great gifts for friends, family, and even colleagues. Try adding a personal message or photo to make it even more special.
Step 9. Create More:
Once you get the hang of making felt bookmarks, why not create some more? With so many different colors and shapes, there are endless possibilities for creating unique pieces that reflect your style and personality. Keep practicing, and you’ll have a collection of awesome bookmarks in no time!
Step 10. Enjoy:
Most importantly – enjoy your new bookmark! Whether you’re using it in a storybook or journal, this handmade creation will be sure to bring smiles every time you pick it up. Remember to keep your bookmark clean and safe; it will last for years.
Following these steps will give you a beautiful homemade felt bookmark in no time. With a few materials and some creative flair, you can create something unique that will last for years! So put on your crafting hat, get creative, and make some fun felt bookmarks!
5 Additional Tips and Tricks
- Use pinking shears to cut the paper template for your felt bookmark. This will help to prevent fraying and give it a more professional finish.
- Use a washable fabric marker or tailor’s chalk to draw your template onto the felt. This will help you keep an accurate shape and size as you cut out your pieces.
- Remember to use a smaller stitch length when sewing felt – this will help prevent any puckering or gathering in the fabric.
- Add embellishments such as buttons, beads, ribbons or lace to customize your bookmark and add texture.
- Finish off your bookmark with a stretchy ribbon loop so it’s easy to attach and remove from books! You can also add a tassel for extra flair – simply tie yarn around a piece of cardboard and trim the ends for a fun accessory.
With these tips and tricks, you can easily create a fun felt bookmark that is unique to your style.
5 Things You Should Avoid
- Avoid paper templates with sharp edges. Sharp edges can damage the felt when cutting and leave an uneven edge.
- Avoid using thick thread as it can make the felt pucker and pull.
- Avoid pressing too hard on the surface when drawing templates, as this can distort the shape of your bookmark.
- Avoid using too many embellishments, or they’ll compete for attention and look cluttered!
- Avoid stretching the felt when sewing – this will cause it to warp your bookmark and ruin its shape.
These tips will help you create a professional-looking felt bookmark that will last for years!
5 Different Style Ideas
- Create a felt bookmark with an animal shape, such as a bunny or bear. You can use different felt colors to make the eyes, ears, and other features stand out!
- Make a festive holiday bookmark featuring your favorite symbols and characters – Christmas trees, snowmen, and reindeer are all fun ideas!
- Get creative with geometric shapes and create a boldly patterned bookmark that will be eye-catching!
- Embroider your design onto the felt for an extra personal touch – think flowers, birds, or inspirational quotes!
- For a classic look, add some lace around the edges of your bookmark for a delicate finish.
These style ideas are sure to inspire you to create a unique felt bookmark that is truly one of a kind!
How Can You Customize Your Felt Bookmark?
- Add a ribbon loop at the top of your bookmark so you can easily attach and remove it from books.
- Use fabric paint to draw designs or write a special message on the surface of your bookmark.
- Embellish your bookmark with buttons, beads, and ribbons for extra texture and color.
- Different felt colors make patterns or shapes like hearts or stars.
- Incorporate embroidery into your design for an even more personalized look!
Using these simple customization tips, you can create a felt bookmark that’s unique to you and adds character to any book it adorns! Now get crafty and have fun creating your one-of-a-kind felt bookmark today!
Conclusion
Crafting a felt bookmark is a fun activity and the perfect way to dazzle up an old book you’re reading. And once you’ve mastered the craft, it can be adapted for any occasion; you can create a new set of themed bookmarks for yourself or give them away as handmade presents. With some basic materials and time, you can make a cute, handmade bookmark that will keep your place in books for years.
Hopefully, the article on how to make a felt bookmark has made the process easier to understand and fun for you. Why not go today and get creative with your felt bookmark designs?
So what are you waiting for? Get creative and start making those awesome felt bookmarks! Plus, if you ever feel stuck on how to get started, our tutorial can serve as a helpful guide along the way. Enjoy turning fabrics into something unique and special — have fun bookmarking!