
Are you a parent with a fridge door cluttered with various artworks by your little Picasso? Does your home possess corners brimming with craft papers, glitter, and glue? If yes, then you’ve landed on the right page.
This guide will share some creative and easy ways to display your children’s art at home, transforming those countless pieces into treasured mementos and an integral part of your home decor. Let’s embark on this journey of turning your home into a gallery of imagination and creativity.

In this blog post, we’ll explore how to display children’s art at home while providing tips for ensuring everything looks cohesive and professional. So whether you’re an experienced curator or a novice decorator, these simple steps will help make every art piece shine bright!
What Will You Need?
To embark on this creative journey of showcasing your child’s artistic masterpieces, you’ll need some essential items:
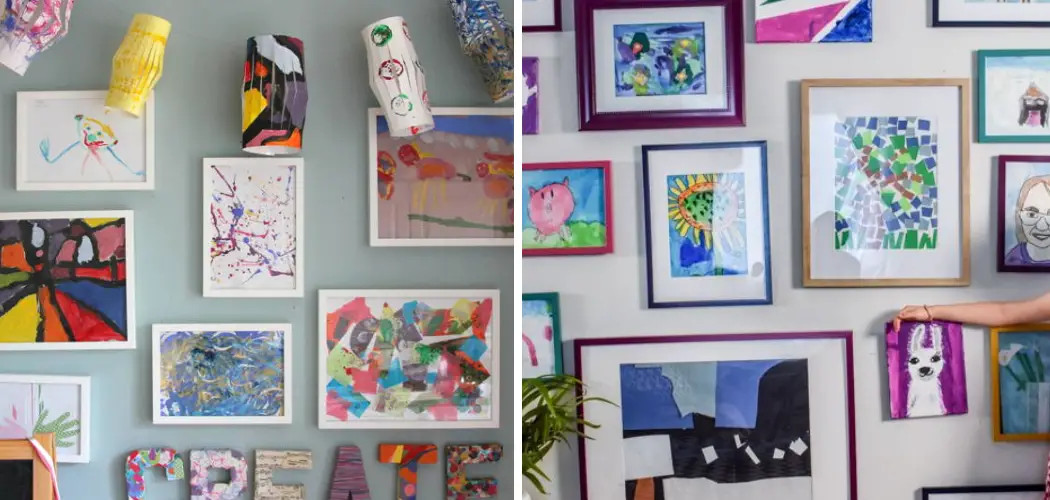
- Frames: Choose various sizes and styles to fit different art pieces. These frames will give your children’s art a polished look and offer protection from dust and damage.
- Clipboards: Clipboards can be a great solution for an easily changeable display. You can mount these on the wall to hang the artwork and switch it out as often as you please.
- Curtain Rods or Wire: These can work as a dynamic gallery where you can hang art using clips. It’s an excellent method for displaying several pieces in a small space.
- LED Light Strips: Use LED strips to highlight featured pieces and add a professional touch.
- Shelves: Shelves with front ledges can provide a practical display solution. You can lean framed pieces against the wall, making it easy to swap out artwork.
Remember, the goal here is not perfection but to celebrate your child’s creativity. So feel free to experiment with these elements to create a display that suits your home and aesthetic preference.
10 Easy Steps on How to Display Children’s Art at Home
Step 1. Sort the Artwork
The first step in displaying your children’s artwork is sorting through many creations. Divide the artwork into ‘keepers,’ ‘recycle,’ and ‘photo archive.’ ‘Keepers’ are pieces that are particularly special or display significant progress, and these are the ones you’ll want to display. The ‘recycle’ pile can include art that doesn’t hold as much sentimental value.

The ‘photo archive’ is for those pieces that are too large or bulky to keep but you’d like to have a digital memory of. This categorization helps manage the clutter and allows you to appreciate the outstanding pieces that deserve a special spot on your walls.
Step 2. Choose the Display Location
The next step is to decide where you want to display the art. Consider areas in your home where the art can be appreciated but is also safe from accidental damage. High-traffic areas like hallways and more private spaces like your child’s bedroom can be great.
Consider creating a rotating gallery in a particular spot or spreading pieces throughout the house. Remember, the goal is to integrate art into your home in a way that makes both you and your child proud. It’s also crucial to ensure that the chosen area is well-lit, either naturally or artificially, to highlight the beauty of each piece.
Step 3. Frame the Artwork
Once you’ve sorted the artwork and chosen the display location, the next step is to frame the chosen pieces. Framing not only gives the artwork a finished and polished look but also protects it from dust, light, and other potential damage. You can opt for a classic frame with a matte, a floating frame for 3D pieces, or even a clip frame for an easily interchanged display.
If you’re on a budget, thrift stores often have interesting and affordable frames. Remember to involve your child in the process. Let them choose the frame or help in arranging the art within it. After all, this display is as much about their journey and creativity as it is about home decor.

Step 4. Install Display Elements
After framing the artwork, the next step is to install your chosen display elements. This could include installing shelves, hanging frames, or fixing clipboards on the walls. Ensure that your chosen method is secure and will safely hold the artwork. If you’re using curtain rods or wire, fix them at a level where the art hangs at eye level.
For LED light strips, position them so they effectively highlight the artwork without being directly visible. When installing display elements, keep spacing in mind. You want the area to look clear, so give each piece some room to stand out. Involve your child in this process, too, so they can contribute to the final layout of their artwork display.
Step 5. Arrange and Hang the Artwork
Now comes the fun part – arranging and hanging the artwork. Based on each piece’s size and color scheme, decide which artwork goes where. You should group similar themes or colors together or create a more eclectic mix. If you’re creating a gallery-style display, sketch your arrangement on paper before hammering nails into the wall.
Remember, variety is key to making the display interesting. Mix horizontally oriented pieces with vertical ones, large pieces with small ones, and so on. For clipboards or curtain rods, simply clip on the artwork. And for shelves, lean the framed pieces against the wall.
Step 6. Light the Artwork
After hanging the artwork, it’s time to focus on lighting, which can enhance the visual appeal of your child’s creations. If you have natural light in the display area, great! If not, consider installing some art-friendly lighting. LED light strips can be placed above frames or shelves to highlight individual pieces. You should install a spotlight or a picture light for larger pieces or a collection of artworks.

Step 7. Regularly Update the Display
After all the effort you’ve put into creating the perfect display for your child’s artwork, remember to keep it fresh and exciting by regularly updating it. This doesn’t mean you need to change the entire setup frequently, but rotating the artwork will keep the display dynamic and give all the ‘keeper’ pieces time to shine. A bonus is that your child will be excited to create new artwork for the display.
Step 8. Encourage and Appreciate
One of the primary purposes of displaying your child’s artwork is to encourage their creativity and appreciate their effort. Make sure you admire the artwork with your child, discuss the pieces, and commend their hard work. This not only boosts their confidence but also fosters a love for art.
Step 9. Photograph and Document
An important step in the process of displaying your child’s artwork is to photograph and document it. This creates a digital archive that can be viewed in the future, allowing you to appreciate the evolution of your child’s artistic skills.
You can create a photo album, a digital slideshow, or even a blog to showcase these photographs. This documentation can serve as a wonderful keepsake and a practical solution for managing the volume of art that children often produce.
Step 10. Share the Artwork
Lastly, remember to share your child’s artistic creations with friends, family, and the broader community. This could be done through social media, email newsletters, or even by inviting people to see your home’s new gallery.
Showcasing your child’s art can be a powerful tool for encouragement and motivation. It gives them a sense of pride in their work and can inspire them to continue creating and experimenting with art.

Always remember to respect your child’s feelings about their work; only share pieces they are comfortable sharing. By doing this, you’re showcasing your child’s creativity and fostering a community that values and appreciates art.
5 Additional Tips and Tricks
- Mix and Match: Feel free to combine different display techniques to create a unique and dynamic gallery. For instance, you could use shelves for some pieces, frames for others, and clipboards for the rest.
- Themed Displays: Consider having themed displays based on holidays, seasons, or the type of artwork. This can create a fun and interactive way to involve your child in the design process.
- Interactive Elements: Consider adding interactive elements to the display. A chalkboard or whiteboard can be a great idea for kids to add doodles and messages.
- Incorporate Art into Regular Decor: Don’t limit the display to one area of your home. Incorporate your child’s artwork into your home decor, such as using their art as the cover for throw pillows or printing it on coffee mugs.
- Safety First: Install artwork at a safe height and secure heavier pieces properly to avoid accidents. Frameless or acrylic frames can be a safer option for kids’ rooms.
With these steps, tips, and tricks in mind, you’re well on your way to creating a beautiful display that serves your child’s creativity.
Conclusion
How to display children’s art at home shows them that you care and value them and their efforts. Students who have art displayed are more likely to engage in these creative activities long-term, and, of course, it also creates a lovely home atmosphere. Whether it’s every single piece or just a few select creations, creating a space for their work is an important part of the creative process.
Taking time to choose the right materials and invest in displaying children’s artwork is both easy and valuable. This will provide a safe place for creativity to thrive and brighten any room with fun colors and designs unique to your child’s individual style.
It may not be practical to hang up all of your kid’s artwork, but taking some time out of each month or week to provide them with special frames or photo albums can make all of the difference and ensure that their creative endeavors are always on display!