
Hello, flower lovers and DIY enthusiasts! Are you looking for a unique and beautiful way to decorate your walls or add a special touch to your events? Then you have come to the right place. In this blog post, we will discuss the art of decorating hoops with flowers, a trend that has been taking over social media and event décor.

Whether planning a wedding or baby shower or simply wanting to elevate your home decor game, incorporating flowers onto hoops is an easy yet stunning option. So grab your favorite cup of tea and learn to create eye-catching floral displays using simple materials and techniques.
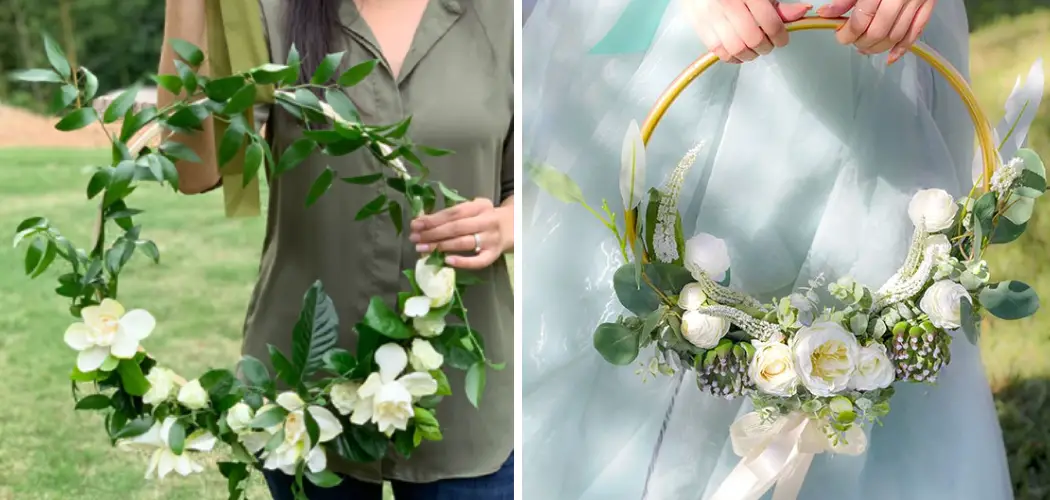
Get ready for major inspiration on bringing nature’s beauty into any space with our guide on “How To Decorate A Hoop With Flowers.”
What Will You Need?
Before we dive into the step-by-step process, let’s take a look at the materials you will need to create your floral hoop masterpiece:
- A wooden or metal hoop (any size of your choice)
- Floral wire or zip ties
- Wire cutters
- Scissors
- An assortment of fresh or artificial flowers and greenery
- Ribbon or twine (optional)
- Hot glue gun (optional)
Now that you have all your materials ready let’s begin creating a stunning floral hoop display!
10 Easy Steps on How to Decorate a Hoop With Flowers
Step 1. Choose Your Hoop
The first step in decorating a hoop with flowers is to choose the right hoop for your project. You can use any size or material of the ring, but make sure it is sturdy enough to hold the weight of the flowers and decorations you will be adding. You can also choose a plain hoop or one already decorated with fabric or ribbon.

Step 2. Gather Your Supplies
Once you have your hoop, gather all the supplies you need for your project. This may include fresh or artificial flowers, greenery, floral wire, a hot glue gun, scissors, and any other decorative elements you want to add, such as ribbons or beads. Make sure to have a variety of flower sizes and colors to create a visually appealing design.
Step 3. Arrange and Attach Flowers
Start by arranging your flowers and greenery on the hoop until you are happy with the placement. Then, use floral wire to secure the stems onto the hoop. If using artificial flowers, you can also use hot glue to attach them directly onto the hoop. Continue adding flowers and decorations until your desired look is achieved. You can also add a ribbon or string at the top of the hoop for hanging purposes if desired.
Step 4. Adjust and Fill in Gaps
After attaching the flowers, step back and look at your floral hoop. Make any necessary adjustments, repositioning flowers if needed. Look for any gaps in your design and fill them in with more flowers or greenery.
The goal is to create a balanced and complete look, with the hoop covered mainly by your floral arrangement. At this stage, you can add any additional decorative elements, such as beads, feathers, or small ornaments, to give your floral hoop a touch of personality and charm.
Step 5. Secure Your Arrangement
Once you’re satisfied with your design, take extra measures to ensure everything is secure. Reinforce the attachment of your flowers and greenery with additional floral wire or hot glue as needed. This step is crucial to prevent elements from falling off once your hoop is hung.

Step 6. Add Finishing Touches
Now that everything is secure, it’s time for the finishing touches. You could add a bow made from the ribbon at the top or bottom of the hoop for a little extra flair, or perhaps drape a string of fairy lights around the hoop to add a soft, magical glow. Be creative, and let your imagination run wild!
Step 7. Choose the Perfect Spot
Finally, find the perfect spot to display your floral hoop. Consider hanging it on a wall, in front of a window, or even from the ceiling. Wherever you decide, ensure it’s a location where all can admire this beautiful creation.
Step 8. Hang Your Floral Hoop
Once you’ve found the perfect spot, it’s time to hang your floral hoop. You might use a nail or wall hook if you’re hanging it on a wall. Consider using a suction cup hook or a ceiling hook for a window or ceiling. Carefully place your hoop onto the hook, ensuring it is secure. Step back and admire your work – you’ve just created a beautiful piece of décor that brings a touch of nature’s beauty to your space.
Step 9. Care for Your Floral Hoop
Remember to care for your floral hoop to prolong its beauty if you’ve used fresh flowers. Spritz it with water every couple of days to keep the flowers fresh. If you’ve used artificial flowers, dust them lightly from time to time to keep your hoop looking fresh and vibrant. Enjoy the natural, aesthetic appeal this piece adds to your space!
Step 10. Share Your Creation
After all the steps, it’s time to share your creation with others. Share a picture of your beautiful floral hoop on social media. You might inspire others to explore their creative side and try this fabulous DIY project. Remember, decorating a hoop with flowers is about expressing your creativity and creating something that brings joy to your space.

So, don’t be shy about trying different flower types, color combinations, and decoration ideas until you achieve your desired look. Keep experimenting and make each floral hoop uniquely yours!
By following these easy steps, you can create a stunning floral hoop that will add charm and beauty to any space.
5 Additional Tips and Tricks
- Experiment with Colors: Don’t limit yourself to one or two colors. Experiment with different color combinations to achieve a visually stunning hoop.
- Play with Sizes: Use flowers of various sizes to create a rich, textured look. Larger flowers can serve as focal points, while smaller ones fill in gaps and add depth.
- Add Greenery: Incorporating leaves and greenery can provide contrast and make your flower colors pop more. Try ferns, eucalyptus, or ivy for a lush, complete look.
- Secure Your Design: Ensure flowers and greenery are tightly secured to the hoop. Use floral wire or hot glue to keep everything in place.
- Consider the Backdrop: Remember, the hoop isn’t just about the flowers. Consider where it will hang and how it will look against the backdrop. This can influence your color and flower choices.
With these additional tips and tricks, you can take your hoop decorating skills to the next level. Remember to have fun and let your creativity flow as you experiment with different colors, sizes, and greenery options.
5 Things You Should Avoid
- Avoid Overcrowding: While it’s essential to create a rich, complete look, don’t overcrowd your hoop with too many flowers. This could make your creation look cluttered, obscuring the individual beauty of each flower.
- Don’t Use Fragile Flowers: Avoid using flowers that wilt quickly or are fragile. They may not survive being attached to the hoop or may not last long after they’re attached.
- Avoid One-sided Decorating: Don’t focus all the embellishments on one side of the hoop. Aim for balance to ensure your creation looks good from every angle.
- Don’t Ignore the Hoop’s Size: Don’t disregard the size of the hoop when choosing your flowers. Large flowers on a small hoop, or vice versa, can throw off the proportions and look awkward.
- Avoid Rushing the Process: Lastly, don’t rush. Creating a beautifully decorated hoop takes time. Be patient and enjoy the process to ensure your result is something you’re proud of.

By avoiding these common mistakes, you can ensure that your hoop decorating experience is stress-free and results in a stunning finished product. Now go grab your flowers and get creative!
5 Different Design Ideas
- Monochromatic: Choose flowers of the same color family for a clean and elegant look. Use different shades and textures to add depth to your design.
- Rainbow: Create a vibrant and colorful hoop by using a variety of flowers in every color of the rainbow.
- Seasonal Theme: Embrace the beauty of each season by choosing flowers that are in bloom during that time. For example, use pastel-colored flowers for a spring-themed hoop or rich, warm-toned flowers for a fall-inspired design.
- Bohemian: Create a boho-chic look using a combination of bright and muted colors and different types of flowers and greenery to create a carefree and eclectic design.
- Personalized: Add a personal touch by incorporating flowers that hold special meaning to you or the person you’re gifting the hoop to. This could be their favorite flower, birth month flower, or even flowers from a significant event in their life.
These are just a few ideas to get you started, but feel free to mix and match different design elements to create a unique and personalized hoop. Remember, the possibilities are endless when decorating a circle with flowers!
Conclusion
In conclusion, how to decorate a hoop with flowers is not only a fun and creative project, but it also adds a touch of natural beauty to any space. From choosing the right flowers to arranging them visually pleasingly, there are so many ways to personalize your floral hoop decoration. Whether you hang it on your wall or use it as a unique table centerpiece, this DIY project will surely impress you and others.
Don’t be afraid to think outside the box and experiment with different types of flowers and embellishments. And if you’re feeling extra ambitious, why try incorporating some greenery or adding some dried flowers for a rustic touch? The possibilities are endless!
So, gather your supplies and let your creativity blossom with this delightful floral hoop decoration idea. We can’t wait to see what you come up with!
Expertise:
Crafting expert with a focus on innovative techniques and diverse materials.
Specialization:
- Textile arts (weaving, embroidery, and fabric dyeing)
- Woodworking and furniture design
- Mixed media and upcycling projects
Recognition:
- Featured in local art exhibits showcasing innovative craft projects
- Collaborated with community organizations to promote crafting workshops
- Received accolades for contributions to sustainable crafting initiatives
Mission:
- To inspire and empower crafters of all levels to discover their creative potential
- Encourages experimentation and self-expression through hands-on projects