
Are you ready to learn the art of crochet? Have you been searching for a unique and rewarding craft project to take on? Are you looking for something that will challenge your creativity and crafting skills, while creating something cute and functional that can be cherished forever?

Look no further than this delightful tutorial on how to crochet an owl! With these simple step-by-step instructions, even those without any prior experience in crocheting can easily create their own charming little companion. Let’s get started!
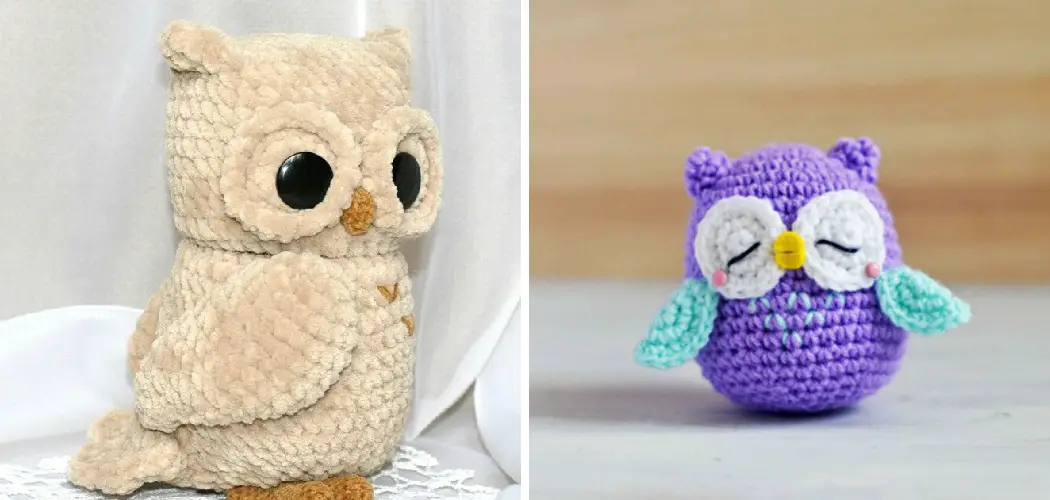
Tools and Materials You Will Need to Crochet an Owl
- Crochet hook (size and type will depend on the yarn weight you choose)
- Yarn in desired colors (recommended: brown, white, black, yellow)
- Scissors
- Tapestry needle
- Safety eyes or buttons for eyes (optional)
- Fiberfill stuffing or yarn scraps
Step-by-step Guidelines on How to Crochet an Owl
Step 1: Gather Your Materials
Before you begin crocheting, make sure you have all the necessary tools and materials within reach. This will save time and prevent frustration as you work on your project. You can find all the tools and materials mentioned above at most craft stores or online. If you’re new to crochet, consider starting with a medium-weight yarn and a size H or I crochet hook. This will make it easier to see your stitches and work with the yarn.

Step 2: Start with a Magic Ring
To begin crocheting your owl, you’ll need to create a magic ring. This technique allows you to start your project without leaving a hole in the center. Begin by holding your yarn between your thumb and index finger, leaving about 6 inches of yarn tail. Wrap the working yarn over your fingers, bringing it toward you and then around to the back. Insert your hook into the ring, yarn over, and pull up a loop.
Step 3: Work Your First Round
Next, work your first round by making six single crochet stitches into the magic ring. To do this, insert your hook into the center of the ring, yarn over it, and pull up a loop. Yarn over again and pull through both loops on your hook to complete the stitch. Repeat this process five more times until you have six single crochet stitches in total.
Step 4: Create the Body
In this step, you’ll be increasing the number of single crochet stitches to create the body of your owl. Start by crocheting two single crochet stitches into each stitch around the ring, for a total of 12 stitches.
To do this, insert your hook into the first stitch, yarn over, and pull up a loop, then yarn over again and pull through both loops on your hook. Repeat this process in the next stitch to create your second single crochet stitch. Continue this pattern around the ring until you reach the end.
Step 5: Continue Increasing
To make your owl’s body larger, continue increasing by crocheting one single crochet stitch in the next stitch and then two single crochet stitches in the following stitch. Repeat this pattern around the ring for a total of 18 stitches. If you want a larger owl, continue increasing in this manner until you reach your desired size.
Step 6: Create the Head
To create the head of your owl, crochet one single crochet stitch in each stitch around the body. Repeat this pattern for as many rounds as you’d like to make the head taller. For a small owl, work three or four rounds. For a larger owl, work five or more rounds. Once you have completed your desired number of rounds, fasten off your yarn and cut it, leaving a 6-inch tail.

Step 7: Create the Ears
To create the ears of your owl, begin by attaching the white yarn to one side of the head. Start by making two single crochet stitches in the first stitch, followed by one single crochet stitch in the next stitch. Repeat this pattern for a total of two rounds. Fasten off your yarn and cut it, leaving a 6-inch tail. While working on the second side of the head, make sure to place your stitches in opposite directions from the first side.
Step 8: Create the Wings
To create the wings, attach your brown yarn to one side of the body. Work six single crochet stitches around each wing, then slip the stitch into the next stitch to join and fasten off. Repeat this process for the other wing. If you’d like, you can add more details to your owl by using different colors or stitches for the wings.
Step 9: Finishing Touches
To complete your owl, use a tapestry needle to weave in any loose yarn ends and trim them. You can also add safety eyes or buttons for eyes by attaching them between rounds on the head. If you’d like, you can stuff your owl with fiberfill or yarn scraps for a plump and cuddly finished product. Make sure to leave enough room for the stuffing so your owl can maintain its shape.
Following these simple steps, you can easily create an adorable and unique crochet owl that can be used as a toy, decoration, or gift. As you become more comfortable with the basic techniques, feel free to experiment with different yarns, colors, and patterns to make your own special creations.
Crocheting is a wonderful hobby that blends creativity and relaxation, so have fun and enjoy the process! So, what are you waiting for? Grab your tools and materials and let’s get crocheting! Happy crafting!

Additional Tips and Tricks to Crochet an Owl
1. When choosing yarn for your owl, select a color that is close to the natural feathers of an owl. This will make your crocheted owl look more realistic.
2. If you are new to crochet, start with a basic amigurumi pattern before attempting a complex design like an owl. Practice makes perfect!
3. Use safety eyes or buttons for the eyes instead of crocheting them. This will give your owl a more professional and polished look.
4. To add texture to your crocheted owl, use different crochet stitches like the bobble or popcorn stitch for the feathers.
5. Consider adding small details like a beak or talons using felt or fabric instead of crochet. This will add dimension and make your owl stand out.
6. Don’t be afraid to experiment with different sizes and shapes when crocheting your owl. You can create owls of all sizes, from tiny keychain charms to large decorative pieces.
7. Utilize online resources or join a local crochet group to get tips and advice from experienced crocheters. They may have unique techniques or patterns for creating owls that you can incorporate into your own design.
8. Take your time and have patience when crocheting an owl. It may take a few tries to get it right, but the end result will be worth it.
9. Don’t be afraid to add your own personal touch to your crocheted owl, whether it’s adding a bow tie or using different colors for the feathers. Let your creativity shine!
10. Finally, have fun with your crocheted owl project! Crocheting is a relaxing and enjoyable hobby, so embrace the process and enjoy the end result.
Following these tips and tricks will not only help you create a beautiful crocheted owl, but it will also enhance your crochet skills overall. Happy crocheting!

Things You Should Consider to Crochet an Owl
1. First, you should consider the level of difficulty of the crochet pattern. Beginners should start with a simple owl pattern, while advanced crocheters can challenge themselves with more intricate designs.
2. Next, choose the right yarn and hook size for your owl project. The type of yarn will affect the overall look and feel of your finished owl, so consider using soft and fuzzy yarns for a cuddly owl or a sturdier yarn for a more durable toy.
3. It’s important to have the necessary supplies before starting your crochet project. This includes a crochet hook, scissors, tapestry needle, stuffing material, and any additional embellishments you may want to add to your owl.
4. Familiarize yourself with basic crochet stitches such as single crochet, double crochet, and slip stitch. These stitches will be used in most owl patterns and having a strong foundation in these basic stitches will make your project easier to complete.
5. Pay attention to the pattern instructions and any special techniques required. Some patterns may require you to work in rounds or use the amigurumi technique, so make sure you understand these before starting your project.
6. Take your time and don’t rush through the project. Crocheting an owl may be a time-consuming process, but it’s important to have patience and enjoy the journey.
7. Don’t be afraid to experiment with different colors and yarns to create a unique and personalized owl. You can also add small details like buttons or embroidery to give your owl some character.
8. Practice makes perfect, so don’t get discouraged if your first attempt doesn’t turn out exactly as you envisioned. Keep practicing and trying different patterns to improve your skills.
9. When finished with your crochet owl, take the time to properly stuff it and finish off any loose ends for a polished final product.
Following these considerations will help you successfully crochet an owl and create a cute and cuddly friend or decorative piece. Remember to have fun and let your creativity shine while crocheting! So, take the time to learn new techniques and patterns, and don’t be afraid to try new things. With practice, you’ll be able to crochet more complex owls and create beautiful handmade pieces. Enjoy the process and have fun with your new hobby! As always, happy crocheting!

Precautions Need to Be Followed for Crocheting an Owl
1. First and foremost, always make sure to read the pattern instructions carefully before starting the project. This will help you understand the steps involved and avoid any mistakes.
2. Choose a suitable yarn for your project. For an owl, a medium-weight yarn in brown or grey colors would work best. Also, keep in mind the amount of yarn required according to the size of your owl.
3. It is recommended to use a crochet hook size slightly smaller than what the yarn suggests, as this will give your owl a tighter and more defined look.
4. Always start with a swatch or small practice piece before beginning your main project. This will help you get familiar with the pattern and also determine if any adjustments need to be made.
5. Keep in mind the tension or gauge mentioned in the pattern. This is important to ensure that your owl turns out the correct size and shape.
6. If you are new to crocheting, it is recommended to start with a simpler owl pattern before attempting more complex ones. This will help you gain confidence and improve your skills.
6. Pay attention to detail while crocheting an owl. Small details like the placement and size of the eyes, beak, and wings can make a big difference in the overall appearance of your finished project.
7. Take breaks while crocheting to avoid strain on your hands and wrists. It is important to stretch and rest periodically to prevent any injuries.
Following these precautions will help you crochet an owl that is not only beautiful but also well-made and durable. Remember to have fun and enjoy the process of creating your own handmade owl. Happy crocheting!

Conclusion
It is now time to end this blog post on how to crochet an owl. You now have the basic skills and know-how needed to take a simple pattern and transform it into a joyful and memorable piece of art. Now, what will you choose for your next creative endeavor? If owls are your thing, why not try out different colors or styles of yarn?
You can even get creative with different sizes and shapes of eyes and ears. No matter what you choose, the end result will be sure to bring a smile to your face every time you look at it! So go ahead—pick up some yarn and start crocheting your own beautiful owl today and show off your latest creation! Who knows—you just may find yourself hooked on the craft for life!