
Are you looking to take your crochet skills up a notch? Gauge is an essential tool for helping you understand how different stitches and sizes of hook work together. Without knowing the gauge, it’s impossible to get the desired measurements in any project. However, measuring gauge correctly can be daunting if you’ve never tried it before!

Gauge crochet is a measurement tool that enables you to ensure your project turns out perfectly. It involves counting the number of stitches and rows in a given area to determine how many stitches you should have per inch or cm.
This blog post will walk you through the basics of how to check gauge crochet and provide expert tips so that you can become a pro at checking your projects with confidence. So grab your hooks and let’s get started!
What Will You Need?
To check gauge crochet, you will need the following materials:
- A pattern or project that includes a gauge requirement
- Yarn in the recommended weight and color for your project
- Crochet hooks in different sizes (as specified by the pattern)
- A ruler or measuring tape
- Stitch markers (optional)
Once you have these items, you are ready to start checking the gauge!
10 Easy Steps on How to Check Gauge Crochet
Step 1. Understand the Gauge
Before you can check your gauge, it is essential to understand what it is and why it is important. The indicator of a crochet project is the number of stitches and rows per inch that should be worked to achieve the desired size. This will vary depending on the pattern and yarn used, so read through your pattern carefully before beginning.

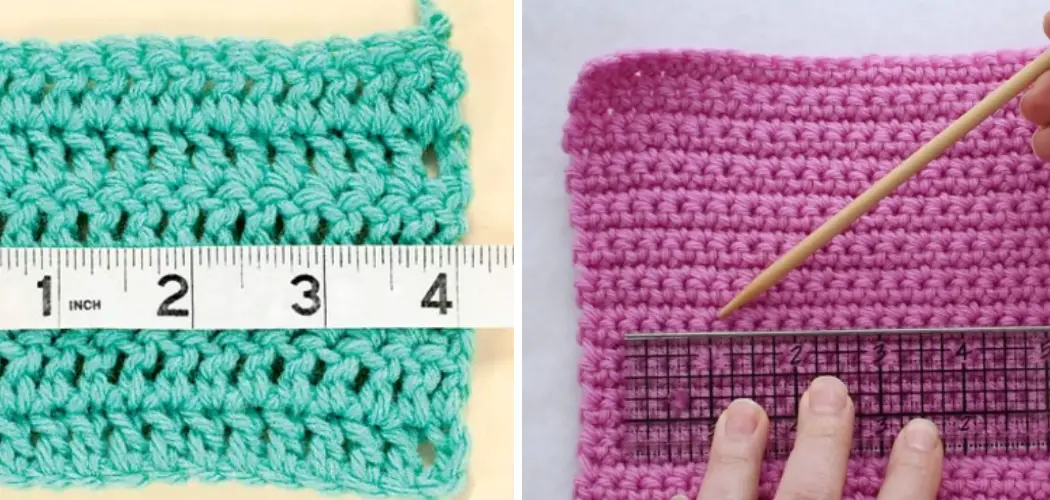
Step 2. Measure Your Swatch
Once you have read through your pattern and understand what your gauge should be, you can begin to measure your swatch. To do this, use a ruler or measuring tape to count how many stitches and rows fit into one inch of the swatch. If you find more or fewer stitches than specified in the pattern, you may need to adjust your hook size.
Step 3. Adjust Your Hook Size
If your swatch does not match the gauge specified in the pattern, you must adjust your hook size accordingly. For example, if there are more stitches per inch than set in the pattern, you will need to use a larger hook size to get fewer stitches per inch. Conversely, if there are fewer stitches per inch than specified in the pattern, you will need to use a smaller hook size to get more stitches per inch.
Step 4. Re-measure Your Swatch
After adjusting your hook size, make another swatch and measure it again. Count the number of stitches and rows in a given inch. If it aligns with the measurements specified in the pattern, you’ve found your correct hook size.
If it doesn’t, you may need to repeat the process of adjusting your hook size and re-measuring your swatch until you achieve the required gauge. Practice and patience are essential in this step. It might take a few tries, but it’s worth it to ensure your crochet project turns out perfectly!
Step 5. Confirm Your Gauge
Once your swatch matches the gauge specified in the pattern, it’s essential to confirm your gauge. This means that you should check the indicator several times in different places on the swatch to ensure it’s consistent throughout.

If the number of stitches or rows varies across the swatch, you may need to practice your technique or tension to achieve more consistent results. Remember, achieving the correct gauge is vital for the success of your crochet project, so take your time and don’t rush this process.
Step 6. Understand the Impact of Tension
It’s important to note that your tension, or how you hold and work the yarn, can significantly affect your gauge. Even the most seasoned crocheters may not consistently crochet with the same tension. Try to crochet as you normally would when creating your swatch, as any changes in your tension can make a significant difference in your gauge.
If you’re still not reaching the right gauge after adjusting your hook size, you might need to consciously change your tension. Relax and ensure your hand movements are fluid and consistent. Remember, every crafter has a unique hand tension, and there’s no ‘right’ or ‘wrong’ tension, just the one that gets you to your desired gauge.
Step 7. Wash and Block Your Swatch
After confirming your gauge, it’s time to wash and block your swatch. This is because the yarn often behaves differently after it’s washed and can affect the gauge. Wash and block your swatch as you would the finished project. Let it dry entirely before measuring again. If the gauge changes significantly, you may need to adjust your hook size or tension again to match the pattern’s gauge.
Step 8. Note Differences in Stitch Patterns
Keep in mind that different stitch patterns can have different gauges. For example, a single crochet stitch will have a different gauge than a double one. If your pattern uses multiple stitch patterns, you may need to create and measure a swatch for each different stitch pattern.
Step 9. Keep a Gauge Swatch Journal
Consider keeping a journal of your gauge swatches, especially if you crochet frequently or work with various yarns and stitches. Note down the yarn used, hook size, stitch type, and the gauge you achieved. This will serve as a valuable reference for future projects.

Step 10. Practice and Patience
Remember, checking gauge in crochet is a skill that improves over time. It might seem time-consuming initially, but as you get the hang of it, it will become an integral part of your crochet process.
As you continue to crochet, you’ll get a better understanding of how your tension and different yarns and stitches affect gauge. With practice and patience, you’ll be able to achieve the desired gauge more quickly, and your projects will turn out as expected.
By following these ten easy steps, you can check gauge crochet like a pro in no time. Remember to take your time and have fun with the process, as it’s an essential step in creating beautiful and well-fitted crochet pieces.
5 Additional Tips and Tricks
- Begin with the Correct Hook: If you’re unsure about the hook size, start with the one recommended in your yarn label or pattern instructions.
- Practice Makes Perfect: The more you crochet, the more consistent your stitches will become, making your gauge more predictable.
- Check Your Gauge Often: Don’t wait until you’re halfway through your project to check your gauge. It’s better to identify any issues early.
- Swatching: Always make a swatch larger than you need. Your edge stitches can warp your gauge measurement, so it’s better to measure in the middle.
- Blocking: Remember to stop your gauge swatch the same way you’d block your finished project. This will give you a more accurate gauge measurement.

With these additional tips and tricks, you’ll be able to check your gauge with confidence.
5 Things You Should Avoid
- Avoid Rushing: Don’t hurry while checking your crochet gauge. Taking your time to accurately measure your gauge can save you a lot of time in the long run.
- Ignoring the Yarn Weight: Each yarn weight works best with a specific hook size. Ignoring this can lead to an incorrect gauge and an ill-fitted final product.
- Overstretching the Swatch: When measuring, avoid stretching or distorting the swatch as it can lead to misleading gauge readings.
- Skipping Swatch Blocking: If you plan to block your finished project, not blocking your gauge swatch can result in a different gauge and a final product that doesn’t fit correctly.
- Forgetting to Count the Stitches: It’s crucial not to overlook counting both your stitches horizontally (across a row) and vertically (down a column). Both directions are critical for an accurate gauge.
By avoiding these common mistakes, you’ll be able to check your gauge more effectively and create beautiful crochet projects with the perfect fit. So don’t rush through checking your gauge – take your time and follow these tips for the best results!
How Do You Adjust the Gauge on a Crochet Pattern?
If your gauge differs from the one stated in a crochet pattern, don’t worry – there are ways to adjust it. Here are a few things you can try:

- Change your hook size: If your gauge is too small, try using a larger hook size and vice versa.
- Adjust your tension: As mentioned earlier, changes in hand tension can greatly affect the gauge. Try consciously adjusting your tension while crocheting to match the pattern’s gauge.
- Modify the stitch type: Some stitches, such as single and double crochet, have different gauges. If your pattern allows for it, consider modifying the stitch type to achieve the desired gauge.
- Use a different yarn weight: Different yarn weights work best with specific hook sizes. If your gauge is significantly off, consider using an additional yarn weight to match the pattern’s gauge.
- Add or remove stitches: In some cases, you may need to add or remove stitches from a row to achieve the correct gauge. This can be done by increasing or decreasing in certain rows as required.
Remember that it may take a bit of trial and error to adjust your gauge, but with practice, you’ll be able to achieve the perfect gauge for any pattern.
What if the Gauge is Too Narrow in Crochet?
If your gauge is too narrow, meaning you have more stitches per inch than the pattern states, here are some things you can try to fix it:
- Switch to a larger hook size: This will result in slightly larger stitches and hopefully achieve the correct gauge.
- Change the yarn weight: A thicker yarn can help create larger stitches and adjust your gauge accordingly.
- Modify your tension: Try to loosen your hand tension while crocheting, which will result in bigger stitches. This may take some practice to get right.
- Add extra rows: If your gauge is only slightly off, adding a few different rows may help compensate for the narrower stitches. Just measure your gauge after each additional row to ensure it’s correct.
By trying out these different techniques, you should be able to adjust your gauge and create the perfect fit for your project. Remember always to measure your gauge and adjust as needed to achieve the best results.
Conclusion
Taking the time to ensure your gauge is correct is critical when crocheting to achieve the desired outcome. Now that you know how to check gauge crochet, you are all set! Take out your crochet hooks and get started on your next project! Don’t forget to take regular breaks and practice mindfulness while creating; crocheting can be a meditative activity that helps us recenter and ground ourselves in the present moment.
Hopefully, this guide has given you the necessary knowledge and tips to check your gauge and create beautiful, well-fitted crochet projects. Remember to have patience, and be bold and practice and experiment until you find what works best for you.
Getting creative with swatches, playing with different yarns and tension techniques, or experimenting with unique stitches can make it even more enjoyable. Embrace the process as you make something beautiful while improving your skills!